- precedence constraints
- synchronization links (i.e. start/start and end/end links).
The TSAs belonging to the same behavior can be linked through control flow links (i.e., the sequence of TSAs as specified within the behavior).
These links must be created in the System Editor to assure that they have been set up properly before you can verify resource behaviors using Process Verification Across Resources.
This procedure describes how to verify resource behaviors. The Process Verification Across Resources command works like the Process Verification command, so this procedure describes the differences between the two commands. Refer to the Verifying the Process for descriptions of the functions.
To have product flow considerations taken into account while executing this command, select the Consider Product Flow check box in Tools > Options > Digital Process for Manufacturing > Gantt Chart.
Verify Resource Behavior
-
Click Process Verification Across Resources
 .
.
If you do not select an object, process of the process list, or a product prior to selecting the command, then the first physical activity under the top resource which has a behavior is used as start object for this command. The activity is highlighted.
If you first select a resource and this Resource has behavior, then the first physical activity under this resource is used as start object for this command. The activity is highlighted.
If you first select a resource and this resource does not have a behavior then the first physical activity of the first child resource with behavior is used as start object for this command. The activity is highlighted.
If a logical activity (Start, Stop) with behavior is preselected, then the first physical activity in this level is used as start object for this command. The activity is highlighted.
If a physical activity under the ResourcesList (TSA) is preselected, then it is used as start object for this command. The activity is highlighted.
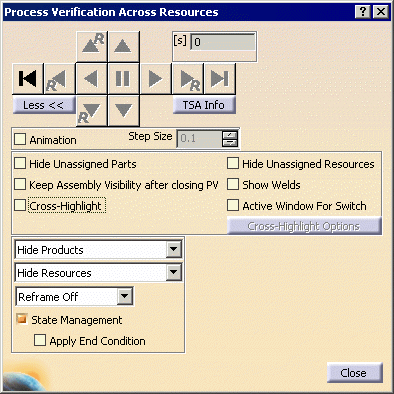
The Process Verification Across Resources dialog box appears:
-
Navigate through the behavior.
Use the options as described below.
|
About Process Verification Across Resources Options
| Animation | When enabled, actions taking place during each step are animated.
When not enabled (default), you will only see a static representation of the objects, or the sub-set of the same, you have opted for in this dialog box. |
| Step size |
This option enables you to change the simulation rate for each step. By altering the numbers, you can make the sub-steps smaller or larger, which makes the simulation run more slowly or quickly. Step Size is only available when the Animation check box is selected. |
| [s] |
This box shows the amount of time elapsed in the process from the process's start to the current activity. |
| Hide Unassigned Parts | Selecting this check box hides all items that are unassigned to activities (that is, items in the product list; this option does not affect parts that are in the resource list). For more information on how this option affects product visibility, see Product Visibility in Process Verification. |
| Keep Assembly State after closing PV |
If the check box selected, then the visibility state of all parts
remains. If the check box is not selected, then the visibility state of all parts is restored to the states that they had before starting process verification. See also Examples of Process Verification |
| Cross-Highlight |
If this check box is selected, cross highlighting occurs for objects
that have been linked to processes by means of relations. The
objects affected by the cross highlight are highlighted and every
process is separately displayed step-by-step in both the PPR tree
and 3D graphic views.
The following assigned objects can be cross highlighted:
When the Cross highlight check box is selected, the Cross highlight options button becomes available. For a more complete discussion of this dialog box and the cross highlighting options, see Cross Highlighting for Process Verification. |
| Hide Unassigned Resources | Selecting this option hides all unassigned resources. |
|
|
Licensing |
| The Show Welds check box appears only if you have license for the DPM Fastening Process Planner product. | |
| Show Welds | Selecting this check box allows you to see the
effects of weld assignments in the 3D geometry. The information is
provided by colors:
When you do not select the Show Welds check box, the welds are not highlighted in any activity. |
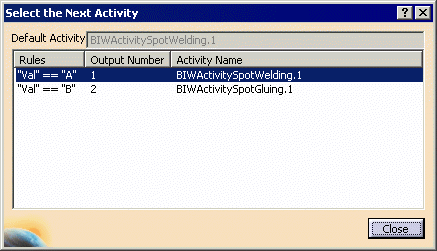
| Active Window for Switch | If you have a switch activity and you select this option,
the Select Next Activity dialog box appears, which
enables you to select the activity you want to see.
If you do not have this option selected, the default next activity appears. |
|
TSA Products
Shown/Hidden
(For information on how these selections are affected by the Hide Unassigned Parts option, see Product Visibility in Process Verification.) Please note the following:
|
|
|
Hide Products |
This option hides all products assigned to any of the activities.
|
| Show TSA's Products |
This option shows only the products assigned to the TSA, the
preceding activities, and all products not assigned to any activity
(unless you selected the Hide Unassigned Parts check box,
as described above).
|
| Show All Products | This option enables you to see all the products assigned to any of the activities. |
| Show Current TSA's Products | This option enables you to see only the products assigned to the current TSA. |
| TSA's Resources Shown/Hidden | |
|
Hide Resources |
This option hides all resources assigned to all of the activities. |
| Show Activity's Resources |
You see only the resources associated with the active activity and all
resources unassigned to any activity. Behavior for the different types of relations:
|
| Show All Resources | You see all the resources. |
| Reframe | |
|
Reframe All Items |
The 3D geometry is reframed with each new step. The reframing is centered on the center of the items as a group. |
| Reframe Off | the 3D geometry is not reframed, even when the effects of the process put some items beyond viewing range. |
| Reframe Activity's Items | The 3D geometry is reframed with each new step. The reframing is centered on the center of the items used in the activity only. Therefore, if a specific activity involves moving a handle away from a reel, then the center of the reel and handle, looked at as a single entity, is the center of the frame. |
| State Management |
|
| Apply End Condition | When the Apply End Condition check box is selected, Process Verification synchronizes to the end condition of that activity before executing the details (assuming that there is a end condition defined for that activity). Navigating through each activity executes the end condition of the activity before executing the details. |