This task deals with:
- Creating a Text with a Leader
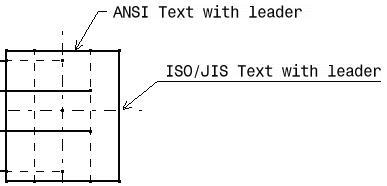
- About Texts with Leader
- Creating a Text with a Leader with Reference to a Datum Target
- Positioning a Text with a Leader on an Existing Text
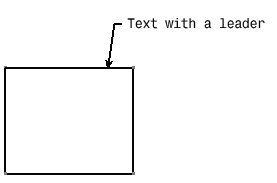
Creating a Text With a Leader
-
Click the Text With Leader
") in the Annotations toolbar (Texts sub-toolbar).
in the Annotations toolbar (Texts sub-toolbar).
-
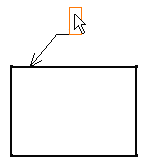
Click the point on the element you want the leader to begin (arrow end).
A red frame appears.")
You can move the pointer so that the leader attachment point is snapped on the privileged direction. For information on privileged direction, see Arrow Orientation. -
Click in the free space to define a location for the text.
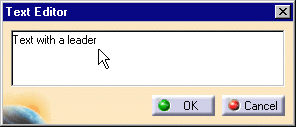
The Text Editor dialog box is displayed.
-
Enter the text in the Text Editor dialog box or directly on the drawing: "text with a leader", for example.
Press Shift+Enter to add new line in the Text Editor if needed and press Enter to validate the text.
-
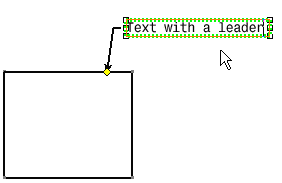
If needed, re-position or modify the text.
-
To end the text creation, click again in free space or select a command icon.
")
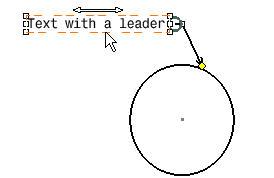
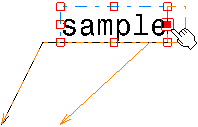
The leader is associated with the element you selected. If you move either the text or the element, the leader stretches to maintain its association with the element.
If you change the element that is associated with the leader, both the new element and the text with leader remain associative to each other. -
Create a circle.
-
Drag the text with leader (using the yellow manipulator at the leader's extremity) to associate it with the circle instead of the rectangle.
When creating a text with leader in a view that is not up-to-date, the leader is correctly positioned, but is not associated to the geometry.
Creating a Text with a Leader with Reference to a Datum Target
In other words, you can associate the extremity of the created leader to the center of the datum target's upper compartment or lower compartment.
-
Click the Text With Leader
in the Annotations toolbar (Texts sub-toolbar).
-
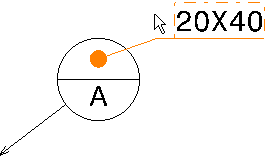
Pause over the datum target.
The attachment points in the datum target's upper and lower compartment are displayed. The nearest attachment point is highlighted to show that the annotation will be positioned on it if that point is selected.

-
Click the attachment point to indicate the leader anchor point.
Symbol of the leader extremity changes to a filled circle and simultaneously the text in the selected compartment is transferred to the created text. However, if the selected datum target is locked for editing, the created text is also locked for editing after its creation.
-
Click in the free space to define a location for the text (text anchor point).
You can move the pointer so that the leader attachment point is snapped on the privileged direction. For information on privileged direction, see Arrow Orientation. The Text Editor dialog box appears.
-
Enter the text in the Text Editor dialog box or directly on the sheet and click OK in the dialog box.
-
Click again in the free space to end the text creation.
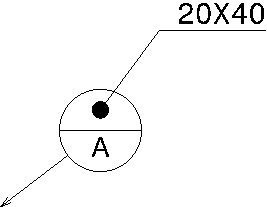
The leader is created and associated to the datum target. The text's angle is set to the same value as that of the datum target, and rigid positional and orientation links are created between the text and the datum target.
Positioning a Text with a Leader on an Existing Text
-
Click the Text With Leader
in the Annotations toolbar (Texts sub-toolbar).
-
Click the point on the element to indicate the arrow end or the leader anchor point.
-
Move the pointer over the existing text.
The attachment points are displayed. The nearest attachment point location is highlighted indicating that the annotation will be positioned with reference to it if that point is selected. For more information about the attachment points, see Annotation Positioning.
-
Click on a desired attachment point to position the text.
The leader is removed and the annotation is positioned on the selected attachment point. An empty frame and the Text Editor dialog box appear. -
Enter the text in the Text Editor dialog box and click OK.
The text is positioned at the reference text's selected attachment point. Its angle is set to the same value as that of the reference text, and a positional and an orientation links are created between both annotations.
If required, you can change the position of the text.
-
Click the text and drag to change the position.
The annotation is snapped to the selected position.
About Texts with Leader |
|
Specifying Leader Orientation
To do this, you have two different possibilities:
- Either go to Tools > Options > Drafting > Annotation and Dress-up tab and check Snap by default (SHIFT toggles). Then, click the Configure snapping button and select either According to leader orientation or Both. To orient directly the leader perpendicularly to the associated element, press the Shift key while clicking on the element to which you want to associate the text with leader (previous scenario, step 3).
- Or go to Tools > Options > Drafting > Annotation and Dress-Up tab, and check Text in the Annotation Creation area. The text leader will be oriented perpendicularly to the geometry by default. In this case, pressing the Shift key will let you orient it differently.
-
Note: - If the leader extremity is constrained by a positioning link, it cannot be moved.
- If the leader extremity is not constrained, the corresponding segment orientation can be snapped on horizontal and vertical directions.
Specifying Text Orientation
- You can also add a leader to existing text. To learn how to do this, refer to Adding a Leader to Existing Text.
- You can perform a number of operations on a leader. To learn more, refer to Editing Annotation Leaders.
Elements to which a Text with a Leader Can Be Assigned
You can assign a text with a leader to the following elements:
- 2D elements
- lines
- points
- circles
- curves
- Generative edges
![]()