This task deals with:
Creating a Datum Target
-
Click Datum Target
") in the Annotations toolbar (Text sub-toolbar).
in the Annotations toolbar (Text sub-toolbar).
")
-
Select the attachment point of the datum target leader.
-
Select a point to be used to position the datum target (anchor point).
")
Tips: - You can move the pointer so that the anchor point is snapped on the privileged direction. For information on privileged direction, see Arrow Orientation.
- You can press Alt key to orient the datum target in vertical direction.
")
-
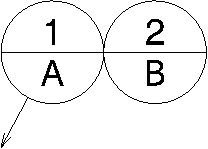
Enter the required values in the fields. For example, 1 and A.
")
Click ... to specify that the datum target provides information on the diameter or the square reference area of the selected element.
")
-
Click OK.
The datum target is created. -
Click the red arrow next to the datum target.
The datum target is now movable. The leader can be placed on the left or right of the datum target.
")
Positioning a Datum Target on an Existing Annotation
-
Click Datum Target
in the Annotations toolbar (Text sub-toolbar). -
Click to define the leader anchor point.
The datum target leader is placed at the indicated location. -
Move the pointer over the reference annotation (in this case, the reference datum target).
The attachment points are displayed. The nearest attachment point is highlighted to show that the annotation will be positioned on it if that point is selected.
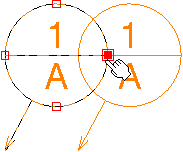
-
Click on a desired attachment point to position the datum target.
The leader is removed and the datum target is positioned on the selected attachment point. A dialog box appears with the pre-entered values and at the same time previewed on the drawing. -
Enter the required values in the boxes.
-
Click OK in the dialog box or click in the empty space to validate the inputs provided in the dialog box.
The datum target is created. If required, you can change the position of the datum target.
-
If required, click the datum target and drag to change the position.
The datum target is snapped to the selected position and the attachment point is modified.
![]()