Creating Arrows  

This task will show you how to create an arrow. For the purpose of this exercise, you will use an arrow to illustrate the kind of hole you want to apply to a circle.
Open the Brackets_views06.CATDrawing document.
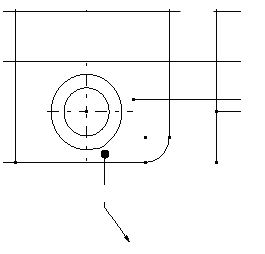
  1. Select Insert > Dress Up > Arrow from the menu bar.

  2. Click a point or select an object to define the arrow extremity (the head).

  3. Click a point or select an object to define the arrow starting point (the tail). For example, select a circle.
    The arrow is created.

    You can define the start and end extremity points using reference geometry or a reference annotation. The arrow remains associative to the geometry and the annotation. In case the arrow extremities are defined using reference annotation using attachment points (the extremity is snapped to it) or without any attachment points.
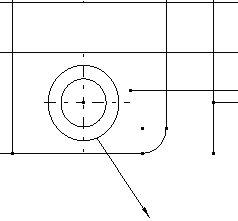
    • The arrow and the selected object are associative.
    • To modify the general appearance of the arrow, either click the arrow and then use the Graphic Properties toolbar, or right-click the arrow and then use the Properties dialog box (select Properties and click the Graphic tab).
    • To modify the position of the arrow, click the arrow and use the manipulators to drag it to its new location.
       
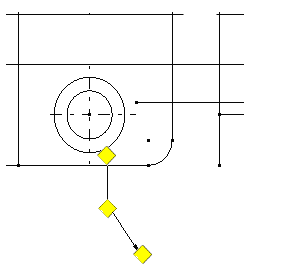
  4. You will now add a breakpoint to the arrow. Select the arrow and right-click a yellow manipulator. A contextual menu appears.

  5. Select Add a Breakpoint. A breakpoint is added to the arrow; you can drag it to change the arrow path.
     

  6. You will now choose a symbol for the arrow tail. To do this, right-click the yellow tail manipulator.

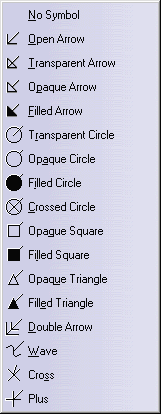
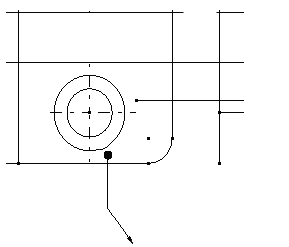
  7. In the contextual menu, point to Symbol Shape and select a symbol, Filled Circle for example.
     

    The symbol you choose now appears on the arrow tail. You can also change the symbol used for the arrow head by repeating steps 6 and 7.
     

  8. You will now create an interruption on the arrow tail. Right-click the yellow tail manipulator again.

  9. In the contextual menu, select Add an Interruption. An interruption is added to the arrow.


About arrows, arrow extremities, and orientation:

There are several important things to understand about creating arrows.

  • You cannot add another extremity to an arrow.
  • Arrow angle and length are defined by standards. For more information, refer to Dimension Parameters in Administration Tasks > Setting Standard Parameters and Styles > Setting Standard Parameters.
  • You can scale the arrow extremities according to the scale of the view.
    In the Standards Definition dialog box, select the Styles node. In the Arrow > Apply Scale On Extremities select Yes to scale the arrow extremities.
    You can also select the Apply scale on extremities check box from the arrow properties.
  • Arrow or leader orientation:
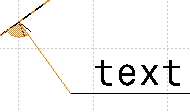
    When creating an arrow or a leader, you can orient it by snapping its orientation on the following privileged directions:
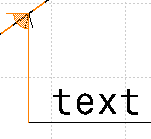
    •  Horizontal and vertical directions:
      • Computed in the sheet for annotations oriented in the sheet.
      • Computed in the view for annotations oriented in the view.
    • Reference normal and tangent directions: The reference can be a geometry or an annotation.
    • Important: Select the Snap on privileged directions option in the Options. See, Infrastructure User Guide : Customizing : Customizing Settings : Mechanical Design : Drafting : Manipulators : Orientation section.

    As you move the arrow to snap it along the privileged direction, when the privileged direction is oriented, the arrow or the leader turns orange.
    When the arrow is oriented in vertical direction When the arrow is oriented normal to the reference
    When moving an arrow or a leader, the orientation of the following can be snapped.
    • The extremity of a  leader or an arrow:
      • If the extremity position is constrained by a position link but can still move, the corresponding segment orientation can be snapped if the corresponding position is allowed by the links.
      • If the extremity is constrained by an orientation link, it cannot be moved.
      • If the extremity is not constrained, the corresponding segment orientation can be snapped on horizontal and vertical directions.
    • The segment at the breakpoint is snapped first followed by first segment from the breakpoint, then the second and so on. The segments that are ignored while snapping are the ones at the terminals whose extremity is positioned by an orientation link or are defined as rigid.
    • The segment at leader attachment point.
    • The leader segments which are directly attached to an annotation have their orientation snapped when moving this annotation. The leaders are snapped in their order of creation. The segments that are ignored while snapping are the ones at the terminals whose extremity is positioned by an orientation link or are defined as rigid.

    When creating an arrow, the arrow head is considered as a fix point, however, you can move the arrow segment so that the arrow segment is snapped on the privileged direction.

    The following points are considered when snapping a leader extremity on its privileged directions:

    • While defining the arrow tail position:

      • If a geometry or an annotation which does not provide any attachment point is selected as a reference, the position of the arrow tail is defined by the intersection of the privileged direction and the selected reference. Otherwise, the privileged direction is ignored and the position is defined according to the selected reference.
      • If an annotation providing attachment points is selected as a reference, the position of the arrow tail is snapped on the selected attachment point.
    • While defining the annotation position:

      • A geometry or an annotation which does not provide any attachment point cannot be selected to define the annotation position.
      • If an annotation providing attachment points is selected as a reference, the annotation position is snapped on the selected attachment point and its leader is removed.
    • The snapping on the paper grid: If Snap by default (SHIFT toggles) is selected in Tools > Options > Drafting > Dimensions tab > Move area, and no reference is selected, the position is first snapped on the privileged direction and then on the closest grid point or grid line (if no grid point is located on the privileged direction).
    • If you press Shift key when a leader is snapped in a privileged direction, the arrow remains snapped until the Shift key is released. If the arrow is snapped in more than one direction, pressing Shift key locks the arrow.

      Note: If snapping on grid is required, pressing Shift key first snaps the the position in the privileged direction and then to the closest grid line.