The expanded Process Verification dialog box appears below.
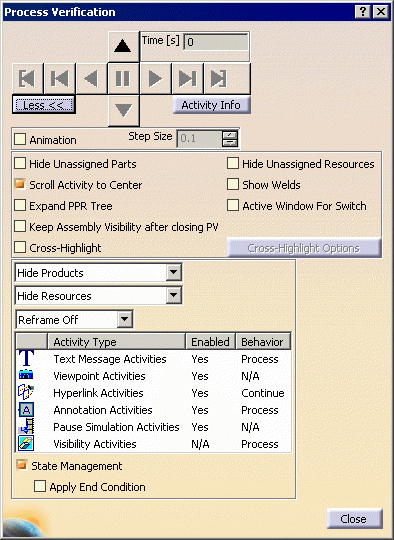
The following table describes the Process Verification options available from this view of the dialog box:
| Animation | When enabled, actions taking place during each step of the process
are
animated.
Animation is only enabled when you press the Next
When not enabled (default), you will only see a static representation of the parts, resources, and welds, or the sub-set of the same you have opted for in this dialog box. |
| Step size |
This option enables you to change the simulation rate for each step. By altering the numbers, you can make the sub-steps smaller or larger, which makes the simulation run more slowly or quickly. Step Size is only available when the Animation check box is selected. |
| Hide Unassigned Parts |
Selecting this check box hides all items that are unassigned to activities (that is, items in the product list; this option does not affect parts that are in the resource list). For more information on how this option affects product visibility, see Product Visibility in Process Verification. |
| Scroll Activity to Center | If this check box is selected (it is by default), the PPR tree scrolls up and down so that as each
activity is highlighted, the PPR tree is centered on that activity. If the activity
Process
Verification is showing is not visible because it is in an unexpanded portion of the tree, only the parent process
is
highlighted, unless the Expand PPR Tree check box is also selected. Selecting the Scroll Activity to Center check box makes the Expand PPR Tree check box available. |
| Expand PPR Tree | If this check box is selected, the PPR tree expands when the activity
Process Verification is showing is not visible in the tree. The Expand PPR Tree check box is only available when the Scroll Activity to Center check box is selected. |
| Keep Assembly State after closing PV |
If the check box selected, then the visibility state of all parts
remains. If the check box is not selected, then the visibility state of all parts is restored to the states that they had before starting process verification. See also Examples of Process Verification |
| Cross highlight |
If this check box is selected, cross highlighting occurs for objects that have been linked to
processes by means of relations. The objects affected by the cross highlight are highlighted
and every process is separately displayed step-by-step in both the PPR
tree and 3D graphic views.
The following assigned objects can be cross highlighted:
When the Cross highlight check box is selected, the Cross highlight options button becomes available. Once Process Verification is finished, cross-highlighting ends. The cross-highlighted objects return to their original appearance. For a more complete discussion of this dialog box and the cross highlighting options, see Cross Highlighting for Process Verification. |
| Hide Unassigned Resources | Selecting this option hides all unassigned resources. |
|
|
Licensing |
| The Show Welds check box appears only if you have license for the DPM Fastening Process Planner product. | |
| Show Welds | Selecting this check box allows you to see the
effects of weld assignments in the 3D geometry. The
information is provided by colors:
When you do not select the Show Welds check box, the welds are not highlighted in any activity. |
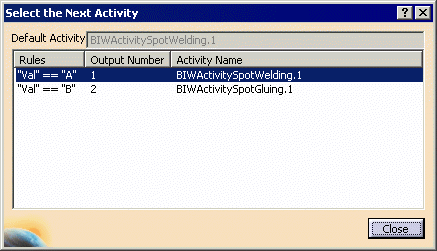
| Active Window for Switch |
If you have a switch activity and you select this option, the
Select Next Activity dialog box appears, which enables
you to select the activity you want to see. The dialog box
shows the rules for the switch, all the available outputs and the
default output.
If you do not have this option selected, the default next activity appears. This option is valid only for the Switch activity and not for any other Logical activity. |
|
Products Shown/Hidden
(For information on how these selections are affected by the Hide Unassigned Parts option, see Product Visibility in Process Verification.) Please note the following:
|
|
|
Hide Products |
This option hides all products assigned to any of the activities.
|
| Show Activity's Products |
This option shows only the products assigned to the activity, the preceding
activities, and all products not assigned to any activity (unless you selected
the Hide Unassigned Parts check box, as
described above).
|
| Show All Products | This option enables you to see all the products assigned to any of the activities. If the Inherit Initial Hide/Show State option is ON then the assigned products that were hidden before launching process verification remain hidden. |
| Show Current Activity's Products |
This option enables you to see the products assigned to the current activity. Usually when the planning is complete, the products are assigned to leaf activities. When any of the products are assigned to the parent activity, they are also available for leaf child activity (because planning is not yet finished). With this option, process verification also shows the products that are assigned to the parent activity. This allows the user to see those products in 3D and assign these products to the leaf activity. For an parent activity, the products are computed from buildup, any product which is assigned to this activity, and any of the previous activities are removed from 3D. Even if an activity is Start or Stop, it is classified as a parent activity because the intention of the user is not yet clear. Therefore, you can add more activities such an activity. |
| Resources Shown/Hidden | |
|
Hide Resources |
This option hides all resources assigned to all of the activities. |
| Show Activity's Resources |
You see only the resources associated with the active activity and all
resources unassigned to any activity. Behavior for the different types of relations:
|
| Show All Resources |
You see all the resources. Any attachment to the resource is not considered assigned to the activity until it is separately assigned to it. For example: a Weld Gun mounted on a robot is a separate resource and must be assigned separately. |
| Reframe | |
|
Reframe All Items |
The 3D geometry is reframed with each new step. The reframing is centered on the center of the items as a group. |
| Reframe Off | the 3D geometry is not reframed, even when the effects of the process put some items beyond viewing range. |
| Reframe Activity's Items | The 3D geometry is reframed with each new step. The reframing is centered on the center of the items used in the activity only. Therefore, if a specific activity involves moving a handle away from a reel, then the center of the reel and handle, looked at as a single entity, is the center of the frame. |
| Text Message Activities |
|
| Viewpoint Activities |
|
| Hyperlink Activities |
|
| Annotation Activities |
|
| Pause Simulation Activities |
|
| Visibility Activities |
|
| State Management |
|
| Apply End Condition | When the Apply End Condition check box is selected, Process Verification synchronizes to the end condition of that activity before executing the details (assuming that there is a end condition defined for that activity). Navigating through each activity executes the end condition of the activity before executing the details. |
Default Settings for Process Verification
The default values for the options that appear in the Process Verification dialog box are determined by the current settings of the Tools > Options > Infrastructure > DELMIA Infrastructure > Simulation tab.
Hyperlink Activity and Pause Simulation Activity Behavior
Note that when a simulation is started with the End Level button
![]() from a parent-level activity and the simulation pauses at a child-level
hyperlink or pause activity, clicking the End Level button
from a parent-level activity and the simulation pauses at a child-level
hyperlink or pause activity, clicking the End Level button
![]() to restart the simulation results in the
simulation ending at the child activity level; and not the original parent level.
to restart the simulation results in the
simulation ending at the child activity level; and not the original parent level.