The Thread-Tap capability creates threads or taps, depending on the cylindrical entity of interest.
This task shows you how to thread a cylindrical pad. Click Creating threads on on conic faces for reference information.
-
Click Thread/Tap
 .
.
The Thread/Tap Definition dialog box is displayed.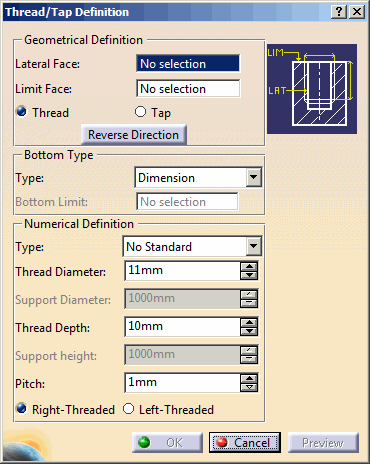
-
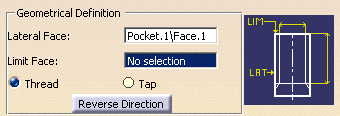
Select the cylindrical surface you wish to thread.
Thread and tap definitions do not depend on the polarity of the cylinder geometry. The Thread/Tap capability lets you specify whether you wish to create a thread or a tap just by checking the appropriate option.
Because of the geometrical element type you have just selected, by default, the application proposes you to create a thread. As shown below, the Thread option is now enabled and a new help image is displayed in the dialog box:
However, if you prefer to create a tap, just select Tap.
-
Select the upper face as the limit face. Limit faces must be planar.
The application previews the thread.In the dialog box, the Geometrical Definition frame displays the name of the faces you have selected. The Reverse Direction button (as well as the arrow in the geometry area) lets you reverse the thread direction if needed.
The Numerical Definition frame provides three different thread types:-
No Standard: if you keep the No Standard option, the field available below is Thread Diameter. You just need to enter the values you need in this field as well as in the fields below.
-
Metric Thin Pitch: uses ISO standard values
-
Metric Thick Pitch: uses ISO standard values
In addition to these three types, you can add your personal standards as described in Reusing Values Already Defined in a File
-
-
Metric Thin Pitch: ISO standard
Refer to ( ISO 965-2 ).
The application uses the minimum standard values.
| Nominaldiam | Pitch | Minordiam |
| 8.0 | 1.0 | 6.917 |
| 10.0 | 1.0 | 8.917 |
| 10.0 | 1.25 | 8.647 |
| 12.0 | 1.25 | 10.647 |
| 12.0 | 1.5 | 10.376 |
| 14.0 | 1.5 | 12.376 |
| 16.0 | 1.5 | 14.376 |
| 18.0 | 1.5 | 16.376 |
| 18.0 | 2.0 | 15.835 |
| 20.0 | 1.5 | 18.376 |
| 20.0 | 2.0 | 17.835 |
| 22.0 | 1.5 | 20.376 |
| 22.0 | 2.0 | 19.835 |
| 24.0 | 2.0 | 21.835 |
| 27.0 | 2.0 | 24.835 |
| 30.0 | 2.0 | 27.835 |
| 33.0 | 2.0 | 30.835 |
| 36.0 | 3.0 | 32.752 |
| 39.0 | 3.0 | 35.752 |
| 42.0 | 3.0 | 38.752 |
| 45.0 | 3.0 | 41.752 |
| 48.0 | 3.0 | 44.752 |
| 52.0 | 4.0 | 47.67 |
| 56.0 | 4.0 | 51.67 |
| 60.0 | 4.0 | 55.67 |
| 64.0 | 4.0 | 59.67 |
-
Metric Thick Pitch: ISO standard
Refer to ( ISO 965-2 ).
The application uses the minimum standard values.
|
Nominaldiam |
Pitch | Minordiam |
| 1 | 0.25 | 0.729 |
| 1.2 | 0.25 | 0.929 |
| 1.4 | 0.3 | 1.075 |
| 1.6 | 0.35 | 1.221 |
| 1.8 | 0.35 | 1.421 |
| 2.0 | 0.4 | 1.567 |
| 2.5 | 0.45 | 2.013 |
| 3.0 | 0.5 | 2.459 |
| 3.5 | 0.6 | 2.850 |
| 4.0 | 0.7 | 3.242 |
| 5.0 | 0.8 | 4.134 |
| 6.0 | 1.0 | 4.917 |
| 7.0 | 1.0 | 5.917 |
| 8.0 | 1.25 | 6.647 |
| 10.0 | 1.5 | 8.376 |
| 12.0 | 1.75 | 10.106 |
| 14.0 | 2.0 | 11.835 |
| 16.0 | 2.0 | 13.835 |
| 18.0 | 2.5 | 15.294 |
| 20.0 | 2.5 | 17.294 |
| 22.0 | 2.5 | 19.294 |
| 24.0 | 3.0 | 20.752 |
| 27.0 | 3.0 | 23.752 |
| 30.0 | 3.5 | 26.211 |
| 33.0 | 3.5 | 29.211 |
| 36.0 | 4.0 | 31.670 |
| 39.0 | 4.0 | 34.670 |
| 42.0 | 4.5 | 37.129 |
| 45.0 | 4.5 | 40.129 |
| 48.0 | 5.0 | 42.587 |
| 52.0 | 5.0 | 46.587 |
| 56.0 | 5.5 | 50.046 |
| 60.0 | 5.5 | 54.046 |
| 64.0 | 6.0 | 57.505 |
-
No Standard
-
To enter the parameters manually, select No Standard. As you are creating a thread, you cannot modify the thread diameter value. If you were creating a tap, you could modify it.
-
Enter 49 mm as the thread depth.
Note that the Support Diameter and Support height fields are grayed. They are merely informative. -
Enter 1.5 mm as the pitch value. The Pitch field defines the distance between each crest.
-
Check Left-Threaded.
-
Click Preview.
Red lines provide a simplified representation of the thread.If you create a tap, the application identifies it as Thread.XXX in the specification tree, but displays a specific icon as shown below:
|
The Bottom Limit element must be planar and parallel to the Limit Face.
Reusing Values Already Defined in a File
To access values listed in a .xml file, the system
administrator must have made the data required available. For reference
information, see
Creating
Thread Standards.
If this step has been done, you just need to select the .xml file from
the
Type list, and optionally
edit one or more values (Thread Depth
and
Hole Depth) if needed.
-
You can extract drawings from threads and taps in the Generative Drafting workbench. For more, see Generative Drafting User's Guide Version 5.
-
You obtain a hole, not a tapped hole, by removing a threaded cylinder from a body.
Cavities on cylindrical surfaces
-
If the cavity is a hole, proceed using the options available in the Hole Definition dialog box as described in Creating Threaded Holes.
-
If the cavity is a groove or a pocket defined on a cylindrical surface, you must use a plane tangent to the surface as the limit face.
Creating Threads on Conic Faces
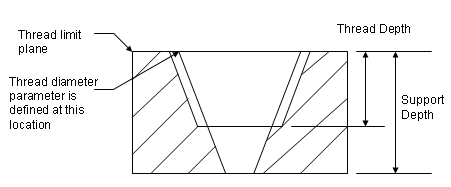
To help you thread conic faces, the following figures illustrate how the different parameters you need to value are defined:
Threads
 |
Note that if the thread diameter value is not equal to the support diameter at the limit plane, the application issues an error message.
Taps
 |
The thread diameter must be greater than the support diameter at the limit plane, otherwise, the application issues an error message.
Using Formulas
The Edit formula... contextual command is available from the different Numerical Definition fields. It allows you to define formulas for managing the different values you need.
From V5R17 onwards, when accessing the Formula command
![]() ,
three additional parameters related to thread features can now be
assigned a value. These new parameters are:
,
three additional parameters related to thread features can now be
assigned a value. These new parameters are:
-
RotationSide: the possible values are True or False. -
StandardType: you need to enter the standard type you want in the Edit name or value of the current parameter field of the Formulas dialog box. The standard you enter must be available in the CATPart document, otherwise the standard attribute is reset and set to No Standard. -
InternalDiameter:(This parameter is not available when defining a thread or tap feature). In case you are handling a thread:-
for which a standard is defined, it contains the minor diameter standard value.
-
for which NO STANDARD is set, it is not set as it is not defined
In case you are handling a tap:
-
for which a standard is defined, it contains the standard nominal diameter.
-
for which NO STANDARD is set, it is not set as it is equal to the diameter support
-
These parameters are not provided for threads
created using application versions before V5R17. However, they become
available as soon as you edit and save the part using V5R17.
User Features and Power Copies
User Features and Power Copies do not support standards used in the definition of thread features.