This section deals with:
Sensors Capability
![]()
This functionality enables to visualize all joint values (with commands or not), measures and joint limits if defined throughout the simulation process.
-
These different values used as sensors provide useful information to check your mechanism design during kinematics simulation operations (i.e. simulation with laws and simulation with commands).
-
Existing distances and interferences specifications are available in the sensors list.
How to access this capability?
When simulating a mechanism with laws or with commands:
|
|
|
|
Step-by-Step Scenario
-
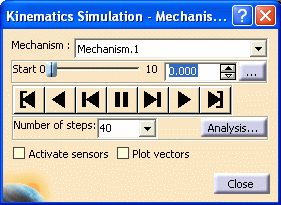
Click the Simulation with Laws icon
") in the DMU Kinematics toolbar. The Kinematics Simulation -
Mechanism.1 dialog box is displayed.
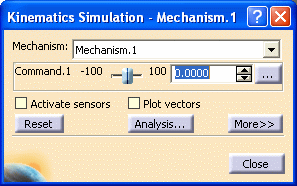
in the DMU Kinematics toolbar. The Kinematics Simulation -
Mechanism.1 dialog box is displayed. -
Activate the Activate sensors option, selecting the check box. The Sensors dialog box is automatically displayed
This scenario aims at checking your mechanism complies with the bill of material.
The required specifications to be checked in our example are the following:
-
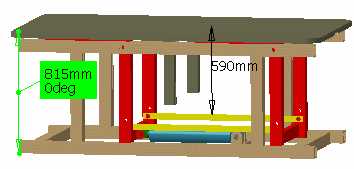
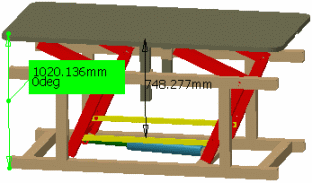
Table height = 815 mm (see measure already defined)
-
Table path = 200 mm approximately ( 815mm to 1015mm)
-
Limits are set on prismatic. 13 (lower limit=0, upper limit = 200mm)
-
There is a law defined corresponding to the jack path
-
Minimum distance between the Arm_Joint products and the table + fixation table
In this first try, you are going to check if your Kinematics mechanism is correctly designed using the corresponding sensors during simulation
Besides, we added an interference specification.
-
-
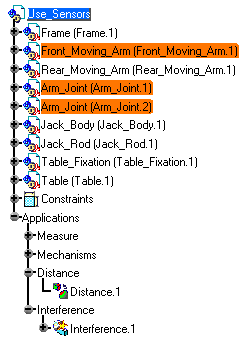
Select the sensors to be observed:
-
Prismatic.13\Length (corresponding to the table path)
-
MeasureBetween. 369\Length (table height)
-
Prismatic.14\Length (corresponding to the jack path)
-
Distance Results.1\Minimal Distance
-
-
Select Stop in the Check Limits area.
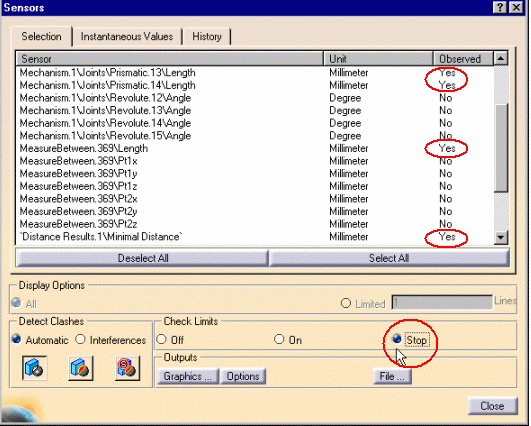
The simulation stops when the upper and lower limits are reached.
For more information about limits, see Checking Mechanism Joint Limits.
-
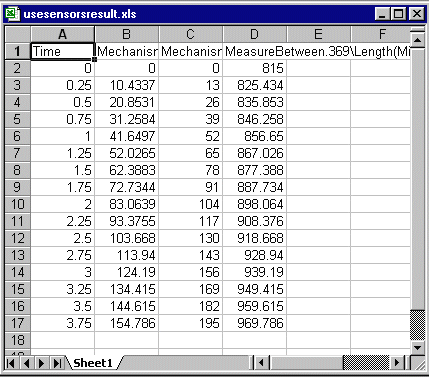
Select the History tab to visualize the sensors behavior during simulation:
use the Play Forward button
before
after
-
Check the last values for:
-
MeasureBetween.369
-
Prismatic.13
-
Prismatic.14
-
Distance Results.1

Note: the sensors values are valid and correspond (approximately) to the specifications
You can re-dimension the jack path to 260mm
The measure is now 1020.136mm.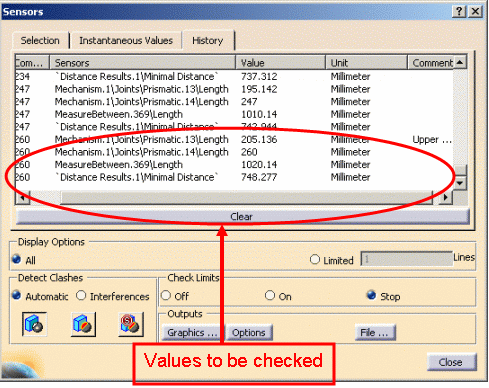
You haven't finished yet as we added an interference. -
-
Clear the History clicking the Clear button
-
Modify if necessary, the Display Options. (the default display options mode is all)
-
Click the Selection tab and select the Interference Results.1\Nbclash sensor to activate it.
Interferences clash detection mode is selected by default and the clash detection setting is On.
Now, click stop
Interference Sensors
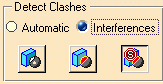
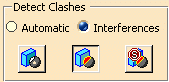
Detect Clashes: How does it works?
To activate clash detection with sensors you need to understand the
combination of clash detection modes (Automatic or
Interferences) with clash settings (On
![]() ,
Off
,
Off
![]() ,
Stop
,
Stop![]() ).
The clash detection behavior will vary with respect to these two clash
parameters. The mode you select affects the clash setting and vice versa
(for example, if you select Automatic the clash setting is
forced to On).
).
The clash detection behavior will vary with respect to these two clash
parameters. The mode you select affects the clash setting and vice versa
(for example, if you select Automatic the clash setting is
forced to On).
Clash detection modes
-
Automatic : Clash is computed between all moving objects and the rest of the world. You do not need to create any dedicated analysis object (interferences).
-
Interferences: Clash is computed with respect to previously defined interference objects. You must define interference objects and activate (Yes) the interferences of interest that appear in the Sensors list (Selectiontab from the Sensors dialog box). For more information about interferences creation, see Detecting Clashes In V5.
The detection clash modes are mutually exclusive:
-
If you activate an interference in the Sensors list (Observed column-Yes), the clash detection is forced to Interferences clash detection mode.
-
If interferences are activated in the Sensors list (Observed column-Yes) when you select Automatic mode for clash detection, all activated interferences are instantaneously deactivated (Observed column-No).
Clash detection settings
![]()
-
 : Ignores any clashes during the
simulation.
: Ignores any clashes during the
simulation. -
 : Highlights clashing parts during the
simulation.
: Highlights clashing parts during the
simulation. -
 : Stops the simulation when two parts
clash.
: Stops the simulation when two parts
clash.
What happens when you activate an interference sensor in the Sensors list?
The table hereafter summarizes the possible combinations between clash
detection modes and clash detection settings as you both select and
activate an interference sensor.
Read the table as follows: the original state is the combination of
the column and the row. The resulting behaviorwhen you select and
activate an interference sensor is shown in the intersecting cell.
Example:
Original state = Automatic detection mode + detection setting off
Resulting state = Interferences detection mode + detection setting on

|
|||||||||||||||||||||||||||||||||||||
-
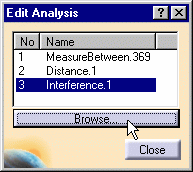
Click Analysis:
- select Interference.1
- click Browse to check the interference specification already defined. See Detecting Clashes if necessary
-
Run your simulation again (click the Start button
 ). Repeat from step 5)
This time, the measure is not valid with respect to the specifications (969.786mm instead of approximately 1015mm)
In the previous try it equals 1020.136mm which is correct
The parts in collision are highlighted in the geometry and in the specification tree
You will need to redesign the Rear_moving_Arm .CATPart.
-
Once satisfied, click the Graphics button in the outputs area to obtain a graphical representation.
Note: You can now plot a sensor according to another sensor using the option button. Read Creating Y=f(X) combined sensors curves
-
Click File to save your results as a .xls, a.txt or Lotus 123 file (provided that you have it installed on your machine).
Give a name and a path. -
Read your document
Restrictions
About interferences, Distances and Measures
- When an interference is defined in your product, and activated as a
sensor
The sensor value: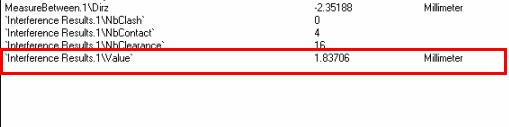
represents either:
- the penetration depth (if there are clashes in the specification results) or
- the clearance value (if there are only clearances in the specification results)
This sensor value is valuated only if you selected the Compute penetration depth check box in the During Initial Computation clash command setting via Tools > Options > DMU Space Analysis > DMU Clash tab at interference creation 
- If you create interferences or distances without exiting the Kinematics simulation commands (either with laws or with commands), these new interferences /distances will not be displayed in the sensors list (this list is frozen when entering the simulation commands).
- Note that distances and measures are not be visible in the geometry area as long as you have not activated at least one sensor belonging to these analyses.
UNIX
- Under UNIX, It is impossible to save your results in . xls format.
Related topics
![]()