-
Select the annotation you just created. (For the purpose of this exercise, you select a free text, but you could also select any other type of annotation.)
-
Select Edit> Properties.
You can also right-click this annotation and then choose Properties from the contextual menu.
-
Click the Text tab. The associated dialog box is displayed.
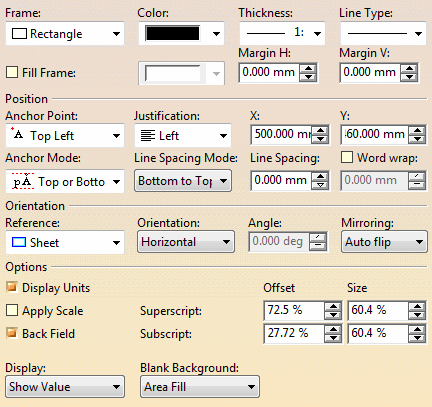
- Frame: you can choose a frame type for the selected text
that is to say rectangle, triangle, circle, etc.
You can:
-
Specify the color, line thickness and line type for the frame in the associated fields.
- Add a color fill to a frame.
- Manage the horizontal and vertical margins of the frame.
-
- Position:
- Anchor Point: you can change the text position in relation to the anchor point. The default type is Global. A global anchor point ensures that the frame of the text does not cross the extension line of the dimension.
- Justification: you can specify a justification for the text: left, center or right.
- X, Y: you can modify anchor point coordinates.
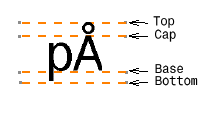
- Anchor Mode: it allows you to position the anchor line to the character Top and Bottom or to the character Cap or Base.
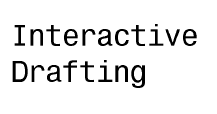
- Line Spacing Mode: you can choose the spacing mode between two line of characters. As an example, create the following free text:
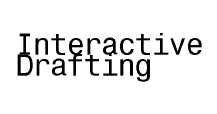
- Line spacing: you can increase or decrease the spacing between two lines of characters.
- Word wrap: allows you to wrap the text in a width you specify.
|
|
When you create a free text, the anchor point is the point you click in the free space to define a location for the free text. |
- Orientation: specify a text orientation.
- Reference: choose Sheet to use the sheet as the reference for the text orientation, or View / 2D Component to use the view or 2D component as the reference for the text orientation.
- Orientation: the text is oriented according to the chosen reference; choose Horizontal to position it horizontally, Vertical to position it vertically or Fixed Angle to position it using a fixed angle.
- Angle: if you choose Fixed Angle for Orientation, you can define the orientation angle according to the chosen reference.
- Mirroring: specify whether you want to mirror the selected text, and what kind of mirroring, or if the text should flip automatically in such a way that it will always be in a readable position.
- Options:
- Display Units: in a text containing parameters with units, displays these units.
- Apply scale: applies the scale of
the view or of the 2D reference component to the display of the text or
to the value of a dimension.

If you want to use as symbols 2D components with text, activate both the Apply Scale property and the Create with a constant size setting (in Tools> Options> Mechanical Design> Drafting> Annotation and Dress-up tab): the size of both the 2D component and its text will then be independent from the view scale. - Back Field: aligns superscript and subscript texts above one another.
- Blank Background: specifies that the text background
should be blanked when the text is displayed over a pattern or over a
picture. In the Blank
Background drop-down list we have three modes available:
- (No)
- Area Fill
- Area Fill and Geometry
For more information about blanking, refer to Blanking Annotations.
- Superscript: increase or decrease the values for the
superscript texts.
The Offset parameter specifies the distance of the superscript text from the base line according to the font size of the text.
The Size parameter specifies the size of the superscript text according to the font size of the text. - Subscript: increase or decrease the values for the
subscript texts.
The Offset parameter specifies the distance of the subscript text from the base line according to the font size of the text.
The Size parameter specifies the size of the subscript text according to the font size of the text. - Display: specifies a display mode for the text: Show Value, Show Box or Hide Value. Refer to Specifying the Text Display Mode below for more details.
-
Modify the available options as required.
-
Click OK to validate and exit the dialog box.
Specifying the Text Display Mode
In this task, you will learn how to specify the display mode for the text. For the purpose of this exercise, you will use a text with a leader and a frame, but this feature is also available with text only, as well as with dimension texts.
-
Select the text and right-click it.
-
Click Properties in the menu that appears. The Properties dialog box appears.
-
Click the Text tab.
-
In the Options area, choose the display mode you want for your text from the Display list.
You have the following options:
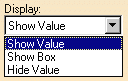
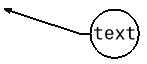
- Show Value: displays the text, and (when applicable) its
leader and its frame. This option is selected by default.
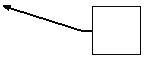
- Show Box: replaces the text and (when applicable) its
frame by a rectangular box and displays its leader.
- Hide Value: hides the text and (when applicable) its frame
but (when applicable) displays its leader.

-
Click OK to validate. The text is now displayed using the mode you set.
- Show Value: displays the dimension and its leader. This
option is selected by default.
- Show Box: replaces the dimension by a rectangular box and
displays its leader.
- Hide Value: hides the dimension but displays its leader.
![]()