The back-clipping plane is parallel to the layout view plane and located behind it. It makes all background elements that are behind it invisible.
 |
-
Right-click the top view in the specification tree or in the sheet and select Add 3D Clipping.

You can also use this alternative method: - Right-click the top view and select Properties.
- In the Properties dialog box, click the Visualization tab.
- Under Back Clipping Plane, select the Activate check box and click OK.

- The 3D viewer lets you position the 3D part. It also lets you visualize a view plane and use it to define the depth.
- All 2D elements of the layout view itself are still visible, independently of the plane's size and position. This lets you work in the layout view as usual, adding geometry, annotations and dress-up for example.
-
In the Clipping dialog box, select Back Clipping
 .
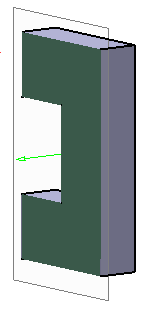
.The 3D part corresponding to the generated view and an arrow for manipulation is shown.
-
Perform either of the following operations to manipulate the clipping tool:
- Drag the arrow to the required location.
-
- Click the arrow to activate the reference element selection.
- Select a point, a planar face, or an axis as a reference element to define the depth.
- In the Depth (in mm) box, enter a value.
This method lets you define the depth precisely.You can select any one of the following for plane translation during reference selection: - Translate plane to geometry
 :
Moves the plane according to the selected
reference element.
:
Moves the plane according to the selected
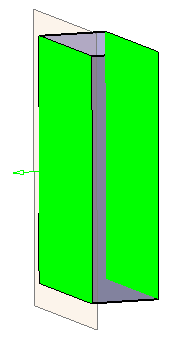
reference element. - Translate plane to bounding box
 :
Lets you select the planes using the bounding
box of the selected element. The bounding box
defines two alternative reference faces. The
selected face is highlighted with green color.
:
Lets you select the planes using the bounding
box of the selected element. The bounding box
defines two alternative reference faces. The
selected face is highlighted with green color.
- Translate plane along main axis
 :
Lets you translate the plane along the main
axis. By default, this option is selected.
:
Lets you translate the plane along the main
axis. By default, this option is selected.
- Under Display, click the following options to
change the visualization accordingly:
- Clipping
tool:
-
Display background and clipping tool
 :
Shows the 3D object and the clipping
tool.
:
Shows the 3D object and the clipping
tool. -
Display clipped background and
clipping tool
 : Shows
the clipped 3D object and the
clipping tool.
: Shows
the clipped 3D object and the
clipping tool. -
Display clipping tool
 :
Shows only the clipping tool.
:
Shows only the clipping tool.
-
Display background and clipping tool
- Transparency: to modify transparency of the clipping tool. By default, the value is 200.
- Turn viewpoint
 :
to turn the viewpoint of 3D object to Iso,
Front, Rear, Left, Right, Top, or Bottom.
:
to turn the viewpoint of 3D object to Iso,
Front, Rear, Left, Right, Top, or Bottom.- With respect to view plane: The viewpoint to be turned is with respect to the view plane. In this case, the 2D layout plane is used as front view.
- According to standard orientation: The viewpoint to be turned is with respect to the standard orientation.
- Clipping
tool:
- Drag the arrow to the required location.
-
Click OK to apply the modifications.
-
To modify the clipping, right-click the clipped view and select Clipping > Modify 3D Clipping.
-
To apply the clipping to a different view, right-click the clipped view, select Clipping > Apply 3D Clipping To, and select a parallel view.
-
To delete the clipping, right-click the clipped view and select Clipping > Remove 3D Clipping.
About the back-clipping plane
- When using for the first time on a view the Activate
back-clipping plane option, the back-clipping plane is positioned by default out of the model, so the model is still completely visible. You have to
move the back-clipping plane as explained above to define the part to be hidden.
If you deactivate the back-clipping plane, then reactivate it, you see that it has kept the position you firstly defined. - To activate or deactivate the back-clipping plane for several views at once, multi-select the views and use the Properties dialog box. Note that when the selected views do not all have the same status (back-clipping plane activated or deactivated for all views), the check box is grayed out.
- When a view is rotated, its clipping frame is rotated using the same angle.
- When the scale of a view is modified, the position and size of its clipping frame is scaled as well.
- The back-clipping plane can also be activated by default for each newly created view. Refer to View Creation > Clipping Frame in the Customizing chapter for more information.
- The back-clipping plane is taken into account:
- when printing in raster mode: all background elements that are behind it are not printed.
- when creating a drawing view: all background elements that are behind it are not generated. Note that the boundary of back-clipped elements is displayed using a specific, un-customizable, line type. Also note that the back-clipping plane is not associative: if you activate/deactivate it, or modify its position after the drawing has been generated, you will need to update the drawing (even if it appears as being up-to-date) in order for your modifications to be taken into account.
![]()