An axonometric view has the following characteristics:
- The three reference axes are represented by 3 lines.
- The lengths measured along the reference axes have a constant factor for each of the axes (but this factor may be different from one axis to the other).
- The plane or axis of the represented object is never drawn parallel to the projection plane.
Isometric views are a particular type of axonometric view, in which the three axes of space appear equally foreshortened.
-
Click View From Reference
 in the Layout toolbar (Views sub-toolbar).
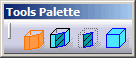
The Tools Palette toolbar appears:
By default, the view type selected in the tools palette is the view type selected in the previous use of this command.-
 Auxiliary View: creates an auxiliary view.
 -
 Section View: creates a section view.
 -
 Section Cut: creates a section cut.
 -
 Axonometric View:
activate this option to create an axonometric view.
Axonometric View:
activate this option to create an axonometric view.
-
-
Click Axonometric View in the Tools Palette if not selected already.
3D viewpoints can now be selected in 3D windows editing the same context as the one edited in the 2D layout window.
When moving the pointer over an incorrect 3D viewpoint, the following symbol is displayed  .
. -
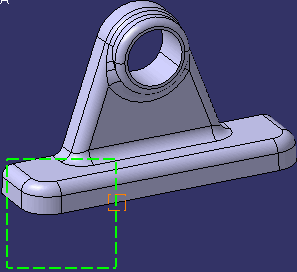
In the 3D window, zoom, rotate or pan to define the 3D viewpoint as needed, and select the 3D viewpoint of your choice, by either:
- Clicking in the free space. The view support will be set on the nearest face of the 3D model's bounding box which is computed parallel to the 3D viewpoint. The view origin will be set at the center of the 3D viewpoint, on the view support plane.
- Clicking a specific 3D point to determine the origin of the view. The view support will be set parallel to the 3D viewpoint, and will pass through the view origin (which itself overlaps the 2D layout view axis).
-
Click on the sheet at the location where you want the view to be positioned.
The axonometric view is created and added to the tree.
The View Creation dialog box appears.
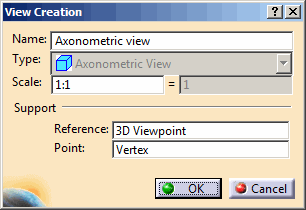
In particular, 3D Viewpoint is specified in the Reference box. Additionally, if you selected a 3D point during the previous step, the origin of the view is specified in the Point box. For detailed information, refer to More about View Creation Dialog Box. -
Optionally, change the parameters.
At this stage, you can still determine or change the origin of the view by selecting the Point box and clicking a 3D point or vertex, or indicating a point on a surface or a curve, in the 3D window. You can also change the viewpoint. -
Click OK in the View Creation dialog box.
The newly-created view is activated. You can now start working in this view.
![]()