This task shows you how to create an associative view in a 2D layout from a FTA (Functional Tolerancing & Annotations) view, plane or sketch.
You can then invert, reroute or isolate such views.
When working in a FTA context, you can enter the 2D Layout for 3D Design workbench each time you need to print complex drawings.
Then you can print several views in the same sheet, display only relevant data in a view, include a title block, create a drawing
etc.
Open the
Common_Tolerancing_Annotations_01.CATPart
document.
Select Start > Mechanical Design > 2D Layout for 3D Design and create a layout alongside the 3D window.
In the 2D window, click View From Reference
 in the Layout toolbar (Views sub-toolbar).
The Tools Palette toolbar is displayed.
Note: Though the Tools Palette toolbar shows Auxiliary View, Section View, Section Cut and Axonometric View options, the view type is automatically set as per FTA view. In this case, it is set to Auxiliary View
 .
.Right-click and check that the Create Datum
 option is not
activated (you will then create an associative view).
option is not
activated (you will then create an associative view).In the 3D window, select Front View.1 from the specification tree.
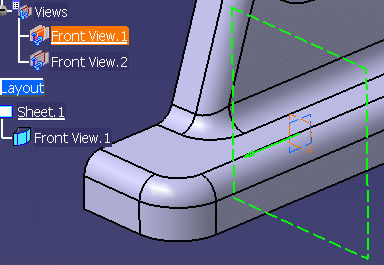

The green arrow allows you to invert the normal (N) of the layout view. At creation, you can also select the Invert option from the contextual menu.
A new Front View.1 item is added to the 2D layout specification tree.
The Tools Palette is disappeared only the Create Datum option is
displayed in the contextual menu.-
In the 2D window, click on the sheet at the location where you want the view to be positioned.
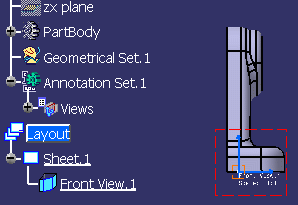
The associative view is created.
For the purpose of this scenario, you will now re-route this view.Notes: - When you move the view for placement, the view stays aligned
and oriented according to the preference selected in Tools
> Options > 2D Layout for 3D Design > View Creation > View From
Reference section.
That is, if the Align according to the active view (SHIFT toggles) and Set orientation according to the active view options are selected, then the following are considered for positioning the view:
If these preferences are cleared, the view can be moved freely in the sheet.- The view can be moved either along the folding direction or perpendicularly to it. Both these directions are represented by two dashed lines.
- The origin of the created view stays on the folding line containing its projection in the 3D background of the active view.
- The view is oriented according to the current orientation of the active view.
- You can also modify the 3D definition of the view plane in the View Creation dialog box to update the position and orientation of the view and make it consistent with the active view. This is unavailable for views created from 3D Tolerancing & Annotation views and captures
- When the view is created, if a geometric element is selected
as a support for the view, the set containing it is
automatically added to the created display filter. This can
happen if the following criteria are satisfied:
- The automatic creation of display filter is selected. To set the filter preferences, see Filter.
- The filtering of the set containing the view support is selected.
- The geometric element is inside the same 3D shape.
- When you move the view for placement, the view stays aligned
and oriented according to the preference selected in Tools
> Options > 2D Layout for 3D Design > View Creation > View From
Reference section.
Right-click the view, and select Change View Support from the contextual menu.
The Change View Support dialog box is displayed. For more information, refer to More about Change View Support Dialog Box.Select Associative type, then select Front View.2 in the 3D specification tree to fulfill the Reference field.
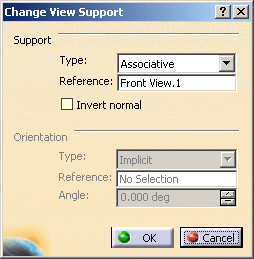
After creation, you can also invert the normal (N) of the layout view by clicking on the green arrow. Note that this modification is only available provided that a single view is selected.
Click OK.
There is no need to update: the layout view is re-routed.
You will now isolate this view.
Right-click the view, and select Change View Support from the contextual menu.
The Change View Support dialog box is displayed.Select the Isolated type.
-
Click OK.
In the specification tree, a red lightning on the Front View.1 icon indicates the view is no more associative.
About views created from FTA
From FTA, you can create only auxiliary views, section views and section cut.
Annotations
To be generated in a "New view from", annotations must fulfill all the following criteria:
- they must belong to the extracted part
- they must belong to a view parallel to the extraction plane, whose normal is not opposite to the extraction plane normal
- must not be in No Show space at view generation or update
- must not be masked by a filter applied to the 2DL view.
More precisely:- if there is a mask or an equivalent filter: filtered annotations are not generated
- if there is a display filter: listed annotations are not generated
Associativity
- The 2D layout views are associative with the 3D FTA views.
- At creation, by default, the layout view name is the FTA view name. However, this name is not associative.
- The layout view properties are not associative with the FTA view properties. As for all other layout views, they are customized via Tools > Options > Mechanical Design > 2D Layout for 3D Design.
- At creation, the 2D Layout view scale is inverse to the FTA view ratio.
Inversion
At creation or at modification, it is possible to invert the normal (N) of all 2DL views, except for projection views (Front, Rear, Left, Right, Top, Bottom and Isometric views).
Reroute
You can reroute to a FTA view:
- an isolated 2D Layout view
- a 2D Layout view associative with another FTA view, plane or sketch.
You cannot reroute a projection view (Front, Rear, Left, Right, Top, Bottom and Isometric views).
Mirrored annotations
When editing a layout from FTA, mirrored annotations are displayed in their creation position, (both in the 2D layout views and in the 3D window). This ensures that the FTA annotations are readable in the layout.
Projection plane modification
When a reference view of an associative 2DL view is
modified, the drawing views generated from this 2DL view can reflect the
projection plane via a simple update, if the Synchronize during
update option is selected (via Tools > Options > Mechanical
Design > Drafting > View tab.
If this option is not selected, you can also use the Modify
Projection Plane command on the selected plane to update the
drawing view.
View origin point
When changing the support of a view or creating a view on a given support, the new view origin point is superposed with the support origin point.
Limitations
You can create a 2D Layout view by selecting the sub-elements of an FTA Offset node, but you cannot select the Offset node itself.
![]()