- Display filters define a list of elements to display and possibly overload while the remainder of the background is hidden.
- Mask filters define a list of elements to overload while the remainder of the background is displayed in the same way as defined in 3D.
In the Visualization toolbar, make sure that
the Display Backgrounds as Specified for Each View
![]() icon is active.
icon is active.
-
From the layout window, right-click the Front view from the geometry area or from the specification tree, and select Filter > Change View Filter. The Change View Filter dialog box is displayed, enabling you to create filters.

- You can also:
- Select Filter > Edit Filter: Default to start editing directly the filter that is applied to the view by default (or whatever filter is applied to the current view).
- Multi-select views to create a filter that will apply to several views.
Whichever method you choose, any filter can be applied to any view in a layout.
- To apply an existing filter to a specific view, use one of the
following methods:
- Right-click the view or views and select Filter > Change View Filter. From the Change View Filter dialog box, select the chosen filter and click Apply.
- Click the view or views and select Edit > Properties. On the Visualization tab, select the chosen filter from the Filter list and click OK. Refer to Editing View Properties for more information.
- To edit a filter name in the Change View Filter dialog box, select the filter name and then click it.
The Change View Filter dialog box contains the following buttons:
-
Display filter: Creates a new display filter.
-
Mask filter: Creates a new mask filter.
-
New from: Creates a new filter of the same type (Display or Mask) as the selected filter.
Once created, this filter is not associative with the original filter. -
Edit: Edits the characteristics of the selected filter through the Edit Filter dialog box.
-
More: Displays the Layout View Filters dialog box.

Tips: - Launch the Layout View Filters dialog box directly (without right-clicking a view first) using Tools > Layout View Filters.
- Launch the Layout View Filters dialog box by right-clicking a layout or sheet and selecting Layout View Filters.
The Layout View filters dialog box allows to reorder filters using the following buttons:
- Clean up: deletes all the unused filter or filters. The default filter is never deleted.
- Delete: deletes the selected filter or
filters.
This button is not available if you accessed the Layout View Filters dialog box through the contextual menu of a view. - Sort A-Z: reorders all the filters or the
selection of a filters alphabetically, except the
Default filter. The selection of filters remains
selected after the reorder.
This button is available:- If there is more than one filter in the layout
- If there is no selection or more than one filter is selected.
- Sort by tree: reorders all the filters or a selection of filters of a layout (except the Default filter) according to the order of the views in the layout. The selection of filters remains selected after the reorder. This button is available:
- If there is more than one filter in the layout
- And if at least one filter (or one filter of the selection) is used by a view.
- Move up: moves the selection of filters
upward.
The Move up button is unavailable if the selection of filters is at the top of the list. - Move down: moves the selection of filters
downward.
The Move down button is unavailable if the selection of filters is at the bottom of the list. - Set as default: sets the selection as the default filter.
Reorder of filters cannot be undone once done. -
OK: Applies the selected filters and exits the dialog box.
-
Apply: Applies the selected filter to the selected view without exiting the dialog box.
-
Close: Exits the dialog box without validating your changes.
- You can also:
-
To sort alphabetically filters except the default one, click Sort A-Z.
-
To Sort automatically filters according to the views order except the default one, click Sort by tree.
-
Click Close in the Layout View Filters dialog box.
You are back in the Change View Filter dialog box. -
Click the Display filter... button. A display filter named Filter.2 is created. Then, the Edit Filter dialog box is displayed to let you edit the filter right now. If you would rather edit the filter later on, click Cancel.
Clicking Cancel will cancel the filter's edition, not its creation.
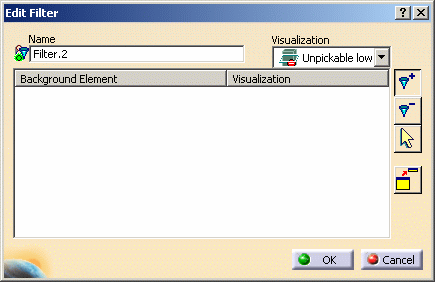
The Edit Filter dialog box contains the following fields and buttons:
-
Name: lets you edit the name of the filter.
-
Visualization: lets you choose the visualization type that should be applied to the selected elements.
The various visualization types are:
-
 Standard: shows both the 2D and 3D backgrounds.
 -
 Unpickable: prevents selecting all elements in both the 2D and
3D backgrounds, even though you can see them. You can just handle 2D
elements, which belong to the current view.
Unpickable: prevents selecting all elements in both the 2D and
3D backgrounds, even though you can see them. You can just handle 2D
elements, which belong to the current view. -
 Low-intensified: dims all elements in both the 2D and 3D
backgrounds.
Low-intensified: dims all elements in both the 2D and 3D
backgrounds.When material is applied to a geometry, this option hides the material type. -
 Unpickable low-intensified: dims all elements in both the
2D and 3D backgrounds. Additionally, although you can see these
elements, you cannot select them. You can just handle 2D elements in
the current view.
Unpickable low-intensified: dims all elements in both the
2D and 3D backgrounds. Additionally, although you can see these
elements, you cannot select them. You can just handle 2D elements in
the current view.
-
-
 Add
mode : adds to the list the elements you select in the
specification tree or in the geometry area, and filters them according
to the visualization type selected in the Visualization
list.
Add
mode : adds to the list the elements you select in the
specification tree or in the geometry area, and filters them according
to the visualization type selected in the Visualization
list. -
 Remove mode: removes from the list the elements you select in the
specification tree or in the geometry area.
Remove mode: removes from the list the elements you select in the
specification tree or in the geometry area. -
 Select mode: lets you select elements and change their
visualization type in the Visualization list.
Select mode: lets you select elements and change their
visualization type in the Visualization list. -
 Switches to Tools Palette: transforms the Edit Filter dialog box
into a Tools Palette containing the same commands as the
dialog box.
Switches to Tools Palette: transforms the Edit Filter dialog box
into a Tools Palette containing the same commands as the
dialog box. 
In the Tools Palette:
-
The Switches to dialog box icon
 transforms
the Tools Palette into the Edit Filter dialog box.
transforms
the Tools Palette into the Edit Filter dialog box. -
The Validates command
 icon validates
your modifications and closes the Tools Palette.
icon validates
your modifications and closes the Tools Palette.
-
-
-
For the purpose of this scenario, you will create a filter that prevents PartBody from being selected using its 3D background and that dims it.
Select the Unpickable low-intensified visualization type and make sure the Add mode is active. -
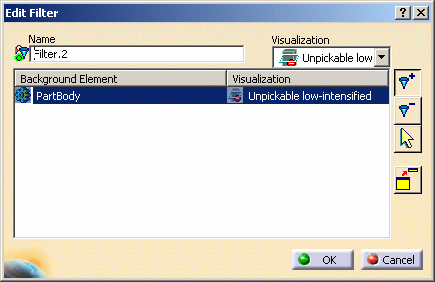
Select PartBody in the specification tree. PartBody is now added to the filter and the Unpickable low-intensified visualization type is applied to it.
-
Click OK to validate and exit the dialog box.
-
Create more number of filters.
-
Back in the Change View Filter dialog box, select Filter.2 and click Apply.
-
Click OK. The dialog box is closed and the newly created filter is applied to the front view. Note that you cannot select the PartBody via the 3D background and that it is displayed using a dimmed color.

-
Select Tools > Layout View Filters.... The Layout View Filters dialog box is displayed.
-
Click Clean up to delete all the unused filters.
All the filters that are going to be deleted are highlighted.A confirmation message box is displayed asking you to confirm if you want to delete all the unused filters:
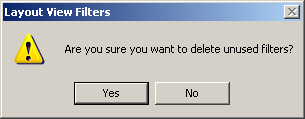
Click Yes to confirm.
In the Layout View Filters dialog box, only the Default filter and the applied filter (In this case Filter.2) are displayed. All the other unused filters are deleted.
![]()