 |
-
Click the Tolerancing Advisor
 in
Annotations toolbar.
| The Semantic Tolerancing Advisor dialog box appears. |
-
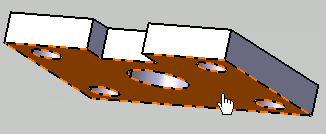
Select the planar surface as shown.
 |
The Semantic Tolerancing Advisor dialog box is updated.
The buttons and options available in the dialog box depend on the
selected features and the standard used: |
- Click
Datum Feature (1
Plane):
 . .
The Datum Feature dialog box appears.
The
datum specification appears both in the specification tree and in the
geometry.
- Enter the
required letter as an identifier.
Press the Ctrl
key and move
the created annotation to place it as required.
- Click
OK.
Datum is created.
The
Semantic Datum
icon in the Semantic Tolerancing Advisor
dialog box is turned to red indicating that this specification is
already defined on the feature.
- Select the
circular hole located at the center as shown.
The
Semantic Tolerancing Advisor
dialog box is updated.
- Click the
Diameter
(1 Cylinder):
 . .
The Limit of Size Definition
dialog box appears.
- Select
Tabulated values.
By default, the tabulated value
is H7.
While creating dimensions, the uppercase and the lowercase letters of
tabulated values appear based on the selected feature, hole or shaft.
You can also enter it manually. Press the
Ctrl
key and drag
the created annotation in the geometry to place it as required.
 |
- If the Propose the last created tolerance values
check box is selected
under New Size Tolerances Creation in Tools > Options > Mechanical >
Functional & Tolerancing Annotations, Tolerances
tab, the last
tolerance type and values defined for Tabulated values in
the previous command are proposed as default for the next command.
- If you manually enter the lowercase letter for hole and
uppercase letter for shaft, the same is proposed as default
for the next hole or shaft selection.
- If you select a vertex or an edge of a feature, default
tabulated value is applied.
|
- Click
OK.
- From the Datum Systems list
in the Semantic Tolerancing Advisor
dialog box, select
the required datum identifier (A in this case) and then select the
cylinder dimension.
The Semantic Tolerancing Advisor
dialog box is
updated.
- Click the
Perpendicularity Specification
 . .
The Geometrical Tolerance
dialog box appears.
You can see that the options and modifiers that are relevant to the
tolerance type and the features that have been selected are proposed.
- Enter
the required Numerical
value and select
the required modifiers.
|
The perpendicularity tolerance is automatically
grouped with the previously created size tolerance. |
- Click
OK.
Press the Ctrl
key and move the created annotation in the geometry to place it as
required.
-
Under Two parallel Planes Tolerance
Zone, define the definition element:
- Face: To define the toleranced zone perpendicular to the
axis of the toleranced cylinder between selected face and
axis.
|
- Edge: To define the toleranced zone parallel to the axis
of the toleranced cylinder between selected edge and axis.
|
-
Click Unselect to clear the remove the
defined definition element.
-
Select the tolerance frame and click
Datum Feature (1
plane):
 in the
Semantic Tolerancing Advisor
dialog box.
The
Datum Definition dialog box appears.
The
datum feature specification is automatically grouped to the previously
created size tolerance and perpendicularity tolerances.
Press the Ctrl
key and drag
the created annotation in the geometry to place it as required.
-
Click OK. You can see that datum B is
created.
- Do not close
the Semantic Tolerancing Advisor
dialog box to perform the next task.
|
![]()