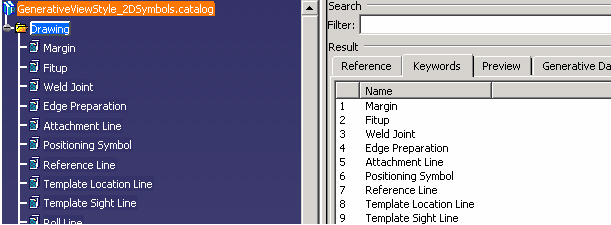
The generative view style (GVS) file is the key file for managing all the
graphic options needed in workshop documents.
All the feature properties as they are to be seen in the generated drawings are
set in this in this file.
The GVS file allows you to create feature representations in a CATDrawing (for example, a Reference Line with desired graphic properties and layer information) and then reference it in a catalog.
When you extract a fabrication sketch, all graphic properties are read from the template representation and transferred to the generated representation.
You can visualize and modify graphic properties directly in the template representation. The link between a manufacturing feature and its graphic properties defined in a template representation is made in the GVS file.
The same XML style file is also used to set the graphic properties of the 3D representation of manufacturing features in the IPM (In-Process-Model) part.
The default GVS file is located in the PRM file as specified in Managing Project Resources.
You can access GVS parameters for browse or edit using the Tools > Standards command. You (as administrator) can customize your own GVS file and save it at a new location. Then, any new graphic properties defined for the manufacturing features are considered in fabrication sketches and 3D IPM parts.
For information on how to create views using generative view styles, how to set view style parameters or more generally on administering generative view styles, see the Generative Drafting User's Guide.
The following standard types are provided.
These standard types have sub-types. You (as administrator) can create other sub-types from these standard types for better modularization and diversity of manufacturing feature representations.
Here are examples of standard sub-types.
Sub-types of Reference Line:
1.Template location line
2.Template sight line.
Sub-types of Forming Line:
1.Roll lines
2.Inverse bending curve
3.Tangency lines, etc.
Sub-types of Opening:
1.Cut Opening
2.Marked Opening
3.Tabbed Opening
4.Bridged Opening.
Sub-types of Cutting Contour:
1.External Cutting Contour
2. Internal Cutting Contour.
To add a sub-type, you (as administrator) must:
A corresponding catalog file contains families under a GVS chapter for all standard and user-defined types.

This catalog points to a CATDrawing, which contains all the 2D representations of features with a complete definition. Each family points to a detailed view containing the corresponding representations. For example, for Reference Lines:

Representations corresponding to Template Location Line are defined and stored in the CATDrawing.
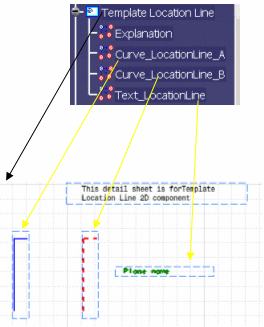
The text 2D detail contains values of what you want to see in the fabrication sketch. For example, if you want to see the "Plane name" for the Template location line, you must write this text in the template.
The points above describe how properties of each standard or user-defined type is to be declared in the CATDrawing and catalog files. The GVS file is also based on these concepts.
The GVS file contains nodes related to each standard and user-defined type. Each node has options to set family and drawing detail names taken from the catalog. This information is used to reference the drawing detail from which graphic properties are read.
A GVS file called DPMStructure_GVSSample.xml is provided, containing the standard nodes.
To access this file:
Then, click on the desired node on the left side and modify a property value on the right side. For example, to change the text name, select a value in the Text combo box.
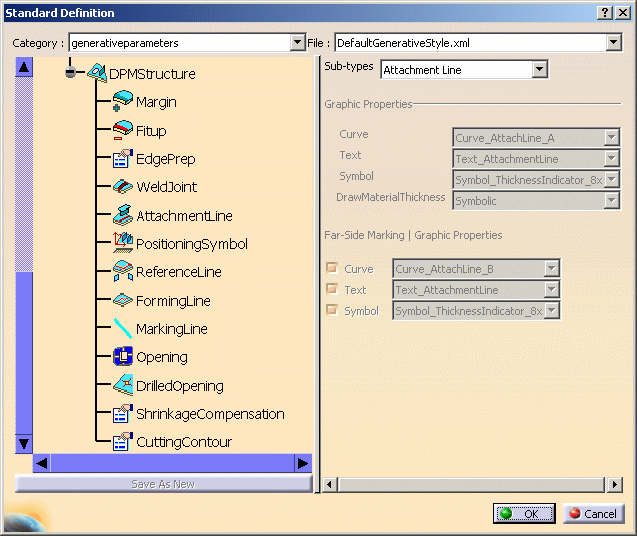
Each node on the left side represents a standard type. On the right side, first combo shows list of all sub-types. For example, in case of the Opening type:
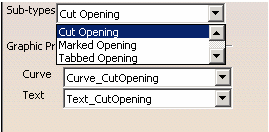
Where the various openings (cut, marked, and so on) are standard sub-types. You (as administrator) can add your own sub-type in the DPMStructure_GVSSample.xml file directly by declaring a new node.
For example, if you want to add a new Forming Line sub-type called Tangency line, you must add it as follows:
<std:enumdef name="TypesOfFormingLine">

   <std:strval>Inverse bending curve</std:strval>

   <std:strval>Roll line</std:strval>

   <std:strval>Tangency line</std:strval>

   </std:enumdef>
After declaring a new sub-type, you must define its graphic properties at the appropriate place in the XML file:
<std:node name="FormingLine">

   <std:node name="Sub-types">

   <std:enumval name="TypesOfFormingLine">Tangency line</std:enumval>

   </std:node>

   <std:node name="Curve">Curve A</std:node>

   <std:node name="Text">Text A</std:node>

   <std:node name="Symbol">Symbol</std:node>

   </std:node>
As shown below, each sub-type can be described by a maximum of three attributes:
So, we assume that any manufacturing feature is one, or a combination of 2 or 3 representations: Curve, Text and Symbol. For each of these representations, if applicable, you must define a drawing detail and reference it by means of the GVS file.
Below is a table that shows which representation is applicable for each standard type.
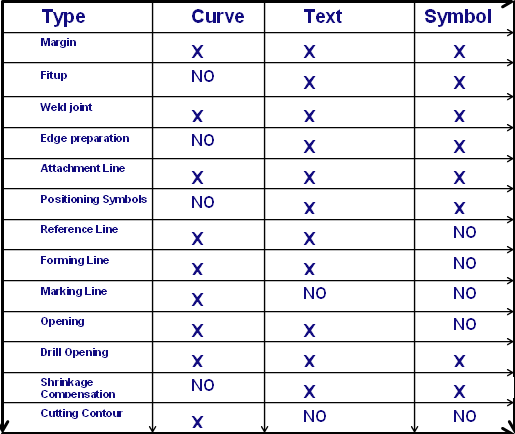
Examples:
An attachment line representation is made of a combination of three
representations: a Curve (line), a Text (label of Attached Part), and a Symbol
(Material throw orientation of attached part)
An opening is a combination of a Curve (circle) and a Text (opening
description, diameter).
Sub-types inherit these properties. You can use different drawing details
for your sub-types.
For example, if you define sub-types of an attachment line, you can set your
customized curve, text and symbol for this sub-type only.
This GVS file is the main repository for storing graphic properties of standard or user-defined types and sub-types. All workshop documents use this file for graphic properties. All other properties related to workshop documents are in different XML style files for the various types of documents. See Generative Parameters for Workshop Documents for more information.
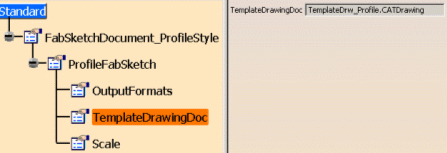
Here is a typical fabrication sketch XML style file (in this case for profiles):
Here is a typical XML style file for XML data output (in this case for jig pin):
