Overview
The following diagram explains what has to be installed on which
machine:
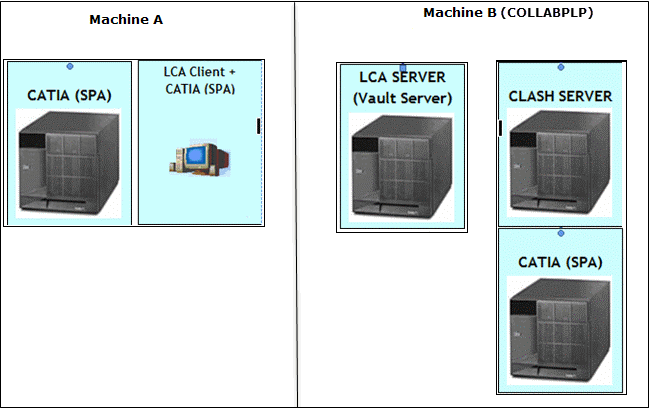
For Machine A, we assume that you have already setup ENOVIA clients (CATIA and ENOVIA VPM or VPM Navigator).
For Machine B, we assume that you have already setup ENOVIA
server and ENOVIA Vault and the database (Oracle or DB2).
This section explains how you can setup one Clash Server and
CATIA.
You will need to use ENOVIA VPM Client:
- if you want to create GCO or CONTEXT
- if you want to launch a Clash computation on a sub-assembly of
the PRC.
| Orbix View | Machine B (COLLABPLP) |
| Port number for orbix daemon Starting Port number for daemon-run servers |
Orbix runs on the ENOVIA Server ENOVIA Server 1570 1590 CATIA communication 1570 1590 |
| Port number for orbix daemon Starting Port number for daemon-run servers |
CATIA Vault Client 2070 |
| Port number for orbix daemon Starting Port number for daemon-run servers |
Vault Server 2070 Clash Server communcation 1570 1590 |
| Port number for orbix daemon Starting Port number for daemon-run servers |
Clash Server Vault Client 1570 |
Note: This documentation mentions steps which are documented exhaustively elsewhere.
For CATIA and ENOVIA LCA code installations, refer to
Unloading Your Product Code on Windows and
Unloading Your Product Code on UNIX.
For ENOVIA database setup (PLM database setup), refer to
Setting Up the PLM Database (Windows) and
Setting Up the PLM Database (UNIX).
For vault setup, refer to Setting Up the Vault Server (Windows) and
Setting Up the Vault Server (UNIX).
On the ENOVIA Server Side: Create the ENOVIAClash.CATSettings using the Automatic Method
- Launch the EnoviaDbSetup that belongs to the ENOVIA setup and
select the tab Clash Setup:
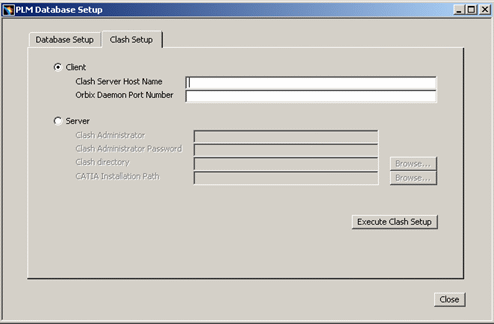
- Check Client in Clash Setup. Provide Clash Server Host Name (Machine
B Name or IP address) and Orbix Daemon Port Number (LCA Installation on
Clash Server):
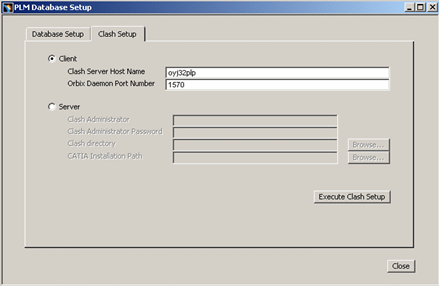
- Click on Execute Clash Setup.
A message confirming successful completion appears:
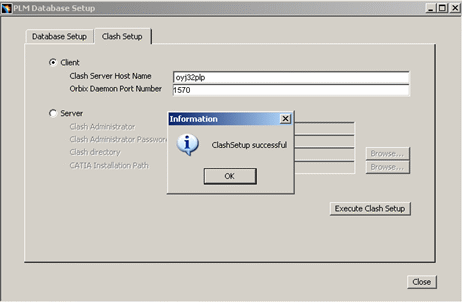
- Click OK and Close.
This Clash Client setup will generate ENOVIAClash.CATSetting in:
$installationpath\win_b64\CATSettings
Installing the Clash Server
Please follow the following procedure to install CATIA and the Clash server on Windows.
Installing CATIA
- Log on as an administrator.
- Start the CATIA installation and proceed as normal and click Next.
- Specify CATIA in the Ident field and click Next.
This identification comes in the environment file name to identify the environment file of this setup.

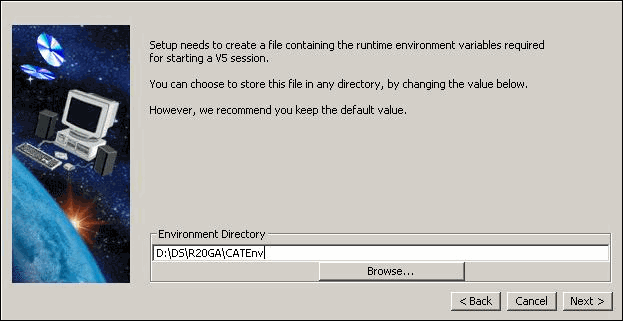
- Enter the path that you have chosen to save the CATIA environment
and click Next.
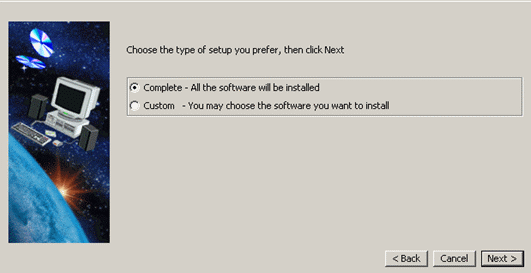
- Click Complete and click Next.
- Set the port number for Orbix daemon as 1570 (depends upon which
free port) and daemon-run servers as 1590 and click next (The minimum
difference b/w the two ports should be 20):
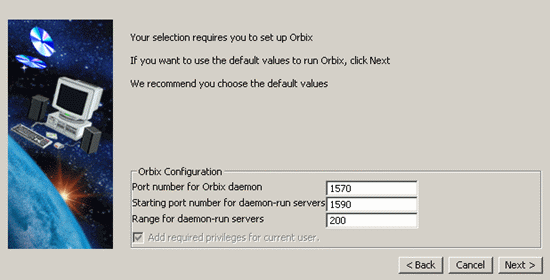
Note: This Port Number for further LCA installation, we need to use same ports afterwards.If the ports are not set properly or they are already in use:
- Go to:
installation path\win_b64\startup\orbix - Make changes in:
orbix.cfg - Go to:
installation path\win_b64\startup\orbix\config - Change in
common.cfg
- Go to:
- Click Next (or you can change the server time out btw 2
to 37500 min’s or retain default value i.e., 60min’s) and click
Next again and click Install to complete the
installation.
Do NOT set up the ENOVIA vault client.
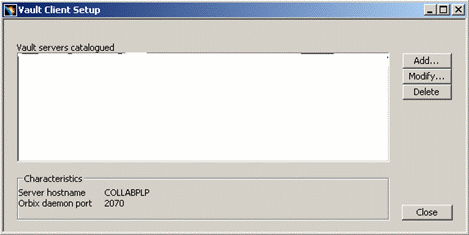
Vault Client Setup
Setting up the vault client generates the file
VaultClient.properties for CATIA setup (Machine B).
- On Machine B, perform Vault Client Setup also.
Go to:
<CATIA_installation_path>\win_b64\code\binand run:
VaultClientSetup.exe
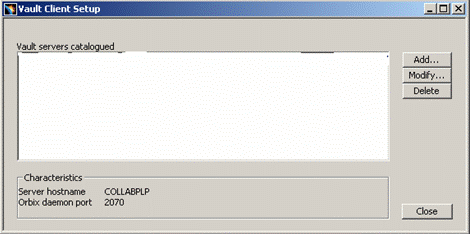
- Click the Add button:
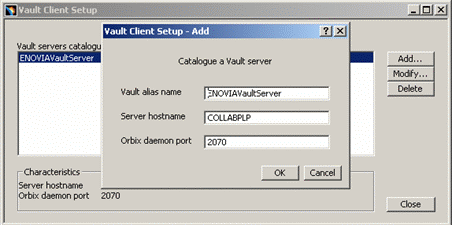
- Specify the Vault alias name as per VaultServer name
mentioned in
VaultClient.propertiesof the ENOVIA LCA Server.
TheVaultClient.propertiesfile is located at:
$installationpath\win_b64\docs\java
Specify Server hostname as LCA Server name. (Machine B Name)
Specify Orbix daemon port as port specified inVaultClient.propertiesof LCA Server on Machine B.
Installing the Clash Server
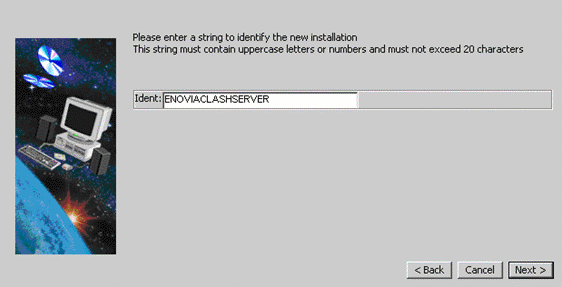
- Start installation of LCA.
- Specify ENOVIACLASHSERVER in the Ident field and click
Next.
This identification will come in the environment file name to identify the environment file of this setup:
- Now select where you want to save the Clash Server Environment.
Note: Use the same CATEnv folder which we have used for CATIA.
- Click Next and select Complete and click
Next.
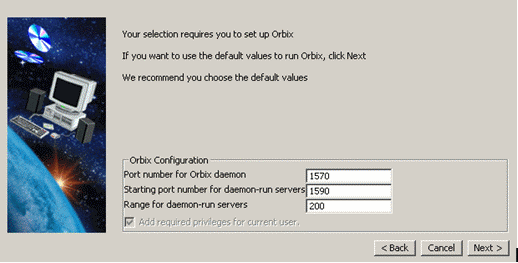
- Set the same port numbers for Orbix daemon as CATIA and click
Next.
The minimum difference between the two ports should be 20.
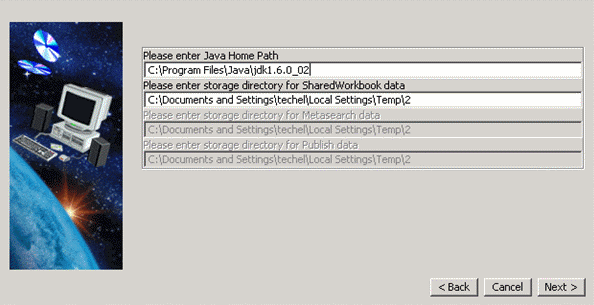
- Select I want to enter CATIA V5 Information and set the
environment path from the default path to:
D:\DS\R19GA\CATEnv
and also check the environment file name of CATIA from the Environment Path and click Next.
Specify our<CATIAInstallationPath>in Installation path field.
- Set an appropriate java path.
In our example, this is:
C:\Program Files\Java\jdk1.6.0_02
- Click Next several times and then click Install.
- After installation is 100%, PLM Database setup menu appears. Click
Cancel without doing anything.
- Click Yes when the following message is displayed:
- Close the Vault Setup dialog box when it appears.
- Click Finish in the Setup dialog box.
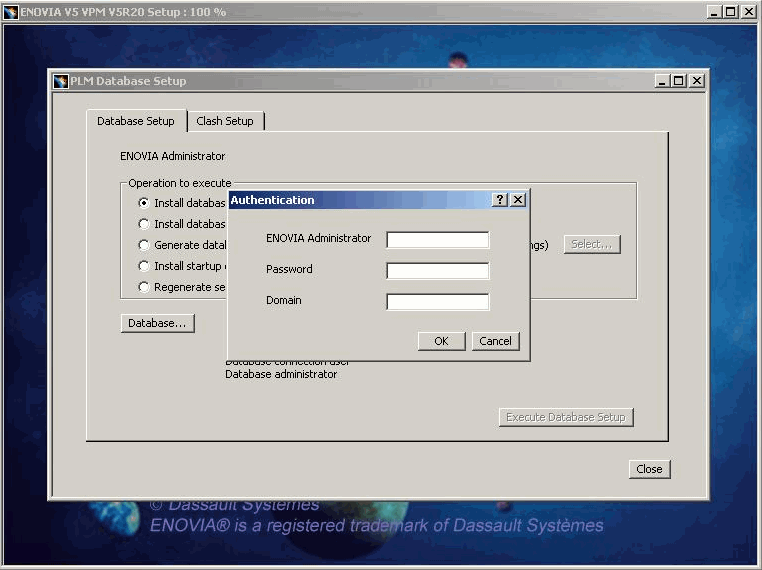
- Run the PLMDataBaseSetup on the Clash Server machine (Machine B).
Click on Execute Clash Setup and click OK in the Successful Clash Setup dialog box, then select the Database Setup tab and select Regenerate Settings from the following Options:
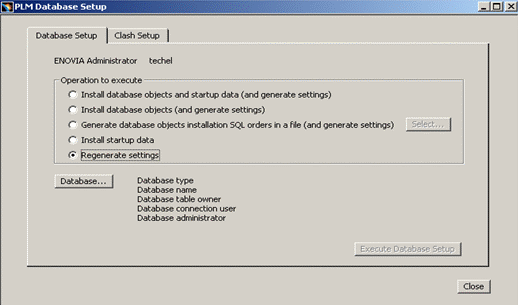
Click the Database... button and specify the values for the following fields:
Select DB2 or Oracle and specify the DB2 Install path (or Oracle Install Path) and Database Alias
Name (Name of Database).
Use appropriate username and password as Database table owner, Vault Database Connection
User and Database administrator.
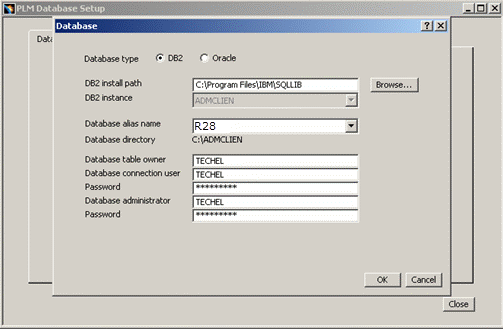
Click OK in the Database dialog box and click Execute database setup.
Note: This will generate CATSettings for the database in:
<CLASHServerInstallationPath>\win_b64\CATSettings
Vault Client Setup
This generates the VaultClient.properties file on
the Clash Server (Machine B).
On Machine B, perform Vault Client Setup.
Go to:
$CLASHinstallationpath\win_b64\code\bin
VaultClientSetup.exe
It opens following dialog box.
Click Add and specify Vault Alias name as per VaultServer name mentioned in
the VaultClient.properties file of ENOVIA LCA Server.
The VaultClient.properties file is located at:
$installationpath\win_b64\docs\java

Please check this file for Vault alias name on LCA Server (Machine A).
Specify Server hostname as LCA Server name (Machine A Name).
Specify Orbix daemon Port as port specified in VaultClient.properties of LCA Server on Machine A.
Customizations
Server
ENOVIAClashServer.imp (Windows and UNIX)
Copy ENOVIAClashServer.imp.unix or ENOVIAClashServer.imp.windows that is in:
<your enovia setup path>/<OS>/reffiles/sample
to:
<CLASHServerInstallationPath>\win_b64\startup\orbix\config\Repositories\ImpRep
		on CLASH Server [Machine B]
Rename ENOVIAClashServer.imp.unix into ENOVIAClashServer.imp.
Rename ENOVIAClashServer.imp.windows into ENOVIAClashServer.imp.
Edit this file with and do the following changes:
<name_of_clash_server_to_be_filled> = <name of the imp file here
		ENOVIAClashServer >

		<owner_to_be_filled> = <same user as the one in ENOVIAVaultServer.imp.
		Typically root>

		<Clash Server Install Path> = <your path to the clash server>

		<env_of_clash_server_to_be_filled> = <env of the clash server>

		<path_to_env_of_clash_server_to_be_filled> = <path the environment of
		the clash server>
On Windows, you find:
<CLASHServerInstallationPath>\win_b64\code\bin\CATSTART.exe -env
		<CLASH Environment File Name> -direnv <Path of CLASH Environment File>
		-run RunClashServer_NT.bat
On UNIX, you find:
<Clash Server Install Path>/<OS>/code/command/catstart -env <env_of_clash_server_to_be_filled>
		-direnv <path_to_env_of_clash_server_to_be_filled> -run
		RunEnovClashStarter
You have a sample of this in <your enovia setup path>/<OS>/reffiles/sample. You can find the files: ENOVIAClashServer.imp.unix, ENOVIAClashServer.IMP.windows
WARNINIG: Don’t use “” in the imp file!!!
RunClashServer_NT.bat (Windows only)
Check that this file is in:
<CLASHServerInstallationPath>\win_b64\code\command on CLASH
		Server [Machine B]
RunEnovClashStarter (UNIX only)
Check that this file is in:
<CLASHServerInstallationPath>\win_b64\code\command on CLASH
		Server [Machine B]
Do the following changes:
<tmp_directory_to_be_filled>

		<tmp_directory_to_be_filled>

		VPMADM_UID=<to be filled>

		VPMADM_GID=<to be filled>
In this file you find:
exec $CATInstallPath/code/bin/ENOVIAClashStarter $VPMADM_UID $VPMADM_GID
		$CATCommandPath/RunEnovClashServer >> $trace 2>&1
RunEnovClashServer (UNIX only)
Check that this file is in:
<CLASHServerInstallationPath>\win_b64\code\command on CLASH
		Server [Machine B]
Do the following changes:
export trace=<tmp_directory_to_be_filled>/RunEnovClashServer$$

		export HOME=<to be filled>

		trace=<to be filled>/ENOVIAEnovClashServer_$date.web

		CLASH_NAME=<name of the clash server>

		CLASHUSER=<to_be_filled>

		CLASHPASSWD=<to_be_filled>

		CLASHROLE=<to_be_filled>

		CLASH_OUTDIR=<to_be_filled>
ClashServerParams_NT.bat (Windows only)
Copy this file from:
<CLASHServerInstallationPath>\win_b64\reffiles\Sample
to:
<CLASHServerInstallationPath>\win_b64\startup directory on
		CLASH Server [Machine B]
Edit this file with following values:
set CLASHITDPORT= <Orbix Port Number>

		set CLASHITFCHECKDIRENV= <CATIA Environment path>

		set CLASHITFCHECKENV= <CATIA Environment Filename>

		set CLASHNAME= < ENOVIAClashServer Name>

		set CLASHUSER=<ENOVIA administrator>

		set CLASHCRYPTEDPASSWD=<ENOVIA Administrator Passwd>

		set CLASHROLE=<default securitycontext>
Enovia_ITFCHECK_NT.bat (windows only)
Check that this file is in: <CLASHServerInstallationPath>\win_b64\code\command on CLASH Server [Machine B]
Enovia_ITFCHECK (UNIX only)
Check that this file is in:
<CLASHServerInstallationPath>\win_b64\code\command
on CLASH Server [Machine B]. Fill correctly the path in Enovia_ITFCHECK.
From R19 onwards, perform the following changes:
<ClashServerInstallationPath>/<OS>/code/command
IT_DAEMON_PORT=<to be filled> - Mention the proper orbix
port mentioned in ENOVIAClash.CATSettings
export CATIAV5installPath=<CATIAV5 Install Path to be filled>
- Mention CATIA Installation path
$CATIAV5commandPath/catstart -run "ITFCHECK_PIM_LAUNCHER $ARGS" -env
		<name of the file that contains the CATIA env> -direnv <name of the
		directory where you find the CATIA env file>
For same machine same installation path:
edit ENOVIA_ITFCHECK file from LCA Server Installation path.
VaultClient.properties of the ENOVIA, Clash Server and CATIA ( in HTTP mode for vault only)
File Location:
<ENOVIAInstallationPath>\win_b64\docs\java
on LCA Server (Machine B).
Edit this file with following modification, add following line at the end of the file:
VaultClient_ENOVIAVaultServer_CommandHTTPServerPort=<Orbix Port
		Number>
Also do the same modification in VaultClient.properties file on CLASH Server (Machine B)
File Location:
<CLASHServerInstallationPath>\win_b64\docs\java
on CLASH Server (Machine B).
Also do the same modification in the VaultClient.properties
file on CATIA (Machine B).
File Location:
<CATIAInstallationPath>\win_b64\reffiles
on CLASH Server (Machine B)
CATIA Environment File on Machine B
File Location: CATEnv folder (E.g. D:\DS\<CATIA Install Path>\CATEnv)
on Clash Server (Machine B).
Edit this file by adding the following variables at the end of the file:
CATIAV5_ENOVIAV5=1

		CATIAV5_OldInteropSave=1

		VaultClient_PropertiesFilePath=<CATIAInstallationPath>\win_b64\reffiles

		VaultClient_PropertiesFileName=VaultClient.properties
CLASH Environment File on Machine B
File Location: CATEnv folder. (E.g. D:\DS\R19GA\CATEnv)
on Clash Server (Machine B)
Edit this file by adding the following variables at the end of file:
VaultClient_PropertiesFilePath=<CLASHInstallationPath>\win_b64\dos\java

		VaultClient_PropertiesFileName=VaultClient.properties
ENOVIAClashServer.CATSettings Modifications on the Clash server (Machine B)
In this file you specify the number of ITFCHECK that runs at the same time. You will find and example of this file in:
<Clash Server Install Path>\win_b64\resources\defaultsetting
You can use the VPMSettings application. Here is an example:
VPMSettings –f ENOVIAClashServer –a –n maxJobNumber –v <number
		of ITFCHECK launched at the same time>
You must copy this settings in the path know by the CLASH Server. Check the runtime environment variable CATUserSettingPath in the CLASH Server environment.
Note About CATOptionsMgt
- Launch CATOptionsMgt on CLASH Server (Machine B). Go to:
<CATIA Installation Path>\win_b64\code\bin
- Run:
CATOptionsMgt.exe
- Set the needed licenses.
Change the value of variable “EnoviaDefaultClashServer” with machine’s IP address & Orbix port number. Give Clash Server machine IP Address.
For Information; messengerplb IP address : 172.30.16.221
The use of the command VPMSettings is useful when the unit of measure management is activated and when the unit is SI. Keep in mind that the Clearance Clash value has to be more than 0.04 millimeter.
Batch Mode: ENOVClashUpdate on Machine B
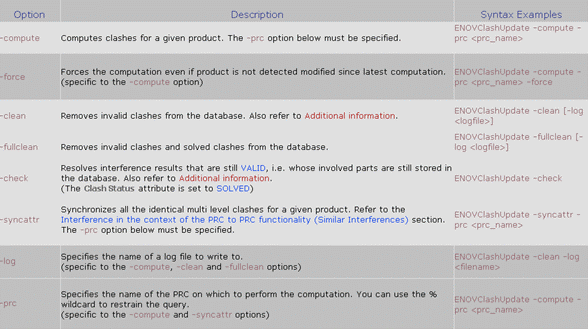
If you want to launch a computation with the blackbox option, you just have to add the following line in the environment file of ENOVIA:
ENOVIA_CLASH_WP_SUPPORT=YES
If you want to launch a computation with the rule option, you just have to add the following line in the environment of ENOVIA:
ENOVIA_CLASH_USE_RULE=YES
On the CATIA side, you just have to add in the environment file:
DMU_CLASH_DEFINE_PRODUCT_FOR_RULE=E:\users\epb\RI\pimphase1\ClashRule_Reference17.CATProduct
DMU_CLASH_SUPPORT_GLO=1 is deprecated everywhere.
When you launch ENOVClashUpdate, use CATStart and the environment of
ENOVIA
Don’t use the environment of the clash server!!!
Note: When you add (or remove) ENOVIA_CLASH_WP_SUPPORT and ENOVIA_CLASH_USE_RULE, you don’t have to relaunch the Clash Server. You have to relaunch the ENOVIA VPM Client or ENOVClashUpdate.
PIM 64-Bit Setup
ITFCHECK functionality will run from 64-bit code.
ENOVIA LCA and Clash Server must be set up along with CATIA 64-bit configuration.
Follow these steps:
- Install CATIA.
- Install ENOVIA LCA.
- Do PLMDBSetup. (Launch PLMDBSetup.exe from ENOVIA LCA installation path.)
- Do Clash Server Setup. (Launch PLMDBSetup.exe from ENOVIA LCA installation path.)
- Do Vault Server Setup. (Launch VaultSetup.exe from ENOVIA LCA Installation path.)
- Once you setup the CATIA, check the SPA.prd file is in the
directory:
$installationpath/aix_a64/code/productIC
Customizations Needed for 64-bit Setup
- CATSettings: Launch CATOptionsMgt.exe:
On Windows, run CATOptionsMgt.exe from:
$CATIAInstallationpath\win_b64\code\bin
On AIX, launch CATOptionsMgt using the following command:
./catstart –run CATOptionsMgt –env <CATIA Env> -direnv <CATIA ENV Path> - Go to General > Licensing tab and check in the “List of
Available Configuration or Products” any product or configuration
that contains SPA product and the knowledge infrastructure.
This will create Licensing.CATSettings in the default CATSettings folder. (Default: $USER_HOME/CATSettings).
Windows: USER_HOME – C:\Users\l23\AppData\Roaming\DassaultSystemes\CATSettings
AIX: USER_HOME -/u/user/<USER>/CATSettings. If you launch CATOptionsMgt with root user then CATSetting will be created in /CATSettings folder. - Modify ENOVIA_ITFCHECK that you find in CLASH Server
Installation path in code/command. (LCA SERVER is same)
The following case is mentioned for AIX:
- Fill in:
IT_DAEMON_PORT=xxx
-Add the runtime environment variable:
export MWHOME=catia_64bits_path/aix_a64/reffiles/mainwin/mw
- Fill in:
export CATIAV5installPath=catia_64bits_path
export CATIAV5commandPath=$CATIAV5installPath/aix_a6464/code/command
-Uncomment following lines & provide proper path:
# Traces
#date=`date +"%Y_%m_%d_%H_%M_%S"`
#run_number=$(echo "$1"|awk -F[\-\.] '{print $(NF-1)}')
#if [ "$run_number" = "" ] ; then
# run_number=$$ # if pb getting run number , then put the current pid
#fi
#trace="<directory where you save traces>/Enovia_ITFCHECK_${date}_${run_number}.traces"
-Replace the line:
#echo "Start CATIA command: 'ITFCHECK $ARGS'" >> $trace 2>&1
$CATIAV5commandPath/catstart -run "ITFCHECK_PIM_LAUNCHER $ARGS" -env <name of the file that contains the env> -direnv <name of the directory where you find the env file>
-By the line:
#echo "Start CATIA command: 'ITFCHECK $ARGS'" >> $trace 2>&1
$CATIAV5commandPath/catstart -run "ITFCHECK_PIM_LAUNCHER $ARGS" -env CATIA_P3.V5R19.B19 -direnv /DS/R19BIW/CATEnv >> $trace 2>&1
- At the LCA installed location i.e. $Installationpath/aix_a64/code/command,
there is a file runCATIAV5FromLCA.sh. Manually edit the file so that
it points to EnvCATIAV5FromLCA.
Also for starting CATIA from ENOVIA LCA, specify the environment file name <CATIA Env File name>.
Snapshot of modified runCATIAV5FromLCA.sh is as follows:#!/bin/ksh
# ********************************************
# *** ***
# *** Start CATIAV5 from ENOVIA LCA V5 ***
# *** ***
# ********************************************# ==========================================================================
# == Variables should be set in CATInstallPath\startup\EnvCATIAV5FromLCA ==
# ==========================================================================
# 1. V5_UNLOAD_PATH : Directory where CATIAV5 is installed
# 2. V5_ENV_NAME : CATIAV5 Environment name
# 3. V5_ENV_PATH : Directory where the CATIAV5 environment file is stored
#
. /DS/R19BIW/ENOVIA/B19/aix_a64/startup/EnvCATIAV5FromLCAOS=`$V5_UNLOAD_PATH/GetOSDS`# =================
# == Start CATIA ==
# =================/DS/R19BIW/CATIA/B19/aix_a64/code/command/catstart \
-env CATIA_P3.V5R19.B19 -direnv /DS/R19BIW/CATEnv -run CNEXTrc=$?
exit $rc - Also check EnvCATIAV5FromLCA located at $ENOVIAInstallationPath/aix_a64/startup.
Snapshot of this file is as follows:
# cat EnvCATIAV5FromLCA
export CATIAV5_ENOVIAV5=1
export CATNoStartDocument=1
export V5_UNLOAD_PATH=/DS/R19/DassaultSystem/B19
export V5_ENV_NAME=CATIA_P3.V5R19.B19
export V5_ENV_PATH=/DS/R19/CATEnv
Here in this file we point V5_UNLOAD_PATH to CATIA Installation path, V5_ENV_NAME to CATIA Environment file name and V5_ENV_PATH to directory of CATIA Environment file.
- Copy all the licenses from CATIA Installation to ENOVIA LCA
Installation, i.e. from:
$CATIAInstallationPath/aix_a64/code/productIC to $LCAInstallationpath/aix_a64/code/productIC
CATSettings Customization
ENOVIAClash.CATSettings file setup.
Set options for clearance if needed:
- View ENOVIAClash.CATSetting
- Same Machine Same Installation path
Go to Command prompt.
In command prompt, go to $LCAinstallation path/code/bin on LCA Server
Run the command:catstart –run “VPMSettings –f ENOVIAClash –l”
With the above command, we can view ENOVIAClash.CATSettings. - Same Machine different Installation Path for CATIA
Go to Command prompt.
In command prompt, go to $LCAinstallation path/code/bin on CLASH Server Installation path.
Run the command:catstart –run “VPMSettings –f ENOVIAClash –l”
With the above command, we can view ENOVIAClash.CATSettings.
CATSettings:
- Same Machine Same Installation path
E:\DS\qdk\R19\CLASH\win_b64\code\bin>VPMSettings -f ENOVIAClash -l
== VPMSettings program ==
== File : ENOVIAClash.CATSettings
== Check ReferenceSetting Directory ==

					** File was not Found in $CATReferenceSetting
== Check UserSetting Directory ==

					== Found in : E:\DS\qdk\R19\CLASH\win_b64\CATSettings\ENOVIAClash.CATSettings

					== Read : Yes

					== Write : Yes

					== Execute : Yes
== VPMSettings List: ==
ENOVIABatchClashAutomatic = YES

					ENOVIAClashClearance = 0.02

					ENOVIAClashServerName = ENOVIAClashServer

					ENOVIADefaultClashServer = MESSENGER1PLB:3000

					ENOVIADocType = NONE

					ENOVIASendUserNotification = YES

					ENOVIASpaceMap = YES

					ENOVIAVolumeFilterClearance = 0.02
- Same Machine Same Installation path
Go to Command prompt.
In command prompt, go to $LCAinstallation path/code/bin on LCA Server
Run the command:catstart –run “VPMSettings –f ENOVIAClash –a –n <Variable Name> -v <Value>”
LICENSING and other CATIA Settings
CATSettings by CATOptionsMgt
- Same Machine Same Installation Path
Run CATOptionsMgt.exe from $LCAInstallationPath/win_b64/code/bin.
It will launch Options toolbar.1. Set the Needed licenses as , AL2 + ALA+ VAR (Licenses which contain the SPA product).
2. Copy the CATSettings and paste them in the CATSettings folder available under the installation directory:
Licensing.CATSettings

			Clash.CATSettings

			CATIAV5Cache.CATSettings

			ENOVIAClash.CATSettings
i.e. from:
C:\Users\l23\AppData\Roaming\DassaultSystemes\CATSettings - Same Machine Different Installation Path for CATIA
Do the above settings on the CATIA Installation path.
![]()