On Windows
This task explains how to install the online documentation after installing the code.
The online documentation is provided on a suite of CD-ROMs. Once the documentation files on the first CD-ROM have been installed, you will be prompted to insert the next CD-ROM, and click OK to continue the installation until you have inserted the last CD-ROM.
Note that you must install all the documentation CD-ROMs: you cannot, for example, install only one out of the whole suite. If you click the Cancel button before installing the final CD-ROM, the documentation files previously installed will be uninstalled.
Installing the Online Documentation On Your Computer
Follow this procedure if you did not install the documentation during the code unloading procedure. Installing the online documentation is very similar to installing the Version 5 code.
You need to have administrator privileges to install the online documentation.
2. Insert the CD-ROM.
Unlike when installing the software, the documentation installation procedure does not start automatically.
3. Use the Windows Explorer to explore the documentation
CD-ROM, and double-click the Setup.exe program on the CD-ROM to start the
installation.
Do not use "My Computer" to access the CD-ROM: this will not work.
From this point onwards, the installation procedure is the same as the online documentation installation procedure within the code unloading phase. Refer to Installing the Online Documentation for full details.
To access the documentation using your browser, locate and open the documentation homepage for your product brand.
![]()
Online documentation for all product brands is installed in the same location.
Uninstalling the Online Documentation
2. In the Change or Remove Programs dialog box, you can choose to uninstall the documentation.
This removes the documentation for all brands.
Note: you can install online documentation for different brands, but all in the same directory (and not in different directories). Installing documentation for different brands in the same directory does not stop you from selectively uninstalling the documentation for one brand: if you do so, the documentation for the remaining brand remains intact.
Installing the Online Documentation on a Server
You may want to install the documentation files on a server to save disk space.
2. Log onto another computer where there are no documentation files.
3. Select the Start > Programs > Windows Explorer command to run the Explorer.
4. Select Tools > Map Network Drive... and map the appropriate network drive before starting a session.
5. Start a session and use one of the commands for obtaining help.
For example, press F1 for contextual help. A dialog box will prompt you to specify the online documentation path.
6. In the dialog box, specify the path where the documentation is located.
If you do so, in the Apache server
configuration file (usually httpd.conf) replace the line:
#DefaultType text/plain
with the line:
DefaultType application/octet-stream
Note: The same type of MIME type configuration must be performed on other types of HTTP servers on which online documentation is to be deployed.
On UNIX
This task explains how to install the online documentation after installing the code. On UNIX, you cannot install the online documentation directly from within the code installation procedure (unlike on Windows).
The online documentation is provided on a suite of CD-ROMs. Once the documentation files on the first CD-ROM have been installed, you will be prompted to insert the next CD-ROM, and click OK to continue the installation until you have inserted the last CD-ROM.
Note that you must install all the documentation CD-ROMs: you cannot, for example, install only one out of the whole suite. If you click the Cancel button before installing the final CD-ROM, the documentation files previously installed will be uninstalled.
Installing the Online Documentation On Your Computer
For illustration purposes, this section describes the installation of online documentation for the CATIA product line. Note, however, that the principle is the same for all product lines.
2. Insert the CD-ROM for your UNIX operating system into the drive.
3. If you are running AIX, check whether the CD-ROM drive is declared.
On AIX, run the command:
lsdev -C -c cdrom
If a line like this is not displayed:
cd0 Available 00-01-00-30-CD-ROM Drive
you need to add the CD-ROM drive by using the smit AIX command, for example.
Then, check whether the CD-ROM drive is mounted. If the CD-ROM drive is not mounted, you will have to mount it before proceeding. You can determine if the drive has already been mounted by typing the command:
mount
In the output lines, you should see a list of mounted file systems. The CD-ROM drive has already been mounted on your local system if a line similar to one of the following lines appears in the list:
/dev/cd0 cdrom cdfrs "date" ro
where "date" is the current date.
Then, mount the CD-ROM drive, if necessary, by typing the command:
mount -v cdrfs -r /dev/cd0 /cdrom
4. On all UNIX platforms, change directory to the CD-ROM mount
point.
./start
The V5Doc Setup program starts, then the Welcome dialog box appears.
When installing additional documentation for the same version (or in another language), after the Welcome dialog box, a dialog box is displayed listing the documentation you already installed. Clicking the Next button will then display a list of preselected documentation reflecting the software you installed, but the documentation already installed obviously does not appear in the list. The additional documentation will be installed in the same directory.
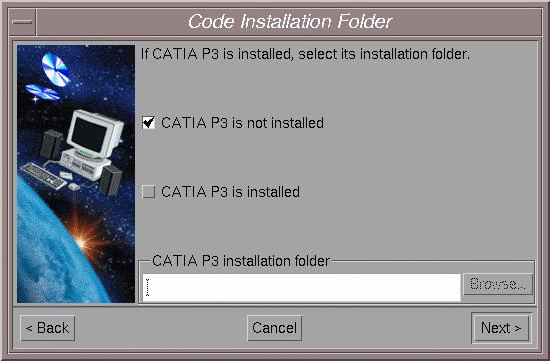
6. Click Next.The Code Installation Folder dialog box appears.

You must specify whether CATIA is installed or not.
7. If it is not already checked, check the option CATIA P3 is installed to indicate that CATIA is already installed.
8. If CATIA is already installed, the name of the installation folder is detected and displayed.
If not, click Browse..., navigate to the installation folder, then double-click the folder name and click OK.
The dialog box displays the name of the installation folder. In this case, it is:
UNIXInstallPath
9. Click Next.
The Choose Destination Location dialog box appears.
The default folder in which the documentation will be installed is:
UNIXInstallPathdoc
Note: you can install online documentation for different brands either in the same directory or in different directories. Installing documentation for different brands in the same directory does not stop you from selectively uninstalling the documentation for one brand: if you do so, the documentation for the remaining brand remains intact.
10. Click Browse... to select a new folder if the default folder is not suitable, or click Next.
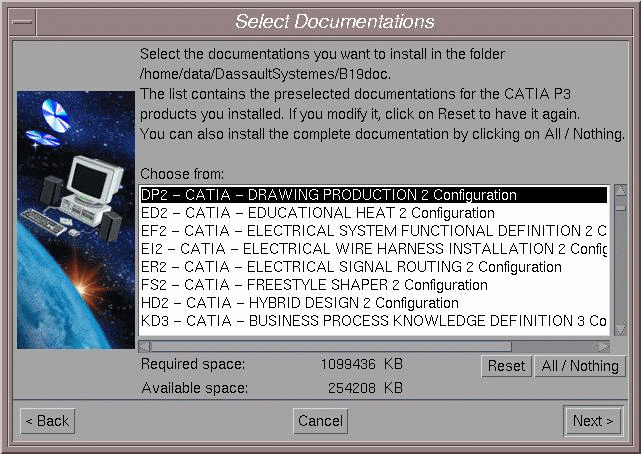
The Select Documentation dialog box appears.

The setup program detects which products are installed and preselects the corresponding manuals in the list, along with any additional prerequisite manuals.
Note: The BAS - Infrastructure and CFY - Common Functionalities documentation sets are prerequisites for all other online documentation and are always installed, even if you do not select them explicitly in the list.
This means that if you select the manual for a specific application (for example, PRT - Part Design), both this manual and the associated prerequisite documentation will be installed.
At this stage, you can:
- deselect manuals in the list
- select additional manuals in the list
- toggle the All / Nothing button to select either all documentation or no documentation respectively
- press the Reset button to return to the original list of preselected manuals.
11. Once your selection is final, click Next.
The Start Copying Files dialog box appears listing the online documentation you are about to install.
12. Click Install to install the documentation.
Depending on your product line, the online documentation may be provided on a suite of up to five CD-ROMs. Once the documentation files on the first CD-ROM have been installed, and depending on which products you selected, you may be prompted to insert the next CD-ROM. In this case, click OK to continue the installation until you have inserted the last CD-ROM.
Note: You must install all the documentation CD-ROMs: you cannot, for example, install only one out of two. If you click the Cancel button before installing the final CD-ROM, the documentation files previously installed will be uninstalled.
13. Once the documentation has been installed, in the Setup Complete dialog box click Finish.
If not, you must update the value for the CATDocView variable in your environment to specify the location of the documentation files. Otherwise, you will not be able to access the documentation.
To do so, use the chcatenv command to change the value of the CATDocView variable to point to the location where the documentation media was installed. For more information, refer to Managing Environments.
Using your browser, locate and open the documentation homepage for your product line.
Installing the Online Documentation on a Server
You set up a documentation server the same way as you set up a Version 5 code server. For more information, refer to Enabling User Access to the Software Over the Network.
You can also access online documentation if it is installed on a http server (for example, Apache).
If you do so, in the Apache server configuration file (usually
httpd.conf) replace the line:
#DefaultType text/plain
with the line:
DefaultType application/octet-stream
Uninstalling Online Documentation
2. Run the command:
rm -rf /usr/DassaultSystemes/EnvNameSuffixdoc
to remove the documentation directory.
![]()