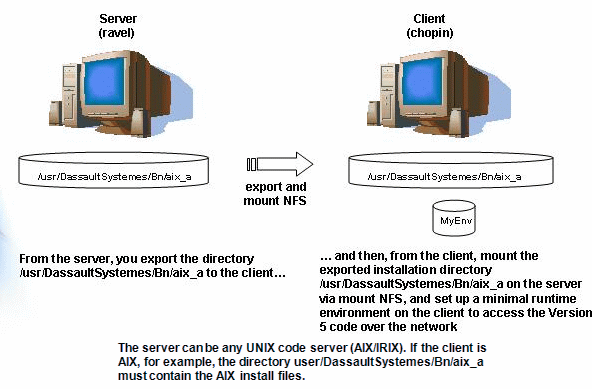
- set up just a runtime environment on each client: each time the server software is upgraded, all you have to do is recreate a new environment on each client
- or, to avoid having to set up a runtime environment on each client, you can simply mount the server software and runtime environment directories from the client and run Version 5 using the environment on the server.
We have chosen the AIX platform for the purposes of this scenario.

- copy all the software into the same folder (as illustrated above)
- or, given that the software is distributed on several CDs ( 1, 2 ...), copy the contents of each CD into a separate folder for each CD, making sure that the name of each folder corresponds to the CD number ( 1, 2 ...) etc.
Setting Up an Environment on the Client
The name of the server, in our example above, is "ravel".
You already installed the software in:
UNIXInstallPath/aix_a
The directory must be accessible from the client.
The name of the client, in our example above, is "chopin".
UNIXInstallPath) via NFS.
UNIXInstallPath/aix_a/code/bin
export PATH=UNIXInstallPath/aix_a/code/bin:UNIXInstallPath/aix_a/code/command:$PATH
export LIBPATH=UNIXInstallPath/aix_a/code/bin (AIX)
./setcatenv
     -e MyEnvironment -p
     UNIXInstallPath -d MyEnvDirectory -desktop
     yes -new yes -a global -cs MyProductLine
where "MyEnvironment" is the name of the environment, "MyEnvDirectory" is the name of the folder containing the environment and "MyProductLine" is the name of the product line.
![]()
UNIXInstallPath/aix_a/code/command
and run this command:
./catstart -run "setcatenv -p
     UNIXInstallPath -e MyEnvironment -d MyEnvDirectory -regserver -cs MyProductLine" -env
     MyEnvironment -direnv MyEnvDirectory
For a description of the setcatenv and delcatenv command syntax for UNIX, refer to Customizing Your Environment on UNIX.
Used to support process interoperability (for example, between CATIA and DMU), the backbone needs to be set up on each computer running applications which need to communicate.
To set up the ports using the default values:
- Go to the following installation directory:
UNIXInstallPath/OS/code/command - Enter the command:
./catstart -env MyEnvironment -direnv
       MyEnvDirectory -run setV5Ports
where "OS" is:
- aix_a
For more information, refer to Communications Backbone Files.
You can run Version 5 as follows:
- double-click the environment icon using the desktop,
- or, go to the following mounted directory:
UNIXInstallPath/aix_a/code/commandand enter the command:
./catstart-run CNEXT-env MyEnvironment -direnvMyEnvDirectory
./catstart -run DMU -envMyEnvironment-direnvMyEnvDirectory
./catstart -run DELMIA -envMyEnvironment-direnvMyEnvDirectory
./catstart -run "delcatenv -d MyEnvDirectory
     -unregserver -cs MyProductLine" -env
MyEnvironment -direnv MyEnvDirectory
./catstart -run "delcatenv
     -e
MyEnvironment -d MyEnvDirectory -desktop yes -a
global -cs MyProductLine" -env
MyEnvironment -direnv MyEnvDirectory
For a description of the setcatenv and delcatenv command syntax for UNIX, refer to Customizing Your Environment on UNIX.
Accessing the Software Without an Environment on the Client
You already installed the software in:
UNIXInstallPath/aix_a
2. From the server, export the following directories to the client:
UNIXInstallPath/aix_a (installation directory)/CATEnv (runtime environment directory)
Both the installation and runtime environment directories must be accessible from the client.
3. Log onto the client as root.
4. From the client, mount both exported directories via NFS.5. Go to the following mounted directory:
UNIXInstallPath/aix_a/code/command
6. Log off the root userid.
7. Log on using a normal userid and run a Version 5 session.In this case, go to the following mounted directory:
UNIXInstallPath/aix_a/code/command
and enter the command:
./catstart -run CNEXT
./catstart -run DMU
./catstart -run DELMIA
![]()