The released cache and timestamp features both require one of the
following DMU licenses:
- DMU Navigator P1 P2 or P3
- N35.prd
- WVR.prd
- PVR.prd
If you activate the cache
using a VB macro, you will not receive a message reminding you to re-launch
your session. You must, however, re-launch your session.
The Cache Management settings page concerns the following settings categories:
Cache Activation
![]()
Note: You must re-start the application in order that the cache activation be taken into account.
![]() By default, this option is unchecked.
By default, this option is unchecked.
Cache Location
![]()
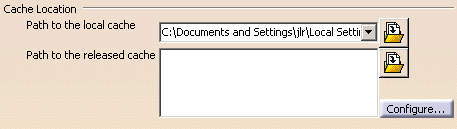
New features have been added to the Cache Management that render the configuration of the local and released caches easier. The new features are:
- Local cache - a history of the last five defined paths
- Released cache - a configuration panel that enables you to:
- select directories from a list of "accessible" directories that have been pre-defined by the administrator
- reorder the directories list
- remove entries from the directories list
Note that it is possible to use environment variables to define a local cache or a released cache:
- the variable should be defined (using the set command on Windows or the export command on UNIX) in the script file used to launch the executable file of the interactive application
- the variable must be correctly valuated to an existing directory
- the entry in the local cache or released cache text-entry field should be of the form ${variable_name}
![]() By default, this variable is valuated to
By default, this variable is valuated to
Windows: C:\Documents and Settings\userid\Local
Settings\Application Data\Dassault Systemes\CATCache
UNIX: $HOME/CATCache
![]() By default, this variable will be a list of the released caches that have
been defined by your administrator.
By default, this variable will be a list of the released caches that have
been defined by your administrator.
The Configuration dialog box appears.
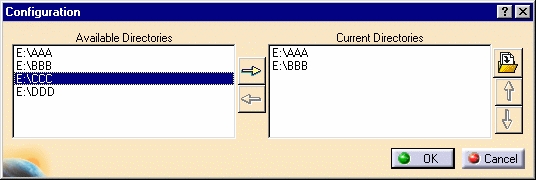 |
To add one of the Accessible Directories to the list of Current
Directories, select the entry in the Accessible Directories list and click
the Right-arrow icon
![]() .
.
The entry is added to the Current Directories list.
Note: The list of directories in the Accessible Directories list is defined by the administrator as follows:
- define a .txt file of which each line contains the path to a directory that will
appear in the list of accessible directories- set and export an environment variable AVAILABLE_CACHE_DIR_PATH
that points to the above .txt file- the administrator can, of course, manage the access rights to the above-defined directories so as to restrict their access to groups of users or specific users

To move one of the entries in the Current Directories list to a higher
place in the list (remember that released cache directories are searched in
the order in which you see them displayed), select the entry in the Current
Directories list and click the Up-arrow icon
![]() .
.
The entry is moved up in the list.
 |
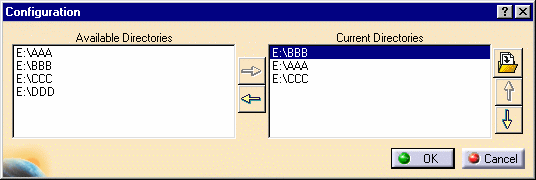 |
To delete an entry from the Current Directories list, select the entry in the Current Directories list and click the Delete button.
To enter the paths identifying the cache locations, click the Browse
icon ![]() . The Browse
enables you to locate the file you want. The user can enter the path to his
own local cache location, and if permitted by the site administrator, one
or more paths to released cache locations.
. The Browse
enables you to locate the file you want. The user can enter the path to his
own local cache location, and if permitted by the site administrator, one
or more paths to released cache locations.
The default directory is the user's home directory under UNIX and the USERPROFILE directory under Windows.
Cache Size
![]()

Check this option to activate the verification that the maximum size of the local cache has not been exceeded.
![]() By default, this option is unchecked.
By default, this option is unchecked.
When a file needs to be tessellated and the maximum size is exceeded, a
sufficient number of
files are deleted, on a least-recently-used basis, in order to make
place for the .cgr file that needs to be calculated. A warning message
will appear in the Incident Report.
Timestamp
![]()
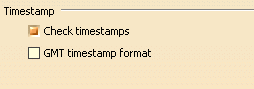
The timestamp option serves to check whether or not tessellated cgr files are up-to-date.
If activated, the system checks the original document's date against
that of the corresponding cgr file, and if older, tessellates the document
again, overwriting the out-of-date version. If dates are the same, no
tessellation is done and the cgr file in the data cache is loaded.
Turning this option off means that no check is run and cgr files in the
cache are systematically loaded.
It is now possible to base your cache on GMT time.
The following are the rules for implementing your cache based on GMT time:
- a batch job will permit you to migrate old caches to GMT time-based caches
- once a cache is migrated to or designated as GMT time-based, you can never go back to a local time-based cache
- ALL caches (local cache and released caches) must be of the same format
To migrate an old cache, use the following command:
CATSysMvCache -o UTC -inputdir input_directory -log file.txt [-outputdir
     output_directory]
If outputdir is not set, the cache specified in
inputdir and the documents it contains are converted to GMT format.
Once a cache has been migrated to GMT time-based, it is no longer compatible with previous releases of ENOVIA DMU or CATIA (i.e. a migrated cache cannot be used in V5R11 or below).
To designate all caches specified in Cache Location as GMT time-based, check the GMT timestamp format checkbox.
Note: When the GMT timestamp format option is activated:
- all new caches will be based on GMT time
- all specified caches must have been updated using the provided batch job
If any of the caches specified do not conform to the rule that all caches must be of the same format, an error message will appear.
![]()