Submitting and Managing Jobs
This section describes how you submit and manage jobs using the Job Manager. The following topics are covered:
 The Job Manager
The Job Manager allows you to do the following:
-
Create an analysis job.
-
Customize an existing analysis job.
-
Submit jobs for analysis.
-
Monitor a job as it progresses.
-
Attach the results from a job to the current analysis document.
-
Kill a job that is currently running.
-
Delete the selected job.
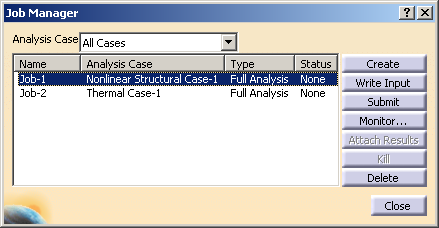
The Analysis Case field at the top of the Job Manager indicates the analysis case (or cases) for which jobs are listed. The four columns of the Job Manager display the following:
Name
The Name column displays the name of the job.
Analysis Case
The Analysis Case column displays the name of the analysis case associated with the job.
Type
The Type column displays the job type. The job type is always Full Analysis for Nonlinear Structural Analysis and Thermal Analysis.
Status
The Status column displays the current status of the job and is updated continually while your job is running. The status can be one of the following:
None
The job has not been submitted for analysis.
Submitted
The input file has been written, and the job is being submitted for execution.
Running
The job has been submitted for analysis and is running.
Completed
The job is complete. You can click Results to view the contents of the output database and graphically verify your results.
Aborted
The job has been aborted due to problems such as fatal errors in the input file or lack of disk space.
Terminated
The job has been killed by the user.
INP error
An error occurred while writing the input file.
![]() This task shows you how to display the Job Manager.
This task shows you how to display the Job Manager.
-
Click the Job Manager icon
 .
.The Job Manager dialog box appears with a list of the jobs that you have created for the current analysis case.
-
Select the analysis case or cases for which you want to see the jobs.
-
For detailed instructions on using the Job Manager to create, edit, submit, and manage jobs, see the following sections :
Submitting Jobs
When you submit an analysis case to the solver, an input file is generated and the analysis results are written to an output database file.
![]() This task shows you how to submit an analysis case to the
solver.
This task shows you how to submit an analysis case to the
solver.
-
Click the Job Manager icon
.The Job Manager dialog box appears with a list of the jobs that you have created. By default, jobs for all analysis cases are shown.
-
Select one or more jobs from the list in the Job Manager, and click Submit.
 Tip: You can also submit a
job by right-clicking on the Job objects set in the
specification tree and selecting Submit from
the menu that appears.
Tip: You can also submit a
job by right-clicking on the Job objects set in the
specification tree and selecting Submit from
the menu that appears.The solver submits the selected jobs for processing. Jobs are processed sequentially, with thermal analysis cases processed first so that the results will be available for use in coupled thermal-stress analyses. If you submit a single job and Run model consistency check is toggled on in the job editor, a Job Submission dialog box appears with the results of the consistency checks described in Checking Your Model. Messages from the input file writer are listed on the Write Input File Messages tabbed page, and Nonlinear Structural Analysis or Thermal Analysis show a consistency check error at the top of the list of errors in the Consistency Check Messages tabbed window if one or more input file writing errors occur. This consistency check error does not appear if the input file writing generates only warnings, and only one consistency check error is displayed even if multiple input file writing errors are displayed in the Write Input File Messages tabbed window. The Job Submission dialog box shows the Write Input File Messages tabbed window by default if an input file writing error occurs.
-
Investigate and, if necessary, correct any error or warning messages in the Job Submission dialog box. Click Continue to continue the analysis, or click Abort to terminate the analysis so that you can make changes to your model.
If you submitted multiple jobs at the same time, the Job Submission dialog box is not available. If an analysis terminates or if there is a problem with the results, select a single job and click Monitor to review warning or error messages created as the analysis was running. You can also submit the jobs again individually with the consistency checks turned on to review any errors and warnings generated prior to the analysis.
-
When you click Continue in the Job Submission dialog box or, if the model consistency checks are suppressed, when you click Submit in the Job Manager, Nonlinear Structural Analysis or Thermal Analysis submits the job or jobs for analysis using the settings defined in the job editor.
The information in the Status column of the Job Manager updates to indicate the job's status.
Note: For information on monitoring a job that you have submitted, see Monitoring the Progress of a Job.
-
When the job completes successfully (i.e., the Status column displays Completed), you are ready to review the results of the analysis. See Viewing the Results of Your Job for more information.
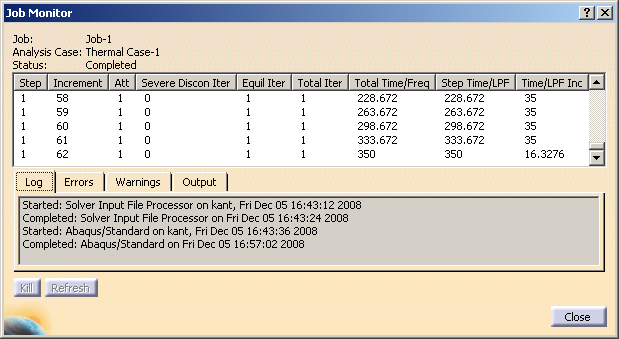
Monitoring the Progress of
a Job
The Job Manager continually updates the status of all the jobs you have created. You can also monitor information concerning a submitted job in the Job Monitor dialog box, shown in Figure 14–2. Only one job monitor dialog box can be displayed at a time.
![]() This task shows you how to monitor the progress of a
job.
This task shows you how to monitor the progress of a
job.
-
Click the Job Manager icon
.The Job Manager dialog box appears with a list of the jobs that you have created.
-
Select a job from the list in the Job Manager, and click Monitor. (The Monitor button is unavailable if you select more than one job.)
The job monitor dialog box for that job appears. The top half of the dialog box displays the information available in the status (.sta) file for the job. The bottom half of the dialog box displays log file information, error and warning messages, and output information.
-
To view the information in the bottom half of the job monitor dialog box:
-
Click the Log tab to display the start and end times for the job that appear in the log (.log) file.
-
Click the Errors and Warnings tabs to display the errors or the warnings that appear in the data (.dat) and message (.msg) files.
-
Click the Output tab to display a record of each output data entry as it is written to the output database.
The information presented in the job monitor dialog box is updated continually as the job progresses.
-
-
If you close the analysis document or exit Nonlinear Structural Analysis or Thermal Analysis while a job is running, incoming job messages are stored only in the .ipm file. Therefore, when you restart Nonlinear Structural Analysis or Thermal Analysis or reopen the analysis document while the job is still running, you must click Refresh to update the contents of the job monitor.
-
If necessary, you can terminate the job by clicking Kill at the bottom of the job monitor dialog box.
Viewing the Results of
Your Job
As each increment of your job is completed successfully, the results for that increment are stored in an output database file. When the analysis completes, you can attach this output database file to an analysis document and use Nonlinear Structural Analysis or Thermal Analysis to view the results graphically.
Note: Nonlinear Structural Analysis and Thermal Analysis support the use of Abaqus 2018, and all output databases will be upgraded to Abaqus 2018 when opened in the V5-6R2019 release. Use the filename_old.odb file to access the output database without the upgrade.
![]() This task shows you how to attach an output database file
to an analysis document in Nonlinear Structural Analysis or
Thermal Analysis.
This task shows you how to attach an output database file
to an analysis document in Nonlinear Structural Analysis or
Thermal Analysis.
-
Click the Job Manager icon
.The Job Manager dialog box appears with a list of the jobs that you have created.
-
Select a job from the list in the Job Manager, and click Attach Results.
Depending on the status of the current analysis case, a dialog box may appear asking you whether to attach the output database file containing the results for the selected job to the current analysis case or to a new analysis case (see Importing an ODB for details). When you attach the output database file to an analysis case, a link to the output database file appears in the Links Manager and step objects for each step in the analysis appear in the specification tree under the Analysis Case Solution objects set for the analysis case. In addition, the status of the Analysis Case Solution entry is updated to show that the solution is now available and is consistent with the model and history specification; in other words, the
 symbol no
longer appears.
symbol no
longer appears.Note: You can attach an output database file to your analysis document using the Import Results Database icon
 , as explained in
Importing an ODB.
However, unless you are opening an output database
file for an orphan mesh, the Job Manager
approach is recommended.
, as explained in
Importing an ODB.
However, unless you are opening an output database
file for an orphan mesh, the Job Manager
approach is recommended. -
You can create and customize different plots of your results. For more information on postprocessing in Nonlinear Structural Analysis and Thermal Analysis, see Postprocessing.
Terminating a Job
You can use one of the following methods to terminate a job within Nonlinear Structural Analysis or Thermal Analysis:
-
In the Job Manager, select a job from the list, and click Kill.
-
In the Job Monitor dialog box for a particular job, click Kill. (For more information, see Monitoring the Progress of a Job.)
Nonlinear Structural Analysis or Thermal Analysis asks you for confirmation, terminates the job, and updates the status of the job in the Job Manager to Terminated.