Creating Analytical Rigid Surfaces
An analytical rigid surface is described by a series of connected lines and curves that have been extruded along a straight line or rotated about an axis. An analytical rigid surface represents a part that is so much stiffer than the rest of the model that its deformation can be considered negligible. An analytical rigid surface does not contribute to the rigid body's mass or inertia properties. Although you must mesh an analytical rigid surface, the mesh is ignored during the analysis and is used only for viewing the location of the surface when you visualize the results of your analysis. Computational efficiency, a reduction in contact noise, and a better approximation to the physical contact are the principal advantages of an analytical rigid surface over a deformable part. See Analytical rigid surface definition in the Abaqus Introduction & Spatial Modeling Guide for more information.
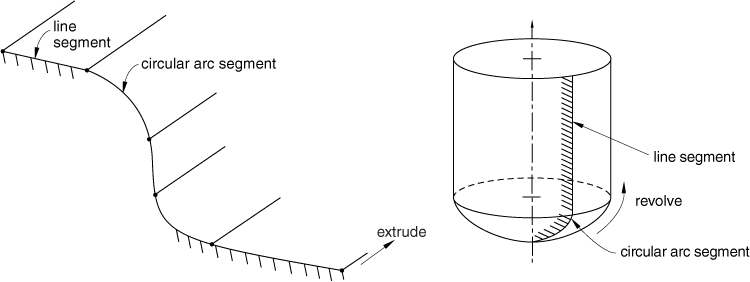
You construct an analytical rigid surface by extruding or revolving any combination of lines or arcs in the Generative Shape Design workbench. The profile that you extrude or revolve must be a single connected (but not necessarily closed) curve. In addition, the curve must be smooth to obtain a converged solution. Figure 7–4 illustrates extruded and revolved analytical rigid surfaces.
You control the motion of an analytical rigid surface by selecting a handler and by constraining or prescribing the motion of the handler point. When you create an analytical rigid surface, you must define the handler point by selecting a vertex or by selecting a point group (containing a single point). You cannot select a vertex that sits on the extruded surface, and you cannot select a vertex from another analytical rigid surface. You must create a separate point and select that point or select a vertex from a different part.
To include an analytical rigid surface in a contact problem, you select it as the support for a general analysis connection. The analytical rigid surface must be the master surface in a contact pair. Therefore, you must select the analytical rigid surface as the first component of a general analysis connection. In addition, you must select all of the faces of the analytical rigid surface when you create the general analysis connection, for example, by selecting the extrude or revolve feature from the specification tree. In turn, you can select the general analysis connection as the support for a contact pair. Analytical rigid surfaces are always single-sided, and Abaqus for CATIA V5 allows you to choose the contact surface when you create the analytical rigid surface. You cannot use the contact pair to switch the contact surface; you must use the contact surface defined by the analytical rigid surface.
Analytical rigid surfaces are available only in the Nonlinear Structural Analysis workbench.
This task shows you how to create an analytical rigid surface.
Click the Analytical Rigid Surface icon
 .
.The Analytical Rigid Surface dialog box appears, and an Analytical Rigid Surface object appears in the specification tree under the Connections objects set for the Initialization step. In addition, an Analytical Rigid Surface Mesh object appears in the specification tree under the Nodes and Elements set. The Analytical Rigid Surface Mesh object contains the node for the handler point.
You can change the identifier of the analytical rigid surface by editing the Name field.
In the window or in the specification tree, select the surface. The surface must be created in the Generative Shape Design workbench by extruding or revolving a combination of straight lines or circular arcs. Any selectable surface is highlighted when you pass the cursor over it.
The Support field is updated to reflect your selection. Arrows representing the surface normals appear on the selected surface.
Select a vertex or a point to represent the handler point. You cannot select a vertex that lies on the surface.
The Handler Point field is updated to reflect your selection.
When you use the analytical rigid surface in a contact analysis, you must select the positive side of the analytical rigid surface as the “master” surface. If desired, click Flip contact direction to switch the positive side of the surface.
The arrows that indicate the surface normals move to the opposite side of the surface.
Click OK in the Analytical Rigid Surface dialog box.