-
Open SmarTeam Editor.
-
Search for the root assembly for which WIP need to be created. For example, Car_Product1.
-
Right-click the assembly, and select CATIA > Create WIP.
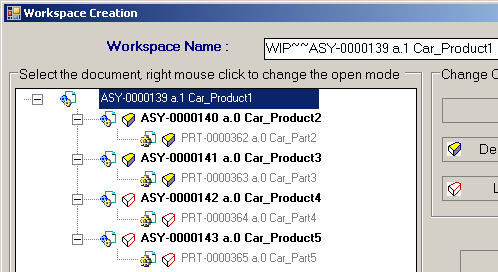
Workspace Creation dialog box appears with the Assembly in full expanded tree view.

The Workspace Creation dialog box has the following options:-
Workspace Name: By default, the name of the SmarTeam assembly tree name appears with the WIP~~. You can rename this name in this box.
Note: Workspace Name should be as per the CATIA – Filename rules. For more information on Filenames rules, see About Filenames. -
Select the document, right mouse click to change the open mode: The SmarTeam assembly which has been selected for WIP creation appears below this option. To apply the Open mode, select the document, and then set the appropriate open mode using any of the following:
-
right-click the document till the open mode you want is set
-
click the appropriate Open mode from the Change Open mode section
Note: You can select multiple documents using Ctrl key and then apply Open modes on all the selected documents. To do so: hold down Ctrl key and select multiple documents and then click Open mode you want from Change Open mode section. The Open mode is applied to all the selected documents.
-
-
No Selection: Click No Selection to cancel all the open modes you have applied on the sub product in the WIP assembly.
-
Design Representation: Click Design Representation to apply design representation open mode on the selected sub product.
-
Light Representation: Click Light Representation to apply light representation open mode on the selected sub product.
-
Collapse all: Click Collapse All to collapse the WIP assembly tree. Once you apply Collapse All, the Button title changes to Expand All, to allow you to expand the WIP Assembly.
-
Show Profile Card: Select the document in the WIP for which you want to open Profile Card, and click Show Profile Card. The profile card for the selected product gets opened.
-
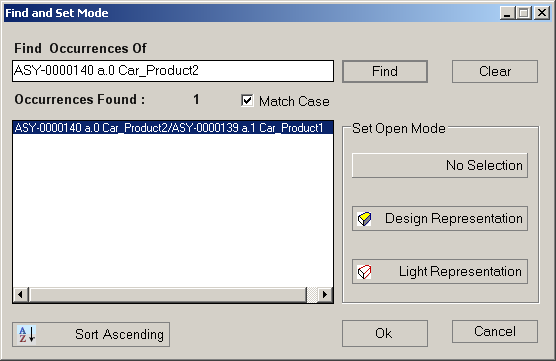
Find and Set Mode: Click Find and Set Mode to search documents in the WIP assembly and apply the open mode. Once you click Find and Set Mode, the following Find and Set Mode dialog box appears. If you select a document in the WIP assembly and then click Find and Set Mode, the selected document appears in the Find and Set Mode dialog box along with its number of occurrences.
-
In the Find Occurrences Of box, enter the document’s full or part tree node name as seen in the SmarTeam Tree View. The document having these characters will be displayed in Occurrences Found box.
-
No Wildcards are supported. Wildcard characters such as %, * are considered as part of the search string
-
The document references (Reverse hierarchy from root separated by /) would be displayed in the Read-only Box. The Read-Only box will acquire scroll bars if the text doesn’t fits in it.
-
You can also browse through the references using Up-Down arrow keys. While browsing the references in the read-only box, same references will be highlighted in main WIP Tree view (similar to the Windows Find functionality).
-
In the Find and Set Mode dialog box, you can do multiple selection with Ctrl + Left Mouse click or Shift + Left Mouse click.
-
In the Occurrences Found box, you can select and set Open modes on all the searched occurrences all at once. To select all the searched occurrences, click inside Occurrences Found box, press Ctrl+A key and then from the Set Open Mode, click the Open mode you want.
-
You can set the Open mode on the selected document by clicking appropriate Set Open Mode button.
The change in open mode will be reflected in the WIP Main Tree view.
Important Note:-
If the parent of a reference is having different open mode than the reference, you will be notified by a message box and the change would be discarded.
-
If there are multiple selections, the references for which the mode change is possible will be done. A warning message will appear for which Set Open Mode has failed (for the instances whose parents are having different open modes). You will have choice either to apply the possible Open modes or cancel the operation.
-
-
You can refine the search by using Match Case check box. This check box is selected by default.
-
You can sort the List box in alphabetical or reverse alphabetical order using the Sort Ascending button. The caption of this button changes to Sort Descending if the list is already sorted in Ascending orders.
-
If you want to clear all the fields of the Find and Set Mode dialog box and also the selections in the Main Tree View, click the Clear button. However, if you have set any mode prior to clear will remain in Tree View.
-
To discard changes and close the dialog box, click Cancel.
-
To register the mode changes and close the Find and Set Mode dialog box, click OK.
-
-
-
Apply the Open Mode you want on the products.
The icons of the products changes according to the Open Mode:-
 or
or
 icons shows that there is no open mode selected on the documents.
For the document other than CATProduct and CATPart there will be no
icons
icons shows that there is no open mode selected on the documents.
For the document other than CATProduct and CATPart there will be no
icons -
 icon shows that the document will be loaded in Design Representation
 -
 icon shows that the document will be loaded as Light Representation
 -
The mode selected for the Parent will be applied to all its children. Children can’t have different mode than their parent, except in case of No Selection.
-
The same document referenced under different parents can have different open modes.
-
For the documents other than CATProduct and CATPart (CGR, model), there will be only two possible modes, No selection or Design Representation as Light Representation has no meaning.
-
-
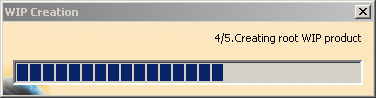
Click OK to create the WIP.
The progress bar appears. It indicate the current step going on, during WIP creation Process. For example, Retrieving information from SmarTeam, Checking documents in CATIA session, Copying documents from SmarTeam, Creating root WIP product, and Inserting components and setting properties.
If there is no error in creation,WIP Creation successfulmessage appears and the WIP gets created.
The WIP Creation panel will remain open with all the controls except Cancel button disabled. You need to explicitly close the WIP panel by clicking Cancel button.-
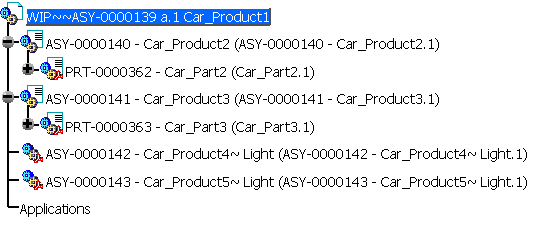
For the document opened in Design Representation the specification tree node will be created by Part Number as shown in above example.
-
For the document opened in Light Representation mode, a CATIA Internal Component will be created by the Part Number of the document followed by ~ Light , under the WIP product and will be linked to Representation file. For example see the Car_Product4 in the above image.
-
The CATIA Internal Component created will be linked to the CGR.
-
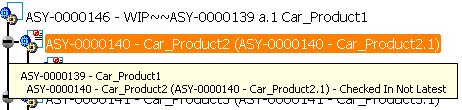
Specification Tree Node Tooltip: A detailed tooltip will be shown on all valid components under WIP (Components created/inserted using WIP commands). This tooltip will indicate component’s hierarchy till the root document, i.e. the document on which WIP is created as shown below:
-
The positions (Positioning Matrices) of the components (Light and Design representations) under WIP Product will be same as in the original assembly.
-
In case of contextual assemblies, if you have selected a document in design representation, which is referring to the context outside the Assembly, the copy of the context to the work directory will be done according to the SmarTeam Life Cycle Rules setting. In case the context would be copied to the work directory, it will not be loaded under the WIP Product.
-
If any document considered for WIP is already present in the CATIA session in Design Representation or Light Representation, or document with the same name is present in CATIA session in Design Representation or Light Representation mode, and you try to create WIP which includes same document in Design or Light representation, following error message will be shown:
Following Document/s selected for WIP is/are already present in
			CATIA session. (Document Name) Please close these documents and run WIP command again.
The WIP panel will be closed. This error message will only be seen if the CATIA cache mode is OFF that is, if the document is loaded in design mode.
-
Behavior of WIP for the Assemblies having CFO ( CATIA Internal Component) and documents other than CATProduct and CATPart (for example, CGR, model etc.) |
|
-
Following are the icons shown in WIP for CFO (CATIA Internal component)
-
 : No Selection
 -
 :
CFO is under a CATProduct and the parent is set with Design
Representation mode.
:
CFO is under a CATProduct and the parent is set with Design
Representation mode. -
 :
CFO is under a CATProduct and the parent is set with Light
Representation mode.
:
CFO is under a CATProduct and the parent is set with Light
Representation mode.
-
-
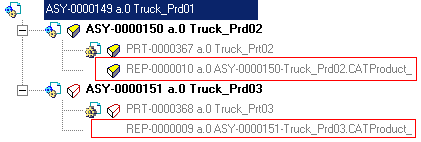
For the document other than CATProduct , CATPart and Internal Component, only two modes are possible, Design Representation and No Selection. In the following example, REP-0000009 is a CGR. If the Parent is in Light Representation, the document (other than CATProduct and CATPart) under it will be Not selected.
-
If the Parent is in Design Representation mode, then these documents will be in Design Representation mode:

-
If the Selected node is a CFO and Design or Light Representation is set, then the node itself will not be a part of WIP, but its children will be. The icons will reflect whether the CFO is considered for WIP creation or not. For example:
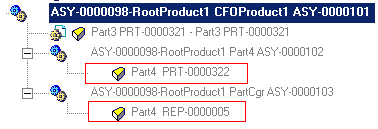
In the above Assembly, Part3, PRT0000322, REP-0000005 will be part of WIP. NO CATIA internal components will be created in WIP.