For each life cycle operation, you can:
-
Check out/in an assembly and all its components together. For example, you can check out the Ski Draft assembly and its ten components.
-
You can check out/in an assembly and handle each component individually. For example, you can check out an assembly and copy all its components to your desktop.
This section provides the following information:
Handling Components |
|
SmarTeam enables you to manage an assembly and its components.
You can:
|
|
For example: You wish to insert a new part into an assembly
to replace an existing part. You can check out the assembly, and copy all
the parts to your desktop, except the part you wish to replace. For that
part, choose the No Operation icon
![]() .
.
When you click OK, the assembly will be checked out of the vault, and all the children except one will be copied to your desktop. In SmarTeam, you can replace the old part with a new part at your desktop to see how it affects the assembly as a whole.
Checking Out an Assembly (from CATIA) |
|
If an assembly is displayed at your desktop in read-only mode, you can choose to check it out in order to modify it. SmarTeam enables you to do so.
-
Display the assembly in CATIA (in read-only mode).
-
To check out a document: Select a document (assembly or part), in SmarTeam menu, select Life-Cycle > Check Out .
-
In the displayed Check Out window, fill in the fields.
Check Out windows display SmarTeam information as set in the Tree Properties dialog box. For more information, see Customizing SmarTeam Document Display Information. -
Click OK.
At your desktop, you can view the assembly and its components. Those documents that were checked out may be modified. After you modify the document, remember to apply the SmarTeam > Save command.
Checking Out an Assembly from a SmarTeam Dialog Box |
|
If an assembly is checked in to a vault, and it is not currently displayed at your desktop (in read-only mode), you must locate the assembly and then select File Operation > Open For... contextual command to launch it into CATIA and modify it.
In the displayed Check Out window, you can right-click to display a dropdown menu which provides several life cycle options. These life cycle options can assist you in managing your assembly. See Life Cycle Options for details.
-
Run a search to locate the assembly that you wish to check out.
-
Right-click the assembly and select File Operation > Open For...
The Open dialog box is displayed. By default, the Open as read-only option is selected.
-
Check the Open for edit option.
Click OK.
The Check Out: CATIA Product dialog box appears.
On the left-hand side of the window, the Check Out icon appears next to the assembly and the Copy File icon appears next to the components.
The default operation for the components (Check Out or Copy File) is determined by the administrator.
Checking out All the Components of a Product
-
To check out not only an assembly (here CATPRD-0042 Hack_Saw) but also all its components, you need to use the Propagate Operation contextual command. This checks out all the documents simultaneously.
-
For more information, see Life Cycle Options.
Checking out Components Individually
-
To check out an assembly and some of its components, you can define an operation for each component as follows:
Either:
-
Right-click on the icon of a document to display a list of options.
This list differs for each life cycle operation, as shown below:

Or, more simply,
-
Click on the icon of the document to choose an operation.
The icon toggles between three states:
Example
In the following example, double-click the icon
 in front of CATPRD-0043 a.0
Support if you wish to check it out:
in front of CATPRD-0043 a.0
Support if you wish to check it out: 
Once done, the Check out icon
 indicates that the document
is selected for being checked out.
indicates that the document
is selected for being checked out. -
-
Fill in the fields in the displayed revision window, and click OK.
-
If any of the link is modified while executing the check out operation on the component in session, then its linked document will get Check out on the Fly provided the linked documents are in Checked In/Released State.
|
|
 Using Undo Check Out
Undo Check Out command enables you to undo the last checked out operation on the selected document such that the document status reverts back to either the Checked In or Released status. If you propagate the Undo Check Out on the selected document, the operation is performed on all the linked documents that are in Checked Out state.
To undo check out a document, right-click the required document (containing at least one linked documents) and select SmarTeam > Life Cycle > Undo Check Out.
The Undo Check out dialog box appears.

-
Click Yes.
The linked documents are in Checked-In state indicating that the Undo Check Out propagation is successful.
A warning message appears if some of the documents (propagated for undo check out) are not unloadable. However, you can continue with this operation for the remaining documents. -
Click No.
The Undo Check Out operation is performed only on the selected document.
Note: You cannot do the following:
-
Perform the Undo Check Out operation on multiple selected documents.
-
Propagate the Undo Check Out operation on the selected document, if the linked documents are not available in the current session.
|
|
Checking In/Releasing an Assembly
If it is the first time you are checking in the part see Checking In a Product for the First Time.
SmarTeam provides two methods for checking in or releasing an assembly:
Note: The Check In (and Release) operation requires saving all components that are undergoing Check In (or release), along with their pointed documents. |
For information on the Release operation, refer to Releasing CATIA Parts, Drawings and Assemblies.
To check in an Assembly
-
From the SmarTeam menu, point to Life Cycle and choose Check In.
The Check In window is displayed. On the left side of the window, the assembly and its components are displayed. -
You can either:
-
check in all the documents together:
-
handle each component individually:
-
Checking in All the Components of a Product
-
To check in all the documents together, right-click and choose Propagate Operation.
The Check In icon is displayed next to each component in the tree. -
Fill in the fields in the Check In window (optional).
-
Click OK.
The assembly and its components are checked in to the vault. The documents are removed from work as well as from CATIA Session. The assembly editor is closed provided no selection to Keep local copy in the Life Cycle panel for the root document.
Checking in Components Individually
-
To handle each component individually:
Either:-
Click on the icon of a document to display a list of options.
This list differs for each life cycle operation, as shown below:
Or, more simply,
-
Click on the icon of the document to choose an operation.
The icon toggles between three states:
-
-
Complete the fields in the displayed window.
-
Click OK.
- Checking in an individual Part: In an assembly, when you Check
In an individual part which is not pointing to any other component,
only that part gets saved and Checked-In in SmarTeam.
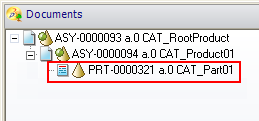
For example, in the following assembly, the CAT_Part01 is modified.
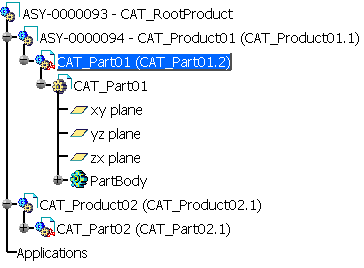
When you Check In this part, only this part gets saved and Checked-In in SmarTeam as shown below:
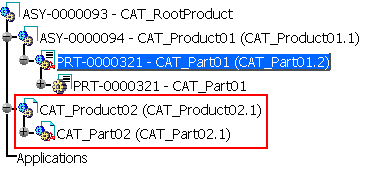
You can verify it in the Profile Card of the assembly that the Check In icon appears only for CAT_Part01 and CAT_Product02 does not appear in SmarTeam as shown below: