-
Save: Saves the document into the SmarTeam database.
-
Save As: Saves the document into the SmarTeam database and defines the project and the parent folder of the document. For example, you can save the new part as a child of the Beta Parts Folder in the Drive Shaft project.
-
Save As Type: Saves the document into the SmarTeam database in a different format and optionally links it to the master CATIA document used to create this document.
Note: This option appears only for CATIA Part, CATIA Product, CATIA Shape and CATIA Drawing documents already saved in SmarTeam.
After you choose a SmarTeam Save option, a CATIA part Profile Card is displayed. After you fill in the attribute fields and click OK, the part is saved in the SmarTeam database.
![]() Although
it is possible to save different document types in the SmarTeam database
using SmarTeam Save Editor or Web Editor capabilities,
you must use CATIA SmarTeam > Save to save the different
CATIA documents in the database.
Although
it is possible to save different document types in the SmarTeam database
using SmarTeam Save Editor or Web Editor capabilities,
you must use CATIA SmarTeam > Save to save the different
CATIA documents in the database.
This section shows you different tasks involved when saving a part:
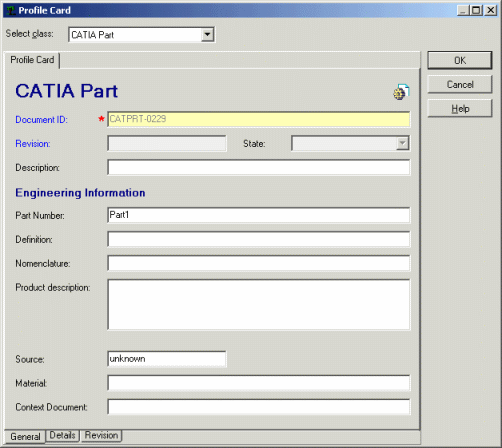
Profile Card
Your administrator may customize the Profile Card (see Chapter 3, "Modifying a Profile Card" of the SmarTeam Administrator's Guide). This window will reflect the appearance of the Profile Card used in your SmarTeam application.
If you choose to work in Batch Mode Save mode (by checking the Batch Mode Save option from the SmarTeam menu), a new Profile Card is not displayed. Instead, the part is saved in the SmarTeam database with the default attributes. You can update the Profile Card attributes at any time.
In the Profile Card, the following information is displayed automatically:
|
 |
|
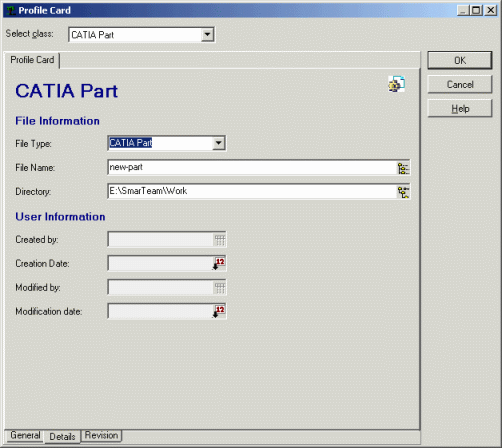 |
SmarTeam enables you to define the following information in the Profile Card:
|
Saving a Part for the First Time |
|
-
In CATIA V5, create a new part.
-
From the SmarTeam menu, choose Save.
The Project Manager dialog box appears. In this window you can define the project and the parent folder to which the document belongs.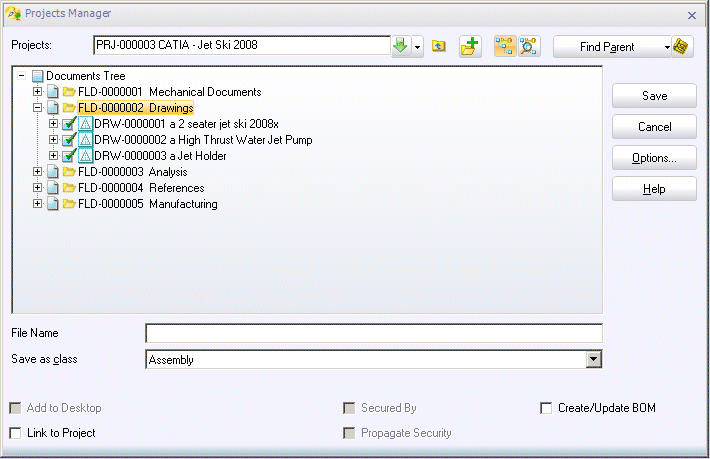
If the document is already saved, the CATIA file name is displayed.
You can define the level of sub-branches displayed in the project selection tree and/or the document selection tree.If you leave the file name field empty, when clicking Save an automatic file name will be generated.
-
Click the
 icon
and choose a project from the Projects Tree dropdown list that appears.
The part will be saved as a document in the selected project.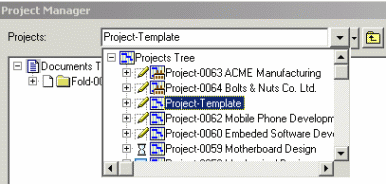
-
Choose a parent folder from the Document Tree. The part will be saved as a child of the selected parent folder.
The classes displayed in the dropdown list are defined by your administrator.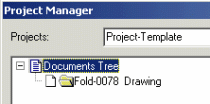
-
Select the Add to Desktop check box to ensure that the document will be placed on Project desktop.
Select the Secured By check box to ensure that the object you select is linked to the project and receives security settings according to the Link to Project settings defined for the entire project.
Note: When the database contains Project-based security and you assign "Secured by
Project" for a leaf class (but not for a super-class), the Secured By checkbox in
the Project Manager window is disabled.
-
Select the Link to Projects checkbox to link the part directly to a project.

-
Click Save.
The Profile Card window is displayed with a CATIA part Profile Card, as shown above.
It is recommended to enter a name for the part in the Description attribute. -
If you wish to save the part to a different class, click the arrow to the right of the Save as class field and choose a class.

-
Select the tabs to review default information about the file.
-
Select the Details tab. If the document is new, the File Name field is empty.
There are two ways to save: Either you give your part a file name or you let the Save function define a name for your part.
If you leave the field blank, the name is built using the CN_ID attribute. -
Specify the attributes for the part.
-
Click OK.
SmarTeam - CATIA Integration automatically saves your file to the database, giving it a unique identity, where it can be easily found for later use.
By default, the text entered in the Description field is displayed in the tree browser next to the ID number. It is useful to assign a meaningful name to the document in the Description field.
If you now want to check in the document, see Checking In a Part.
Creating a Folder in a Project or in an Existing Folder
When saving a part, you may create
a new folder and save the part to this folder. The Create Folder
![]() button is enabled when you select either a project or a folder and it is
not available when you select a document.
button is enabled when you select either a project or a folder and it is
not available when you select a document.
Creating a Folder in a Project
-
Select a project from the Projects dropdown list.
-
Select the Documents Tree node and then click
 . A
profile card for the new folder is displayed.
 -
Fill in the attributes in the folder's profile card.
If the folder is created as the child of a project, the folder is automatically set as a desktop object.
If the folder is created as a child of another folder, the folder will not be set as a desktop object.
Note: This default setting can be overridden by the user.
Creating a Folder under an Existing Folder
Perform the procedure described above, selecting a folder rather than a project in Step 1.
Add to desktop
-
Add to desktop: The Add to desktop check box will be available only when the Link to Project option is checked.
-
Secured by: Select the Secured by check box when using Project-based security.
![]() When
you mark the Secured by
check box, the Link to Project check box is marked and
will be disabled for changes.
When
you mark the Secured by
check box, the Link to Project check box is marked and
will be disabled for changes.
Saving a Part After Modifications |
After a part is added to the SmarTeam database, you are likely to modify the part in CATIA many times. Each time you modify the part, you must save it using one of the SmarTeam Save options.
|
-
Open an existing part in CATIA V5.
You can run a search to locate the part and then launch it directly into CATIA V5. -
From the SmarTeam menu, choose Save.
The part is saved in SmarTeam and its Profile Card is updated accordingly. -
You can define the level of sub-branches displayed in the project selection tree and/or the object selection tree. Click Options to display the Save Options window and click the Tree Setting tab.
-
Check the appropriate checkboxes.
Alternatively, you can do as follows:
-
Choose Save As.
The SmarTeam Save As window is displayed. -
Choose a project from the Project Tree. The part will be saved as a document in the selected project.

-
Choose a parent folder from the Object Tree.
The part will be saved as a child of the selected parent. -
Click Save.
The part (together with its hierarchical links) is saved in SmarTeam and its Profile Card is updated accordingly.
Saving a Part as a Different Type |
The Save as Type option saves the current document into the
SmarTeam database in a different format and optionally links it to the
master CATIA document used to create this document. This safely saves the created
document to SmarTeam, eliminating the possibility of mistakes when manually defining the file type and linking it to a specific revision.
As a result, a new object is created in SmarTeam that represents the created format, with the correct behavior (according to the selected format), and is linked to the original format (if this option is selected).
All this is done from within CATIA, without the need for additional
operations in SmarTeam - Editor.
Note: This option appears only for CATIA Part, CATIA Product, CATIA Shape and CATIA
Drawing documents already saved in SmarTeam. This functionality is
disabled when the user overrides the Save As dialog with the SmarTeam
Save As dialog.
-
From the SmarTeam menu, choose Save as Type....
The Save as Type... dialog box appears.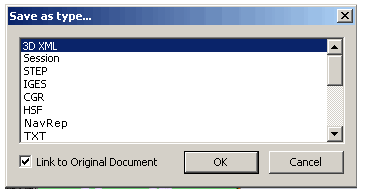
-
Select the file type.
Click OK.
-
Select the Link to Original Document check box to link the current file to its original document.
-
The Project Manager window appears. The name of the file shown in the File Name field is in the following format:
<Original File Name>.<Original File Extension>.<Destination File Extension> -
Type a new file name if required. The .cgr extension is added automatically.
The Object and CATIA Exchange link are created. The direction of the link is from the original object to the exported object.
-
In the Tool name box, type IGES or STEP.
For a complete list of the available file types, see Available File Types.
To specify that the Link to Original Document check box will appear checked by default, set the CATIA.LinkToOriginalDoc key to Yes.
Enabling Save as Type
-
Verify that all required file types appear in Application Setup. If file type does not appear, create the file type you want.
-
To enable the Save as Type functionality in CATIA integration, modify the SmarTeam database using the SmarTeam Data Model Designer (DMD).
-
Assign class mechanism to class or classes where converted files will be stored (for example, Exchange class). Refer the following table for the available file types:
Class Mechanism File Extension File Type 3DMAP 3DMAP 3DXML .3dxml 3DXML CATIA Model CATIA Model CATIA Representation .cgr CATIA cgr HSG .hcg HSG IGES .igs IGES NavRep .NavRep NavRep STEP .stp STEP STL .stl STL VPS .vps VPS HSF .hsf HSF Session .session Session TXT .txt TXT VRLM .wrl VRML DXF .dxf DXF AutoCAD Document .dwg AutoCAD CGM .cgm CGM SVG .svg SVG GL2 .gl2 GL2 PS .ps PostScript PDF .pdf PDF Image Document .tif Image
Saving a Part with its Associated Design Table
-
Create a basic part.
-
Click the Design Table icon
 to
create a design table for the part.
To know how to create a design table, see the Knowledge User's Guide. -
Once created, save the Excel file as well as the design table you generated.
-
Now, to save these documents in SmarTeam, click the Save icon
 or SmarTeam>Save.
This declares the two documents i.e. the part and the Design Table, and saves them in the database. The Project Manager dialog box appears.
-
Click Save.
The Profile Card dialog box appears for the part. -
Click OK.
The Profile Card dialog box now shows information specific to the Design Table: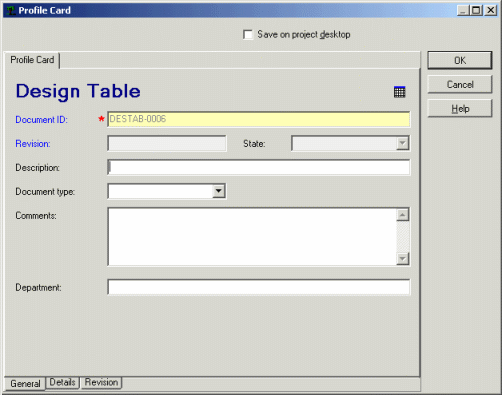
-
Click OK.
-
By default, you cannot see the link between the part and its design table. To visualize it, right-click the part and select Associated Objects > CATIA Links.
-
In the window that appears, choose CATIA Design Table.
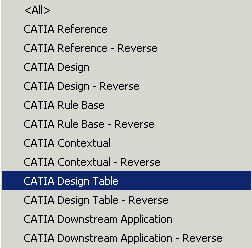
You can now see the link between the CATIA part and the Design Table:

Viewing CATIA Links in the Design Table
When you save a CATIA design table (Microsoft Excel) to SmarTeam, the table is assigned CATIA Design Table behavior. When you browse to this CATIA design table, CATIA links are visible in the profile card Link tabs.
When you create a table and save it to SmarTeam, perform a Check In or Release operation using the SmarTeam – Excel integration and then connect it to a CATIA document, a link is created when the CATIA document is saved to SmarTeam.
Note: When viewing the table object in SmarTeam, the CATIA links are not visible. This occurs because a checked in or released design table cannot be updated with CATIA behavior in SmarTeam. Therefore, the Check Out/New Release operation should be performed on the table object before saving the CATIA document to SmarTeam.