You will:
- Start the Command
- Define the Numbering Parameters
- Create or Select an Existing Profile
- Select a Product
- Add Columns
- Save the Bill Of Material
Administrators can find information about the profiles here.
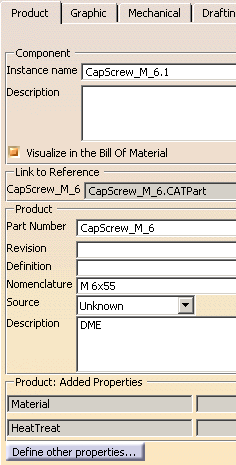
In Mold Tooling Design, the following information is visible in the Product Properties of the tooling component:
- The supplier reference, visible under Nomenclature,
- The name of the supplier is visible under Description,
- The definition of the material and heat treatment, visible under Added Properties.
The generation of the Bill Of Material is based on the following rules:
- The Bill Of Material is generated from a product, generally the root of the Tooling project.
- A profile can be used to load and store the general environment of the Bill Of Material for a given project.
- Only components where the check box Visualize in the Bill Of Material is selected are taken into account.
- Deactivated components are not taken into account.
- Components that have the same reference (Nomenclature) receive the same numbering and enrich the quantity of this reference, even if the V5 reference of the part/product is different.
- When no reference (Nomenclature) is defined, the instances of the component receive the same numbering and the quantity is equal to the number of instances.
- Since the management of the Bill Of Material is based on the instance name, do not modify instance names between two generations of a Bill Of Material.
- Do not use the delimiter character “;” in the name of:
- The Part Number and Instance name of a component.
- User property to associate with a column.
- A column.
Start the Command
-
Select Analyze > Tooling Bill Of Material.
The Bill Of Material dialog box appears.

Define the Numbering Parameters
The Numbering parameters define the information required to
generate the Bill Of Material.
Define them before selecting a product.
-
Under Numbering, select a Mode to define the type of numbering:
- Integer:
Start Number and Increment let you define the way of numbering. - Letters:
Start Number and Increment are deactivated.
Labels A to Z then AA to ZZ… are generated (upper case).
To respect ISO norm (AP203 format), letters I, O, Q and X are never used.
- Integer:
-
Still under Numbering, Existing Numbers defines how to consider an existing numbering when updating a Bill of Material.
These options become available after you have selected a profile.- Select Keep to keep the existing numbering.
If necessary, new numbers will be created to complete the existing numbering. - Select Replace to replace the existing numbering.
- Select Keep to keep the existing numbering.
-
Still under Numbering, select the Sort by Component Type check box to sort the Bill Of Material by type of components, with the following order:
- Tooling plates,
- Angle pin,
- Baffle,
- Bushing,
- Cap screw,
- Core pin,
- Countersunk screw,
- Dowel pin,
- Ejector,
- Ejector pin,
- Ejector sleeve,
- Eye bolt,
- Flat ejector,
- Insert,
- Knock-out,
- Leader pin,
- Locating ring,
- Locking screw,
- O-ring,
- Connector plug,
- Retainers,
- Sleeve,
- Slider,
- Spring,
- Sprue bushing,
- Sprue Puller,
- Stop pin,
- Support pillar,
- User component,
- Other components with no tooling component type
Create or Select an Existing Profile
We recommend that you work with a profile.
Two types of profiles are available:
- The Reference Profile, which sets the format of the Bill
of Material.
For example, when you select a Reference Profile, the Numbering parameters are set automatically as specified in the Reference Profile.
The Reference Profile is usually created by an administrator, by editing a Work Profile.
See Advanced Information About Reference Profile for more information. - The Work Profile, which is a kind of temporary Bill Of Material generated by the command, used to keep the information required to update a Bill Of Material in the future.
-
Click Work Profile.
-
In the File Selection box that appears, go to the directory where you want to save the Work Profile and enter its name.
Click Open. -
Click Yes in the message box asking you if you want to create the Work Profile.
The path and name of the profile appears as the Work Profile.- It initializes the numbering and the management of columns.
- It stores the information of the Bill Of Material for a given project, for a future update.
- It is completely generated when you click Close.
-
Click Reference Profile.
-
Select the Reference Profile in the first File Selection box that appears. Click Open.
Its name and path are displayed next to the corresponding button. They are editable.
In particular, you can erase the content of this field if you decide not to use this file.
To load an existing Work Profile:
-
Click Work Profile.
-
In the File Selection box that appears, go to the directory containing the profile and select it.
The Work Profile is loaded.
Its name and path are displayed next to the corresponding button. They are editable.
In particular, you can erase the content of this field if you decide not to use this file.
- When a Reference Profile is defined without a Work Profile, the Reference Profile initializes the numbering and the management of columns.
- When a Reference Profile and a Work Profile are defined, the Reference Profile is always copied as Work Profile.
- If you had already selected a Work Profile (or a Reference Profile, and a Work Profile), selecting a new Work Profile will replace the one previously selected.
- If the profiles are not valid, a message will describe the problem.
Select a Product
-
Select a product in the specification tree, generally the root of your tooling project.
The available information about this product is displayed under Bill Of Material, organized in columns.
Add Columns
Columns define the controls to manage the final display of the Bill Of Material.
Those columns are related to the Properties of the components
There are fixed columns:
- Number: The number of the component.
- Quantity: The quantity of identical components.
- Part Number: The part number of the component (the name of its reference). When several components have the same reference, the Part Number of the first component reached is displayed.
- Reference: The reference of the component (Nomenclature).
- Mold Reference: for tooling plates, the reference (value of parameter named RefMold) of the mold base.
- Supplier: The name of the supplier (Description).
- Material: The material of the component (Added Properties > Material).
- Source: The source of the component (Source = Unknown/Made/Bought).
- Heat Treatment: The heat treatment of the component (Added Properties > HeatTreat).
- Unit Price: The unit price of the component.
This column is editable in order to define the unit price of each component.
When the component contains a parameter of type real and named UnitPrice, its value is put in the corresponding cell. - Price: The total price of a component.
This total price is computed by V5. It is equal to Unit Price*Quantity.
Once you have selected a product, you can add columns (up to 50).
-
To add a column:
-
Type its name in the field between Add and
Editable.
You cannot add a column with an existing name.
Hit Enter, Add becomes available.

-
Clear or select the Editable check box according
to your needs:
you can use an editable column to enter information. -
Click Add.
The column is added to the right, under Bill Of Material.
-
Type its name in the field between Add and
Editable.
-
To add a column from user property.
The user property can be of any type.
The added column contains the value of the selected user property for each component (if this user property is defined for the component).-
Type its name in the field on the right of Add from
User Property.
You cannot add a column with an existing name.
This type of column is not editable.
Hit Enter, Add from User Property becomes available.

- Click Add from User Property.
The column is added to the right, under Bill Of Material.
-
Type its name in the field on the right of Add from
User Property.
-
Under Bill Of Material, click a column.
The cursor is positioned under this column.
If the column is an added column, an editor field and two buttons (Rename and Delete) appears.
Only Delete is available.
-
Click Delete if you want to delete the column.
-
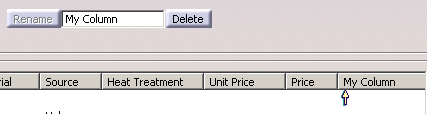
To rename the column:
- Enter a new name and hit Enter.
Rename becomes available. - Click Rename.
- Enter a new name and hit Enter.
For all columns (fixed and added):
-
Select a column.
-
Use the left and right arrows to move a column to another position.
-
Click Hide to hide the column.
-
Once at least a column has been hidden, Display appears, together with the list of the hidden columns.

Select a column from the list and click Display to redisplay it.
Save the Bill Of Material
-
Enter the required prices in the Unit Price column.
(Click the required cell to start the editor).
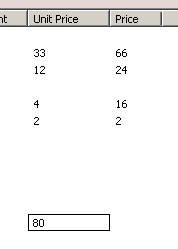
The Price column is updated. -
The Total Price at the bottom is computed.

-
Click Save As... and enter the name and path of the Bill Of Material.
It is a .csv file.
Advanced Information About Profiles
The information below is for advanced users, such as administrators, who need to create a Reference Profile, or to edit a Work Profile.
The Reference Profile and the Work Profile share the same structure, made of three sections delimited by the keywords HEADER, DATA and ASSOCIATION as in the example below:
HEADER;
Mold.1;1;K;0;1;1;
0;1;3;4;5;6;8;1007;1009;10;11;
12;Unique Price;-1;;
2;Very Important;2;Important;
DATA;
1;ClampingPlate.1; ; ; ;
2;CavityPlate.1; ; ;Core = Cavity;
3;CoreSupportPlate.1; ;65; ;
4;RiserBar1.1;5.1; ; ;
5;SettingPlate.1; ; ; ;
6;EjectorPlateA.1; ; ; ;
7;EjectorPlateB.1; ; ; ;
8;CapScrew_M_2.1;12.1;12.1 euros; ;
9;Ejector_EPH_2.1; ; ; ;
10;LocatingRing+Screw_2.1; ; ; ;
11;LocatingRing_R100.1; ; ; ;
12;CapScrew_M.1; ; ; ;
ASSOCIATION;
LocatingRing_R100.1;
CapScrew_M.1;
CapScrew_M.2;
ClampingPlate.1;
CavityPlate.1;CorePlate.1;
CapScrew_M_2.1;
CapScrew_M_2.2;CapScrew_M_2.3;CapScrew_M_2.4;CapScrew_M_3.1;
CapScrew_M_3.2;CapScrew_M_3.3;CapScrew_M_3.4;
LocatingRing+Screw_2.1;
CoreSupportPlate.1;
RiserBar1.1;RiserBar2.1;
SettingPlate.1;
EjectorPlateA.1;
EjectorPlateB.1;
Ejector_EPH_2.1;Ejector_EPH_3.1;
| Line | Contents | Comments |
| 1 | HEADER; | Mandatory It contains the general information of the Bill of Material. |
| 2 | Project instance name;Sort type;Keep/Replace;Integer/Letter;Start integer;Increment; | Mandatory Where:
|
| 3 | ColNFx1;ColNFx2;ColNFx3;ColNFx4;ColNFx5;ColNFx6;ColNFx7;ColNFx8;ColNFx9;ColNFx10;ColNFx11; | Mandatory Number (0 to 60) of the fixed columns
Note:
|
| m | ColNAdded;Column name;Added type;Property name; | One line per added column Where:
|
| n | DATA; | It contains the information of a row of the Bill of
Material. It is absolutely necessary when Existing Numbers is set to Keep. |
| n+1 | Number;Instance name;Unit price;Contents of added 1;…;Contents of added n; | Where:
|
| n+m | Number;Instance name;Unit price;Contents of added 1;…;Contents of added n; | Where:
|
| p | ASSOCIATION; | It contains association between components. It is absolutely necessary to compute the correct quantity of a component. |
| p+1 | Instance name1;Instance name2;…;Instance nameN; | Where:
|
| p+m | Instance name1;Instance name2;…;Instance nameN; | Where:
|
![]()