-
Click Creation Detail Modeling
 in the Operations toolbar.
 -
Select the subdivision surface.
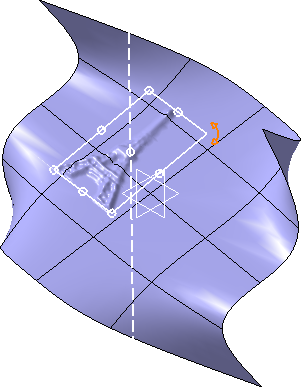
A Tools Palette, a slider, and a detail square shape on the subdivision surface are also displayed.
-
From the tools palette, click File Chooser
 , and select a picture.
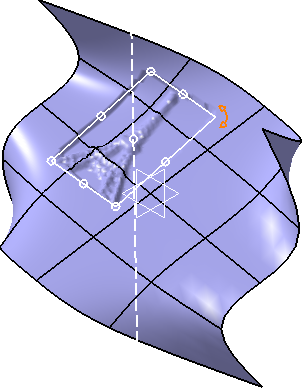
The picture is mapped on the subdivision surface and a hybrid feature Subdivision Hybrid.x is created in the specification tree.
Tips: - Access this command by pressing CTRL+SHIFT+L.
- Drag the picture on the subdivision surface from the file folder.
The tools palette is modified.

The following icons are displayed in the tools palette:-
 Modification:
Selects the picture to be edited.
Modification:
Selects the picture to be edited.You can also access this command by pressing CTRL+SHIFT+H. -
 Remove: Removes the selected hybrid
feature.
Remove: Removes the selected hybrid
feature.You can also access this command by pressing CTRL+SHIFT+S. -
 Remove All: Removes all hybrid
features.
Remove All: Removes all hybrid
features.You can also access this command by pressing CTRL+SHIFT+O. -
Creation Detail Modeling:
Creates a new picture with a new position to choose.
You can also access this command by pressing CTRL+SHIFT+M. -
File Chooser: Selects a picture
or replaces an existing one.
You can also access this command by pressing CTRL+SHIFT+L. -
 Save & Edit Picture: Saves and
edits the original picture. If the picture is a psd
file, a png file will be generated before editing
the picture.
Save & Edit Picture: Saves and
edits the original picture. If the picture is a psd
file, a png file will be generated before editing
the picture.You can also access this command by pressing CTRL+SHIFT+P. -
 Update
Picture: Reloads the edited picture or the
original picture if it has not been edited. If the
picture is a psd file, a png file will be reloaded.
Update
Picture: Reloads the edited picture or the
original picture if it has not been edited. If the
picture is a psd file, a png file will be reloaded.
You can also access this command by pressing CTRL+SHIFT+Q. -
 Reverse U,
 Reverse V,
 Reverse Z: Modifies the
picture orientation.
Reverse Z: Modifies the
picture orientation.You can also access this command by pressing CTRL+SHIFT+U. -
 Edit Amplitude: Modifies the
amplitude value.
Edit Amplitude: Modifies the
amplitude value. -
 Color Zero / Detail: Defines either
the amplitude or the detail level using the slider.
By default, the icon is set to Detail.
Click the icon to switch to Color Zero.
Color Zero / Detail: Defines either
the amplitude or the detail level using the slider.
By default, the icon is set to Detail.
Click the icon to switch to Color Zero.You can also access this command by pressing CTRL+SHIFT+Z. -
 Drawing View: Turns the picture view.
You can also access this command by pressing CTRL+SHIFT+X. -
 Apply (Enter):
Applies the command.
Apply (Enter):
Applies the command.
-
Use the handles on the square shape to perform the following operations:
- Modify its amplitude
- Modify its size
- Move it on the surface
- Rotate it
- Translate it

Notes: - The center of the detail corresponds to the point picked on the surface and its orientation is normal to the surface.
- You can restore the initial parameters by pressing Ctrl and clicking the affinity handle.
- You can press Shift while manipulating to only move the square shape. The image is moved once you release the Shift key.
-
Use the slider to modify the precision and quality level.

-
Click Color Zero / Detail to switch to Color Zero and use the slider to modify the grey value and define the amplitude.
-
Click Apply
to apply the changes.
The Detail Mapping.x feature is created in the Subdivision Hybrid.x node in the specification tree.Notes: - A message may appear when selecting the picture to allow its compression.
- You can create several hybrid features. If two mapping zones overlap, a message appears and the zones are displayed with different colors. Cut the subdivision surface in the middle to have two separate zones.
- If a picture is mapped onto a closed surface, the detail may be truncated or twisted.
![]()