You can create parametric primitives and customize them.
-
From the Creation section of the action bar, click Parametric Primitive
 .
.
The Tools Palette is displayed. The default primitive, a box, is previewed.

The following icons let you create a primitive: -
 Rectangle Primitive
 -
 Circle Primitive
 -
 Polygon Primitive
 -
 Ring
Primitive
Ring
Primitive -
 Sphere Primitive
 -
 Cylinder Primitive
 -
 Box
Primitive
Box
Primitive -
 Pyramid Primitive
 -
 Torus
Primitive
Torus
Primitive -
 Tube
Primitive
Tube
Primitive -
 Prism Primitive
The following icons are available in the tools palette: -
 Transformation in 1 Direction: Associates the
dimension according to one direction. Click
Transformation in 1 Direction: Associates the
dimension according to one direction. Click
 to switch to synchronize the transformation in all three
directions (for a 3D primitive) and
to switch to synchronize the transformation in all three
directions (for a 3D primitive) and
 in two directions (for a 2D primitive). This is available
for all the primitives.
in two directions (for a 2D primitive). This is available
for all the primitives. -
 Sharp Attraction: Adds weight to the edges of the
primitive. Click
Sharp Attraction: Adds weight to the edges of the
primitive. Click
 to switch to the Smooth Attraction mode.
 -
 Position on Center: Places
the primitive at the center of the reference position. Click
Position on Center: Places
the primitive at the center of the reference position. Click
 to place the primitive at the bottom of
the reference position or
to place the primitive at the bottom of
the reference position or
 to place on top.
This is available for all three dimensional primitives.
to place on top.
This is available for all three dimensional primitives. -
 Initial Angle: Reverts to the initial angle of the primitive.
-
 Cutting Mode: Defines the number
of sections or cuts. Press Alt to switch from the
manipulation of the size to the selection of the cut. The selection type
appears at the level of the help text.
Cutting Mode: Defines the number
of sections or cuts. Press Alt to switch from the
manipulation of the size to the selection of the cut. The selection type
appears at the level of the help text. -
 Conical Mode:
Sets a conical ratio. This is available for only cylinder,
box, tube, and prism primitives.
Conical Mode:
Sets a conical ratio. This is available for only cylinder,
box, tube, and prism primitives. -
 Edition: Modifies data specific to each type of
primitive.
Edition: Modifies data specific to each type of
primitive. -
 Mesh View:
Hides or shows the mesh.
Mesh View:
Hides or shows the mesh. -
 Selection: Lets
you select a reference element to position the primitive.
Selection: Lets
you select a reference element to position the primitive. -
 Apply (Enter):
Applies the command.
Apply (Enter):
Applies the command.
-
-
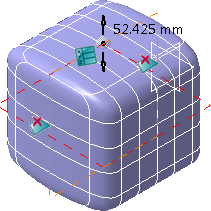
Click
to create a box primitive.
The box primitive is previewed. On each surface you can see control points at which dimension is displayed. -
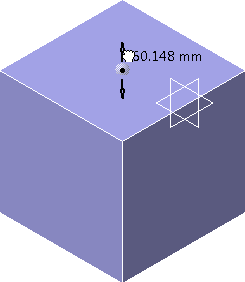
Click Transformation in 1 Direction
and drag a control point to transform the primitive.Original Primitive Transformation in 1 Direction Transformation in 3 Directions 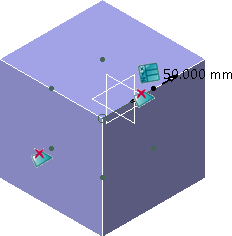
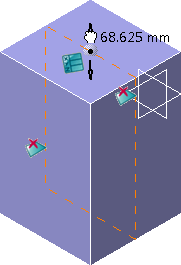

Tip: Click Edition
in the Tools Palette to open the data dialog box and
modify the data of the primitive precisely. -
Click Cutting Mode
to define the
number of sections or cuts. Use the slider to set
the number of sections. Tip: Click
to open the Cut Primitive dialog box and enter a
value precisely.
Notes: - The number of sections for the circle, sphere, cylinder, and torus primitives are always even. This is to avoid generating triangular faces.
- The maximum number of sections for the polygon, pyramid, and prism primitives is 17.
- The maximum number of sections for the circle, sphere, and the cylinder primitives is 34.
-
Click
 to remove a face. Click
 to add the face again.
 Note: You cannot remove both the top and bottom faces simultaneously. -
Click Sharp Attraction
to switch to Smooth Attraction mode and remove weight off the
edges of the primitive.With weight Without weight 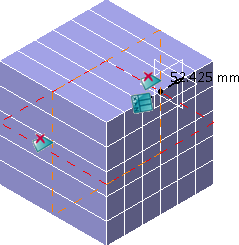
- Click Conical Mode
. Use the slider to set the conical ratio.
Tip: Click
to open the Conical Ratio dialog box and enter a
value precisely.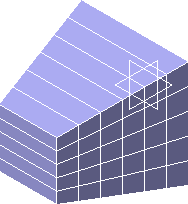
- Click Position on Center
to change the position of the
primitive with respect to the reference position.
- Click Apply
to apply the changes.
![]()