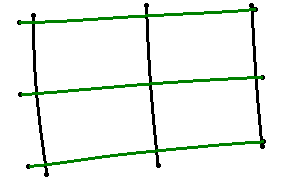
This task shows you how to create a subdivision surface, based on an existing set of curves (the net).
Create a shape containing
several curves. They can be any kind of curves: IMA curves, 3D curves,
border of a face, and so on.
You can also open the
NetSurface.CATPart
document.
 |
-
Click Net Surface
 in the Creation
toolbar.
in the Creation
toolbar.
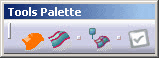
You can also access this command by pressing ALT+SHIFT+N. A Tools Palette is displayed:
Option Description Shortcuts  Guides Selection
Select the guides (selected by default). Ctrl + Shift + U  Profiles
Selection
Profiles
SelectionSelect the profiles. Ctrl + Shift + V  Net
Feature
Net
FeatureCreates the surface with links to the input curves. Ctrl + Shift + Z  Subdivision Feature
Create the surface without any link to the input curves. Ctrl + Shift + Z  Apply
ApplyApplies the command. -
Click Guides Selection
.
By default, it is selected. -
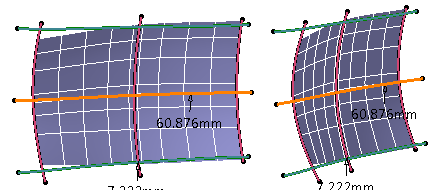
Select the guide curves (horizontal curves).
The net surface is dynamically previewed: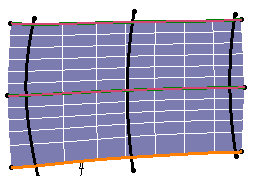
-
Click Profiles Selection
. -
Select the profile curves (vertical curves).
The net surface is dynamically modified: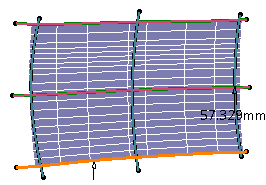

The value shown in the 3D area corresponds to the maximum deviation between the generated surface and the selected profile and guide curves and is displayed at the point where this deviation has been computed. New icons appear in the Tools Palette:

Option Description Shortcuts  Swap Curves
Swap guide curves with profile curves and vice-versa. Ctrl + Shift + I  Best Solution
Gives the best solution in both guide and profile directions. This command is available only when Subdivision Feature
is selected.Ctrl + Shift + B  Face Number for Guide
Defines the number of faces for each guide using a slider. Ctrl + Shift + W  Face Number for Profile
Defines the number of faces for each profile using a slider. Ctrl + Shift + Y -
Click Swap Curves
.
-
Click Best Solution
.
The best solution in both guide and profile directions is displayed: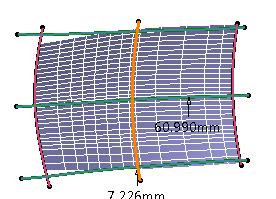
This capability may generate important number of faces or profiles. To decrease or increase them, use the Face Number for Guide
and the Face Number for Profile
commands. -
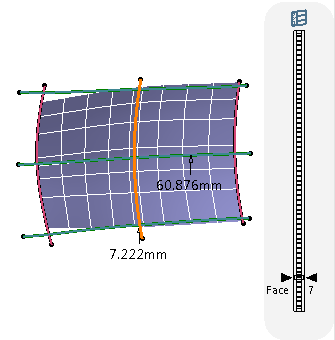
Click Face Number for Guide
.
The Value Edition icon appears in the Tools Palette
and a slider is displayed at the right of the screen to let you define
the number of faces in the guide direction. The maximum number of faces
is defined by default.
icon appears in the Tools Palette
and a slider is displayed at the right of the screen to let you define
the number of faces in the guide direction. The maximum number of faces
is defined by default.
You can also drag the slider to increase or decrease the number of faces.The minimum number of faces in the guide direction corresponds to the number of profile curves - 1.
-
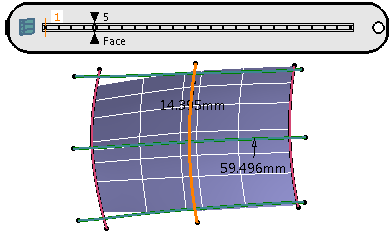
Click Face Number for Profile
.
The Value Edition
icon appears in the Tools Palette
and a slider is displayed at the top of the screen to let you define the
number of faces in the profile direction. The maximum number of faces is
defined by default.
You can also drag the slider to increase or decrease the number of faces.
The minimum number of faces in the profile direction corresponds to the number of guide curves - 1.
- Click
Apply
to validate the command.
The subdivision surface is created.
In the specification tree, the created surface appears as Subdivision Net.x if Net Feature is activated. If Subdivision Feature is activated, it appears as Subdivision Surface.x.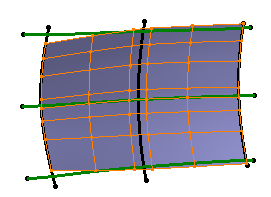
-
Double-click the surface to modify and deform the created surface.
The Tools Palette appears.

- Profile curves must not intersect each other.
- Guide curves must not intersect each other.
- Sometimes the maximum number of given faces may not be reached.
- The created shape may not exactly follow the guide and profile curves.
- If you have selected the border of a surface as the curve input, the resulting subdivision surface will not be continuous in point with the neighboring surfaces.
![]()