More Operating Mode information is available in the Local Healing Basic Task.
Edges to Heal
Displays the list of edges to heal.
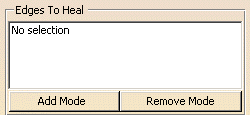
You can edit that list:
- by selecting elements in the geometry:
- Standard selection (no button clicked):
- when you select an unlisted element, it is added to the list
- when you select a listed element, it is removed from the list
- when you select an unlisted element, it is added to the list
- when you select a listed element, it remains in the list
- when you select an unlisted element, the list is unchanged
- when you select a listed element, it removed from the list
If you double-click Add Mode or Remove Mode, the
chosen mode is permanent,
i.e. successively selecting elements will add/remove them.
However, if you click only once, only the next selected element is added or
removed.
You only have to click the button again, or click another one, to deactivate the mode.
- by selecting an element in the list then using the
RemoveSel contextual menu item to remove it from the list
or the ReplaceSel contextual menu item to replace the element by another.
Parameters tab
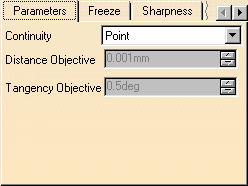
Point or Tangent continuity are available.
Distance to be reached in respect with the point continuity, i.e. the maximum gap allowed between two healed elements.
Available for a Tangent continuity.
Angle to be reached in respect with the tangency continuity, i.e. the
maximum allowed tangency deviation
allowed between healed elements.
Those two objectives can be deduced from an analysis, such as
Surface Connection Checker.
Freeze tab
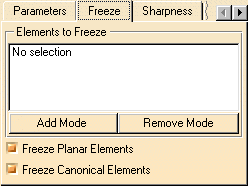
This tab lets you freeze elements, i.e. define elements that will not be modified.
By default, no element is frozen. You can either select specific elements to freeze, or select automatically all planar elements or all canonical elements:
-
- Select the elements to freeze. These are elements that should not be affected by the healing operation.
- You cannot freeze edges to be joined. If you want to do so, you first need to freeze the faces.
- You can edit the list as described above for the Edges to Heal
- Freeze Planar elements:
- When you select this check box, all planar elements found in the selection to be healed are frozen.
- This option is inactive on edges adjacent to surfaces that are not continuous.
- Freeze Canonical
elements:
- When you select this check box, all canonical elements (including planar elements as they are canonical elements) found in the selection to be healed are frozen.
- This option is inactive on edges adjacent to surfaces that are not continuous.
Sharpness tab:
Available for a Tangent continuity.
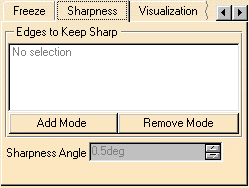
Sharpness is available for a Tangent continuity.
Provided the Tangent continuity mode is active, you can retain sharp edges, by clicking the Sharpness tab, and selecting one or more edges.
Defines the sharp edges that must remain sharp.
You can edit the list as described above for the
Edges to Heal
Allows to redefine the limit between a sharp angle and a flat angle (the
maximum value).
This can be useful when offsetting the resulting healed
geometry for example.
By default this angle value is set to 0.5 degree.
Visualization tab:
Enables you to better understand the discontinuities in the model and the
results of the healing action.
It lets you define the way the messages are displayed on the healed
element.
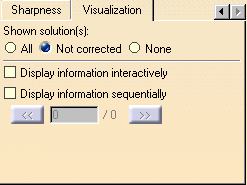
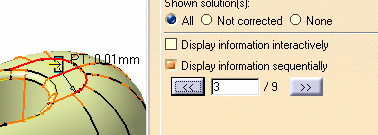
Check the required option to display all solutions (All),
or the edges that are not corrected (Not
corrected),
or to display nothing (None).
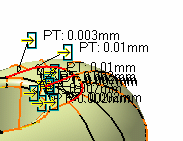
All the messages, that is to say the messages indicating
where the discontinuity remains as well as those indicating
where the discontinuity type has changed (in point (PT) and tangency (^))
Shown solution(s): All
-
By default, both the symbols
 or
or
 and the information text
are displayed:
and the information text
are displayed:  ,
,
on all edges. For a better comfort, you can:-
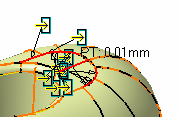
Display information interactively: Only the symbols
or
that point on each edge
processed are visible.
The information text appears as you move the cursor over the symbol.
-
or Display information sequentially. In this case, the counter below indicates the rank and the total number of solutions.
Click the << or >> to display the information on a given edge (symbol and text).
If you combine both options, only one edge is highlighted with one symbol
Place your cursor on that symbol to display the information text and push the arrow to go to the next edge.