The Functional Edge Fillet command allows you to fillet the edges at the intersection of the functional features. You can select edges, faces, or a whole feature.
This task shows you how to:
Create Fillets at the Intersection of Several Features
-
Click Functional Edge Fillet
 in the Dressup & Modifiers toolbar (Functional Fillets
sub-toolbar).
in the Dressup & Modifiers toolbar (Functional Fillets
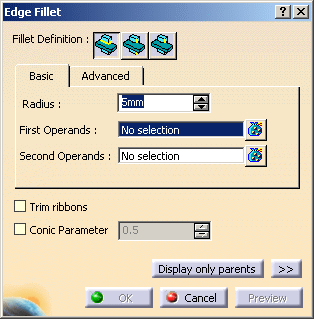
sub-toolbar).The Edge Fillet dialog box appears.
-
Click Create fillets at the intersection of several features
 as Fillet Definition.
 -
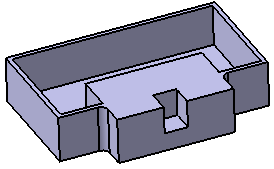
In the First Operands box, select Shellable Prism.1 from the specification tree.
-
In the Second Operands box, select Added Prism.1 from the specification tree.
-
In the Radius box, type the value or use the arrows to change the value of the radius to 3mm.
-
Click More>> for more information.
-
Click OK to confirm the operation.
The fillets are applied on the edges at the intersection of the selected functional features as shown below. A new feature (identified as Edge Fillet.x) is added to the specification tree under the Solid Functional Set.x node.
Create Fillets on Full Edges
-
Click the Functional Edge Fillet
.The Edge Fillet dialog box appears.
-
Click Create fillets on full edges
 as Fillet Definition.
 -
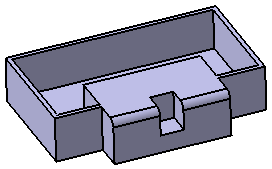
In the Object(s) to fillet box, select the edge as shown below.

-
In the Radius box, type the value or use the arrows to change the value of the radius to 3mm.
-
Click More>> for more information.
-
Click OK to confirm the operation.
The fillet is applied on the entire edge as shown below. A new feature (identified as Edge Fillet.x) is added to the specification tree under the Solid Functional Set.x node.
Create Fillets on Relimited Edges
-
Click the Functional Edge Fillet
.The Edge Fillet dialog box appears.
-
Click Create fillets on relimited edges
 as Fillet Definition.
 -
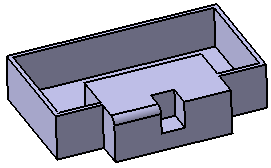
In the Object(s) to fillet box, select the same edge as indicated in the above scenario.
-
In the Radius box, type the value or use the arrows to change the value of the radius to 3mm.
-
Click More>> for more information.
-
Click OK to confirm the operation.
The fillet is applied on the edge till the limitation created by the cutout as shown below. A new feature (identified as Edge Fillet.x) is added to the specification tree under the Solid Functional Set.x node.
More about Edge Fillet Dialog Box
Propagation
Two propagation modes are available:
- Minimal: edges tangent to selected edges can be taken into account to some extent. The application continues filleting beyond the selected edge whenever it cannot do otherwise.
- Tangency: tangencies are taken into account so as to fillet the entire edge and possible tangent edges.
Advanced Options
Selecting Advanced tab displays two additional options:
Edges to keep
When filleting an edge, depending on the radius value you specified the fillet may affect other edges of the part that you do not want to fillet. In case you can anticipate such a result, before confirming the Fillet operation, specify the edges you want to exclude from the operation by selecting in the Edge(s) to keep box.
Limiting Elements
The Limiting element option lets you intersect the fillet with one or more planes. You can use the contextual commands available for creating limiting elements by right-clicking in the Limiting element box. You can select points as limiting elements. These points must be located on the edge to be filleted and they must have been created using the On curve option available in the Point Definition dialog box.
Trim Ribbons
You can trim the fillets to be created by selecting the Trim ribbons check box.
Conic Parameter
The Conic Parameter option allows you to vary the section
of the fillet.
For a parameter comprised
between or equal to:
- 0.5, the resulting curve is a parabola.
- 0 < parameter < 0.5, the resulting curve is an arc of an ellipse.
- 0.5 < parameter < 1, the resulting curve is a hyperbola.
Display Only Parents
The Display Only Parents button lets you deactivate the feature and all the features which are not parents from it. For more information, see Using the Display Only Parents Option to Retrieve a Creation Context.