This task shows you how to import moments from a text file on a surface. Importing moment from a text file means importing and mapping moment data from a text or excel file. To learn more about the data mapping capability, see Data Mapping.
Moments can be imported on surfaces, exclusively.
Only available with the ELFINI Structural Analysis (EST) product.
Imported moments can be applied to the following types of supports:
|
Geometrical Feature |
Mechanical Feature |
Analysis Feature |
||||
|
Spatial Groups |
Geometrical Groups |
Groups by Neighborhood |
Groups by Boundary |
Others |
||
|
Point/Vertex |
|
|
|
|
|
|
To know more, refer to Authorized Supports.
Open the sample55.CATAnalysis document from the samples directory.
-
Click Imported Moment
 in the Loads toolbar.
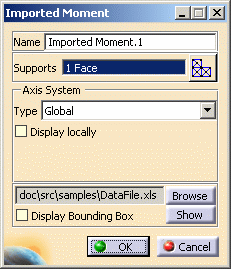
The Imported Moments dialog box appears.

- Name: lets you modify the load name.
- Supports: As soon as the support is selected, the
Select Mesh Part button is available.
To know more about the Select Mesh Part button, refer to Selecting Mesh Parts. - Axis System: The Axis System Type combo
box allows you to choose between Global and User
Axis systems, for entering components of the resultant moment
vector.
- Global: if you select the Global Axis system, the components of the moment vector (in a file) will be interpreted as relative to the fixed global rectangular coordinate system.
- User: if you select a User Axis
system, the components of the moment vector (in a file) will be
interpreted as relative to the specified rectangular coordinate
system.
To select a User Axis system, you must activate an existing Axis by clicking it in the specification tree. Its name will then be automatically displayed in the Current Axis field.
If you select the User Type, the following options are available:
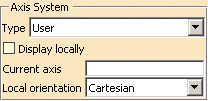
To know more about axis system, refer to Axis System Type.
- File Selection: use the Browse button to select the desired file.
- Display Bounding Box, if needed, on the model.
-
Select a surface as Support.

-
Click the Browse button in the Imported Moment dialog box to select the file to be imported.
The File Selection dialog box appears to let you choose the file to be imported. In this particular case, select DataFile.xls file from the samples directory.
-
Once the File name has been selected, click Open in the File Selection dialog box.
The Imported Moments dialog box is updated.
-
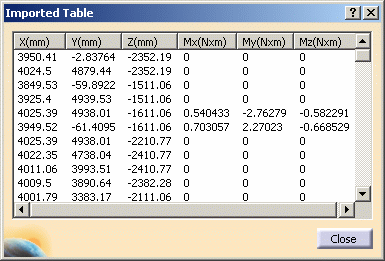
If needed, click the Show button to display the Imported Table box corresponding to the selected file data.
In this particular case, the imported table appears as shown here:
-
Click Close in the Imported Table dialog box.
-
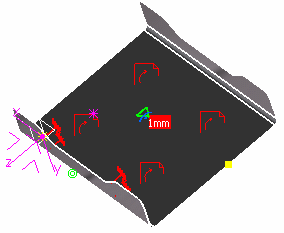
In this particular case, we also decided to activate the Display bounding box (as shown in the dialog box above).
The model appears as shown here: the face to be used as support for the imported moment is bounded.

-
Click OK in the Imported Moments dialog box.
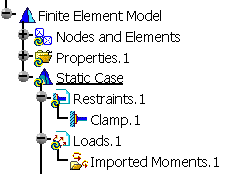
The resulting model appears as shown here:
The Imported Moments.1 feature is displayed in the specification tree.
For each mapping point of the data file, the corresponding moment is distributed to the nodes of the element that contains the mapping point. If the mapping point corresponds exactly to a node, the moment is directly applied to this node. When the support is a surface, the moment is converted into an equivalent force. When the support is a point or a vertex, the moment is directly applied.
![]()