Project 3D Elements
This task shows how to project edges (elements you select from the 3D area) onto the sketch plane.
-
Click Project 3D Elements
 in the Operations toolbar (3D Geometry sub-toolbar).
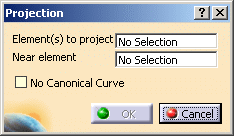
The Projection dialog box appears.
-
In the Element(s) to project box, select face of a pad as the reference element.
-
In the Near element box, select the side face of a pad.
The minimal distance is computed between each domain and the near element to keep the nearest solution. -
Optional: Select the No Canonical Curve check box to create a composite curve instead of canonical curve.

The No Canonical Curve check box is cleared by default. In this case, a canonicity detection is performed on projected curves according to the application tolerance, in other words the application tries to recognize sketcher elements like line or conic curves. Due to the canonicity approximation, changes may occur in resulting projected curve types.
-
Click OK.
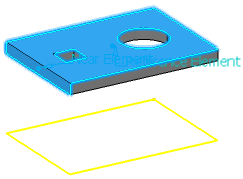
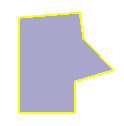
The edges are projected onto the sketch plane. These projections are yellow.
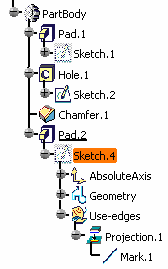
The node (identified as Projection.x) is added to the specification tree with a mark for each closed profile.
Note: If you select the curved surface of a cylindrical face, you can select any of the following elements: - Circular edge: This is the default selection.
- Axis: Right-click the selected surface and choose Select Axis.
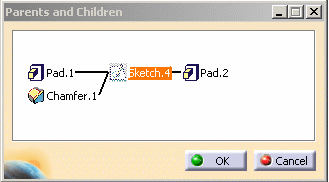
Parents/Children
If you apply the Parents/Children... command to a sketch
containing a projected edge obtained after selecting a face or an edge, the
Parents command shows the last solid feature that modified the projected
geometry.
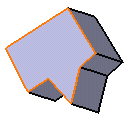
In the example below, one of Pad1's edge has been projected and used in
Sketch4. The capability shows a parent relationship with Pad1 but also with
Chamfer1 that is the last feature in the part body.
|
- If you select a face...
...all of its edges are projected as a unique curve (composite curve):
- You can apply the Relimitation
 ,
Corner
,
Corner
 and Chamfer
 commands on projections.
 - A canonicity detection is performed on projected curve according to
the application tolerance, in other words the application tries to
recognize sketcher elements like line or conic curves.
Due to the canonicity approximation changes may occur in resulting projected curve types. - If No Canonical Curve check box is selected, a composite
curve is created instead of a canonical curve.
A composite curve is a curve which can represent a simple or complex shape, like a line or a contour, which can be constrained. - The No Canonical Curve check box is unavailable when editing a use-edge mark of composite curve type in the specification tree.
- The No Canonical Curve option is not taken into account if you activate the Create Datum mode.
- In general, we recommend not to create projections from wireframe elements which lie on a plane orthogonal to the sketch. As a matter of fact, the orientation of the result of these projections in the sketch plane is not stable.
- If you isolate a composite mark, as many simple geometry elements as the mark was containing are created, associativity will not be available anymore.
- When the intersection of multi-domain element leads to the creation of multi-domain use-edge, the marks constitute a group where deleting a mark leads to the deletion of all the marks.
Project Using Select Boundary Edges
-
Right-click the faces of interest and choose Select Boundary Edges from the contextual menu.
-
Click Project 3D Elements
in the
Operations toolbar (3D Geometry sub-toolbar).
The Projection dialog box appears.
Every element of the selected faces is now pointed as a Reference Element.

-
Click OK.
The projections of the selected boundary edges are displayed on the sketch plane in yellow color.
A projection node is created in the specification tree (identified as Projection.x) with a mark (identified as Mark.x) under it for each projected element.
Information about No Canonical Curve option