Make sure the merged parts were defined using a Master Stacking Sequence.Generate plies groups from each virtual stacking in the resulting merged part before starting Assemble Plies Groups by Merging Plies.
- Plies groups must have the same rosettes and directions.
- Their support surfaces must be geometrically identical.
- A Master Stacking Sequence is required. Sequences names must belong the Master Stacking Sequence. Each sequence name in a plies group must be unique.
- Plies orientation and material must be consistent with the Master Stacking Sequence.
- Cut-pieces are not supported.
- Plies with non standard contours such as plies with darts, skin swapping, limit contour, material addition, etc, are not supported.
-
Click Assemble Plies Groups by Merging Plies
 in the Grid Design
toolbar.
in the Grid Design
toolbar.
-
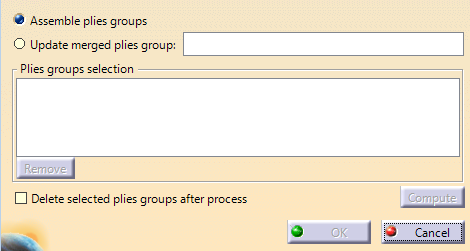
Select Assemble plies groups.
-
Select the plies groups to merge.
Plies are merged to create a new plies group.
- Assemble Plies Groups by Merging Plies interleaves the plies groups according to the Master Stacking Sequence specification. The order of sequences is that defined in the Master Stacking Sequence.
- Then, for each sequence, Assemble Plies Groups by
Merging Plies checks each ply for a connection with another one.
For example:
- If Ply.1 from Plies Group.1/Sequence.1 has a connection with Ply.2 from Plies Group.2/Sequence.1, the plies are merged into a single ply that covers the surfaces of Ply.1 and Ply.2.
- If a ply has no connection with another one, a new ply is created with the same geometry.
- The contour of created plies is computed from the geometry of the original plies.
-
If modifications have been made to the original plies groups, select Update merged plies groups and select the assembled plies group to update.
The assembled plies group must be linked to at least two non deleted original plies groups.
The plies group is updated with the modification made in the original plies groups.
All links made on the merged plies (Iso-thickness area, top surface, etc) are kept while updating their shape.
Only plies contours are modified, plies are not deleted, unless necessary.- During the update, a temporary merged plies group is generated from the list of original plies groups.
- The sequences of both the existing merged plies group (named here EMPG) and the temporary merged plies group (named here TMPG) are compared. If a sequence only exists in the TMPG, it is created in the EMPG.
- If a sequence only exists in the EMPG, it is deleted. If a sequence exists in both EMPG and TMPG, the plies under this sequence are compared.
- To link a ply under the sequence of EMPG with a ply under the sequence of TMPG, Update merged plies groups checks whether there is an overlapping between the plies shell. If this link exists, the ply under EMPG is replaced by the ply under TMPG.
The link between plies is erroneous and the link between the existing ply and the other entities (Iso-thickness area, top surfaces, etc…) is lost if:
- The modification of plies shell under a sequence divides a ply into two or if there is a join between two plies.
- Multiple plies under a sequence of TMPG have an overlapping with one or several under a sequence of EMPG.
- Multiple plies under a sequence of TMPG have no overlapping with those under a sequence of EMPG.
-
If the original plies groups are no longer needed, select Delete selected plies groups after merge before generating the merged plies group. This may be useful for other processes such as core sample computation, ply section, etc.
![]()