-
Click Laser Projector
 in the
Data Export toolbar.
in the
Data Export toolbar.
The Laser Projector dialog box is displayed:
-
Select Target Points and specify if they are Drift targets or not.
-
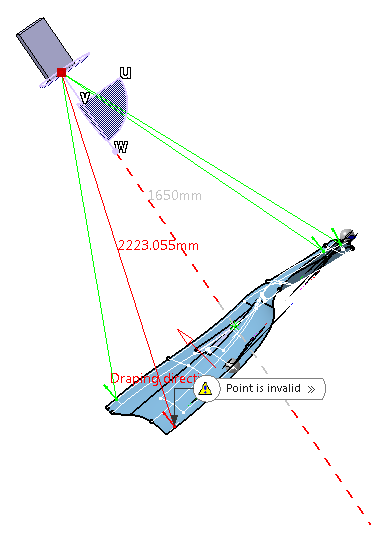
Select a Reference Surface and a Draping direction.
If necessary, click the Draping direction in the graphic area to invert it.
By default, the Draping direction is that of the first plies group in the stacking with that reference surface. -
Click Reset position with target points.
Up to now, the 3D representation of the laser projector was in error (source not found).
It is now positioned with respect to the selected target points:
It points towards the reference surface, along the line given by the center target point and the sum of the normal vectors at the target points.
The distance along the line from the center point is the average distance between the minimum and maximum distances provided in the Properties tab. -
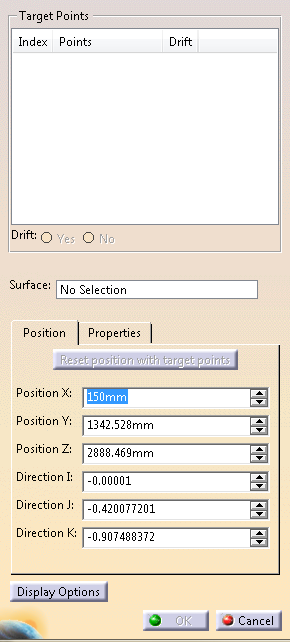
Modify the projector position (Position X, Y, Z and Direction I, J, K), either from the Position tab, or by dragging the compass.
The compass is positioned at the laser projector eye.
The distance between the projector eye and each target point is displayed in the graphic area,
and turns red if below the minimum distance or above the maximum distance defined in the Properties tab.
The ray also turns red to indicate that the projector position is possibly an issue.
-
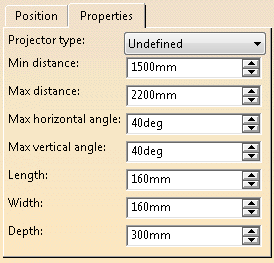
From the Properties tab, define:
- The projector type from the list, as defined in the
Predefined Laser Projectors settings.
If you select a predefined laser projector, the following values are automatically specified and are not editable.
You must define them if you select Unknown type. They are stored at validation. - The minimum and maximum distance between the projector eye and the target points.
- The maximum horizontal and vertical angles between the ray and the eye line of the projector, respectively in the horizontal and the vertical directions.
- The length, width and height of the laser projector representation (for a more realistic display).
- The projector type from the list, as defined in the
Predefined Laser Projectors settings.
-
Select display options.
A Laser Projectors Group is created in the
specification tree.
Each defined Laser Projector
is stored under this node, with its parameters, but without any
geometry.
Hide/Show of projectors is available.
Copy/Paste within the
Laser Projectors Group is
available.
![]()