 |
This section provides background
information about stereoscopic viewing.
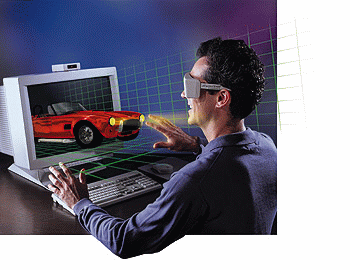
Computer technology uses stereoscopic viewing to recreate the way we
naturally see depth - stereoscopically. Stereoscopic viewing describes how
we use both eyes, each with a slightly different perspective, to perceive
depth in a physical environment. It delivers the most realistic visual
representation possible of complex digital models, giving engineers,
architects and scientists the best possible understanding of
three-dimensional information, and yielding levels of technical proficiency
not available using a typical 3D view.
These images can be perceived by a user wearing special glasses which
continuously transmit separate images to the left and right eyes, creating
a view of computer or video-based objects that have depth, perspective and
presence in three-dimensional space. |
|

|
 |
We do not intend to describe here all the
possible hardware configurations which support stereoscopic viewing for
Version 5. Consider the examples of hardware configurations mentioned in
this section as no more than that: just examples. |
|
What Do You Need?
Stereoscopic viewing is possible on both entry-range and high-end
configurations: you do not automatically need expensive equipment to enter
the realm of stereoscopic viewing. |
|
Entry-Range Configurations
On entry-range configurations, you need at least a graphics board
supporting stereoscopic viewing on your platform, and a set of special
glasses.
The CrystalEyes®
range of glasses (designed by StereoGraphics, Inc.) is an example of the
type of special glasses supported allowing you to benefit from stereoscopic
viewing capabilities.
|
| |
In case you want to use a standard computer
with only one graphic board, two video inputs (one per eye) are required to
manage a stereoscopic display system. If you have a computer with only one
graphic board providing a single video output, the Cyviz XPO2 is a
solution. The Cyviz XPO2 is a small electronic box converting one active
stereo video input into the two corresponding plain video outputs (one
per eye). A typical application would be a projection wall with passive
stereo (two projectors) or a head mounted display: |
| |
 For detailed information about XPO2, please browse the following
internet site :
http://www.cyviz.com
|
|
High-End Configurations
High-end configurations typically involve not only specific graphics
boards and special glasses, but also a whole range of high-quality,
immersive, stereoscopic display platforms from vendors such as Mechdyne, which allow you to manipulate, assemble, and disassemble virtual
mechanical objects while navigating through the entire digital mock-up.
For detailed information about supported hardware configurations, and
general information about Mechdyne products, browse the following
Internet site:
http://www.mechdyne.com/
http://www.barco.com/projection_systems/
|
|
How to setup stereoscopic viewing in V5?
|
|
This section is dedicated to stereoscopic
viewing on systems that use one graphic board supporting OpenGL quad
buffered stereo. |
 |
-
Set up the appropriate hardware configuration.
-
Set up the graphic adaptor configuration for stereoscopic
display.
| This step depends on
hardware and operating system configuration. Some systems require
administrator privileges to change the graphic adaptor display
mode. You are required to determine the height, width and
frequency characteristics of the graphic interface.
|
| On Solaris: On
Solaris 8 use the fbconfig command, first to know the available
configurations:
$ /usr/sbin/fbconfig -res ?
Choose a configuration, for instance 1280x1024x114s, then use
the fbconfig command once again:
$ /usr/sbin/fbconfig -res 1280x1024x114s
Logout to restart the X server.
On previous Solaris versions, the configuration command may
depend on the kind of graphic adaptor you have: ffbconfig for
Creator 3D, afbconfig for Elite and SUNWifb_config for Expert 3D.
|
| On AIX:
On AIX systems, you can use the smit utility:
- log as root
- run smit
- choose "Devices"
- choose "Graphic Displays"
- choose "Select the Display and Resolution refresh Rates",
then the correct graphic board if more than one are on the system
- choose a stereo visual. The "list" button provides a list of
all available graphic modes. Stereo modes are at 120Hz, for
instance 1024x768@120Hz.
|
| On HP-UX: With
root privilege, use the setmon command to know the available
configurations:
$ /opt/graphics/common/bin/setmon -r
This gives a table on which each line corresponds to an
available graphic mode. To choose a graphic mode, type:
$ /opt/graphics/common/bin/setmon -s n
where "n" is the entry number of the chosen graphic
mode. |
 |
To avoid a bad colormap
effect between CATIA V4 and CATIA V5, some modifications need to be
done in the X server file as explained below: First, logon as
"super user". Then,
create:
mkdir -p /etc/dt/config
copy:
cp /usr/dt/config/Xservers /etc/dt/config/Xservers
edit:
/etc/dt/config/Xservers
at the end of the line beginning with ":0 Local", add:
(on Solaris) "-dev /dev/fbs/ifb0 defdepth 24
defclass TrueColor"
(on AIX) "-d24 -classTrueColor"
Then, restart the X server. |
| On Windows based
platforms
Stereo activation can be found in "Display properties" (select
the "properties" contextual command in your desktop background).
Depending on the graphic adaptor, you may need to have
administrator privilege to access the stereo setting.
The location of this setting varies depending on the graphic driver
vendor. If it is not directly available in the vendor. If it is not
directly available in the vendor tab page, look for "advanced
configuration" in the vendor tab page or in the "settings" tab
page. In some cases, you may need to reboot the computer to
activate the new mode. |
-
Start a session.
-
Select Tools > Options > General > Display >
Visualization.
-
Click the Devices tab, and click On
next to Stereo option to enable stereoscopic viewing.
Note the following platform-specific restrictions
when enabling stereoscopic viewing:
- on AIX: you lose colors by passing from 24-bit to
12-bit colors using the GXT800 graphics board.
|
-
Exit your session to save your settings, then restart.
-
Display the Stereoscopic Viewing dialog box as
follows:
c:Stereoscopic
- Or, select Tools > Customize, click the
Commands tab, select All commands from the
"Categories" list, then click Stereoscopic. You can
then add the command to a toolbar for easy access as explained in
"Customizing a Toolbar by Dragging and Dropping" in the
Infrastructure User's Guide. Select the command once it has
been moved to the toolbar
- Or select View > Commands List then click
Stereoscopic.
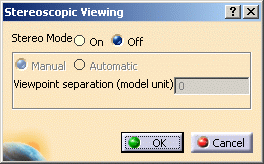
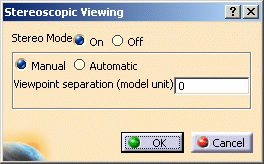
The Stereoscopic Viewing dialog box looks like this:
|
 |
| By default, stereoscopic viewing is disabled (Off).
|
-
Set the Stereo option to On to enable
stereoscopic viewing.
 |
| Note that visualization performance is impaired if
select On. |
-
Set either Manual or Automatic
mode.
This mode sets the distance between your eyes when
using stereoscopic viewing (to do so, enter the distance in the
Viewpoint separation box).
The default mode is Manual. |
| Automatic mode When working in
Examine mode, you should set the eye gap to Automatic.
Use this setting if you are viewing an object that in real life you
could reasonably manipulate using your hands. This setting is
suitable for working in confined spaces requiring an accurate
perception of depth, in which you focus on the rotation point.
When automatic mode is active, the eye-distance is adjusted
automatically depending on the zoom factor.
In automatic mode, the line of sight converges on the focal
point. If the focal point is far away, and objects are located
before the focal point, these objects will be viewed in a fashion
more precise than in real life, so viewing results are unrealistic
in this case. |
| Manual mode Manual mode
provides you with precise control over the distance between your
eyes, so that you can adapt your field of vision to the working
context.
The value you enter is in millimeters.
This mode is particularly suitable for working in Walk
or Fly mode, when working on large-scale assemblies or
industrial plants requiring a wider field of vision. If you need to
perceive a high degree of depth, you should set the distance
between your eyes accordingly.
In this mode, the line of sight is parallel. |
|
|
 |