 |
This task explains how to
generate graphic replacement for openings. |
|
|
The sample XML file provided with this application is
Structure_GVS.xml.
This file is located in ../OS/resources/standard/generativeparameters.
Customizing parameters in this file affects the appearance of your
drawings and is an administrator task. The reference planes that
will be used for a given project are defined in an XML file pointed by a
PRM resource:
- ProjectReferencePlanes.
For more information, see
Project Reference Planes. |
 |
Appropriate application
licenses including one for Generative Drafting are required. |
 |
For information on how to create views using generative
view styles, how to set view style parameters or more generally on
administering generative view styles, see the Generative Drafting
User's Guide. |
|
|
For graphic replacement for reference plane systems, see
Graphic Replacement
for Reference Plane Systems.
|
 |
In the sample XML file, generative view style parameters for openings
are located towards the bottom of the file under StructureObjects.
|
|
|
- Opening
-
- Graphic Replacement
Values.
-
- ViewType Description.
-
- SideView
Parameters.
-
- AnyView Description.
-
- DashX Parameters.
-
-
- ShortAxis Parameters.
-
-
- LongAxis Parameters.
- AnnotationTextStyle
Parameters.
- Connection Description.
-
- Draw value
- WeldSeam parameters
-
- AngularTolerance
- UseSymbols
- S_Representation
-
- LongWeldSeam parameters.
-
-
- ShortWeldSeam parameters.
- SymbolicRepresentation
-
-
- WeldSeam parameters.
- WeldSeamWithKnuckle
parameters.
-
- TightHiddenPlate
parameters
|
|
|
GraphicReplacement To use
graphic replacement. Yes or
No. |
|
|
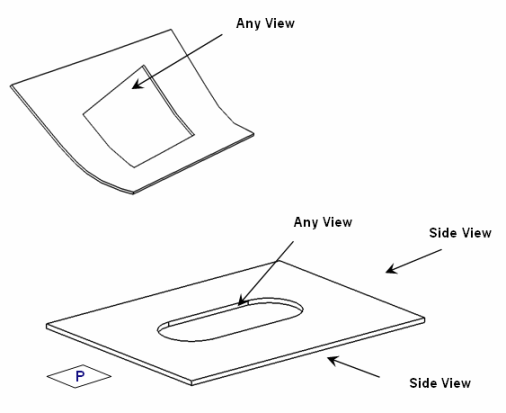
ViewType There are two view types
for openings: SideView and AnyView.

If the Opening geometry is planar (or is lying on plane P), and if
the projection vector of the view is also lying on plane P, then it is
SideView. In all other cases, it is AnyView.
See SideView
information and AnyView
information.
|
|
|
SideView
- Draw
- See values.
- Linetype
- See values.
- Linethickness
- See
values.
- ButterflyThickness
- Default is
5.0
- AnnotationTextStyle
- See
parameters and values.
|
|
|
AnyView

- Draw
- See values.
- Linetype
- See values.
- Linethickness
- See
values.
|
|
|
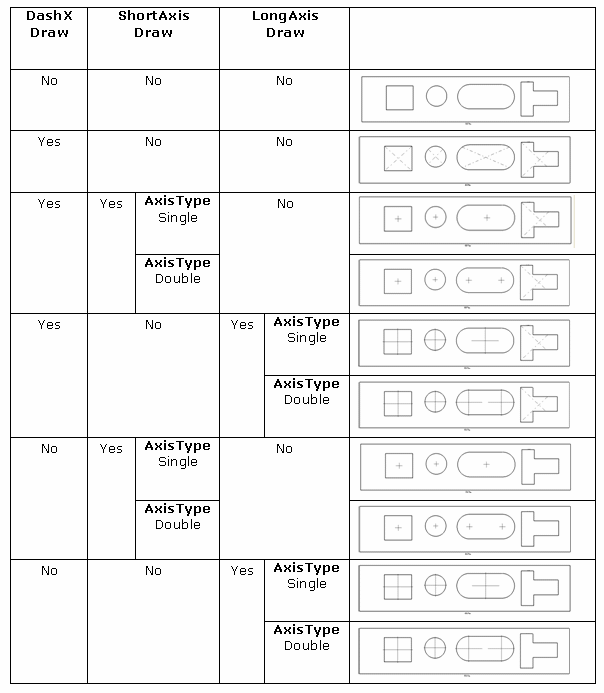
- Draw
- See values.
- Linetype
- See values.
- Linethickness
- See
values.
- AxisType
- Set Double (default) or Single axis for
oblong openings.
|
|
|
Connection
- Draw
- Yes specifies to draw connection. If No,
the connection is not drawn.
- Weld Seam
-
- AngularTolerance
- Specifies the angular tolerance of weld seam. By
default, its value is 1.
- UseSymbols
Specifies whether to draw the use symbol. By default,
the value is No.
- S_Representation
parameters
- SymbolicRepresentation
parameters
|
|
|
S_Representation
- LongWeldSeam
- Offset
- Specifies the offset value. By default, the offset value is 3.
- Thickness
- Specifies seam thickness. By default, the thickness index is 3.
For more information, see
values.
- ShortWeldSeam
- Gap
- Specifies the gap value. By default, the value is 1.
- Length
- Specifies the seam length. By default, the value is 5.
|
|
|
SymbolicRepresentation
- WeldSeam
- ChapterName
- Specifies the chapter name. By default, the name is
Connections.
- DetailName
- Specifies the detail name of weld seam. By default, it is
S_5x1.
- WeldSeamWithKnuckle
- ChapterName
- Specifies the chapter name. By default, the name is
Orientations.
- DetailName
- Specifies the detail name of weld seam. By default, it is
SwKnuckle_5x1.
|
|
|
TightHiddenPlate
- StraightLineType
- Specifies straight line type. By default, the line type is 1.
For more information, see
values.
- CurvedLineType
- Specifies curved line type. By default, the line type is 1. For
more information, see
values.
- CurvedLinethickness
- Specifies curved line thickness. By default, the thickness index
is 2. For more information, see
values.
|
|
|
|

