Creating an Annotation Activity

This procedure describes how to add an annotation activity to a process.
  Annotation activities enable users to see any functional dimensioning and tolerancing (FD&T) annotations or 3D text annotations that have been created in parts or processes used by the simulation.  Users who work with the cache turned off see all annotations when a part or process is inserted into a V5 process.  Users who work with cache turned on should see below for information on how initially to see all the annotations.
  Once users can initially see all the annotations, they can create annotation activities to turn on or off selected annotations throughout their process simulations.  If you want an annotation to be visible during only one other activity in a simulation, you can make the annotation activity a child activity of the parent activity.  In that instance, the annotation appears in the simulation only during the parent activity; no additional annotation activity is required to turn off the annotation.
  The FD&T data is added to parts using the Product Functional Dimensioning and Tolerancing product; it is added to processes using the Process Dimensioning and Tolerancing product.  You create 3D text annotations using 3D Annotation.
 

Seeing Annotation Data


For CGR data

DPM Assembly Process Simulation can handle CGR data with annotations when users take the following actions:

  • Turn on the Save 3D Annotation representation in cgr option in the Tools > Options > Product Structure > Cgr Management tab.
  • Use the List Annotations Set Switch On/Off command to list the annotations on the cgr data.
    See Enabling/Disabling 3D Annotations.
  • Use the Filter command.
    See Using Annotation Filters.
 

For all data

This procedure assumes that you have either selected the activity immediately prior to the one you wish to insert or that you have selected process; it also assumes you have a product or process loaded that contains annotations.

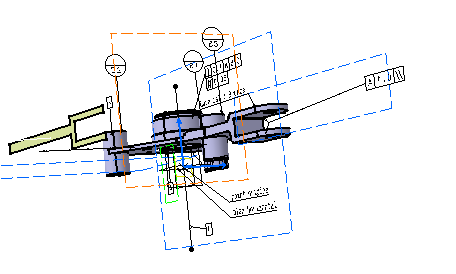
When you open data within DPM Assembly, the FD&T annotations are hidden by default; 3D annotations are not hidden.

Adding an Annotation Activity to the Process

 
  1. Click Annotation Activity .

    An annotation activity appears on the PPR tree and the Edit Annotation Operation dialog box appears.
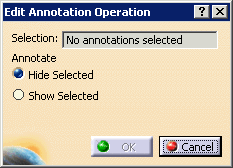
    The default is Hide Selected.
  2. Select the annotations whose visibility you want altered.

    As you select them, the selection counter increases.  If the annotation is not visible, selecting the part associated with the annotations enables you to select the annotations associated with the part.  Selecting a different part turns off the annotations of the first part selected.
  3. Select either Hide Selected or Show Selected.

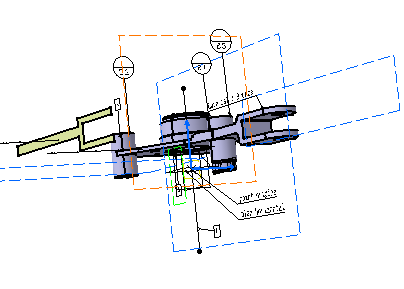
    The images below show the annotations selected and the effect of hiding them.
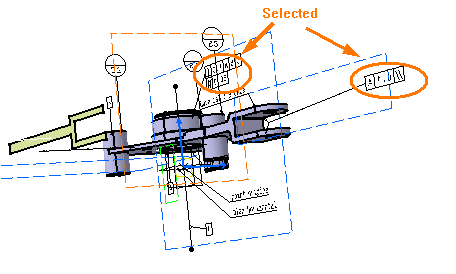
  4. Click OK.

Working with cache off means working in the design mode, which can slow performance.  Many users prefer to work with the cache option on.  To set the cache option to on, select Tools > Options > Infrastructure > Product Structure > Cache Management tab.  Then select the option Work with the cache system.
  If you create a 3D annotation in a .CATProduct document, that annotation cannot be selected for the Annotation Activity.  The 3D annotation must have been created in a .CATProcess document.