|
|
|
|
A publication has a name and references a geometry or parameters inside the product (or one of its sub-products).
The publication of parameters can be used when:
|
- the parameter is published outside the reference level in a CATProduct
- the parameter aggregated in the CATPart is published at instance level in CATProduct
- the parameters of the reference are published at instance level
- publishing the published parameter at root level
-
Open the KwrScrew.CATPart document.
-
Add parameters to the part.
-
Click the
 icon. The Formula Editor opens. From the New parameter of
type scrolling list, select Volume and click
New parameter of type.
icon. The Formula Editor opens. From the New parameter of
type scrolling list, select Volume and click
New parameter of type. -
In the Edit name or value of the current parameter field, enter the name of the parameter: MyVolume. Click Apply and click Add Formula. The Formula Editor opens.
-
Enter the following formula by using the Dictionary: smartVolume(PartBody\Pad.1 ) + smartVolume(PartBody\Pad.2 ) . Click OK, and Yes.
-
From the New parameter of type scrolling list, select Length and click New parameter of type.
-
In the Edit name or value of the current parameter field, enter the name of the parameter: MyDepth. Click Apply and click Add Formula.
-
Enter the following formula: MyDepth=PartBody\Pad.2\FirstLimit\Length and click OK.
-
From the New parameter of type scrolling list, select Length and click New parameter of type.
-
In the Edit name or value of the current parameter field, enter the name of the parameter: MyDiameter. Click Apply and click Add Formula.
-
Enter the following formula: MyDiameter=PartBody\Sketch.2\Radius.2\Radius * 2. Click OK twice.
-
-
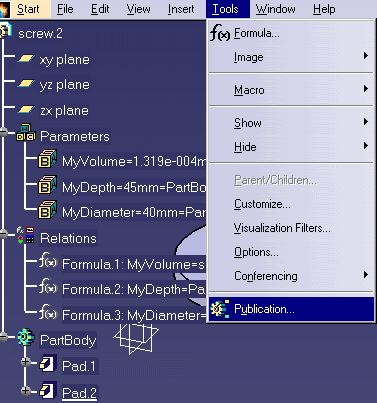
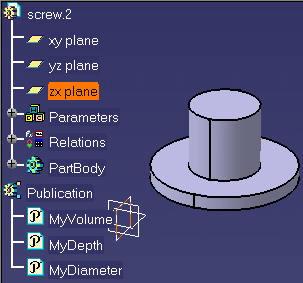
Publish the MyVolume, MyDepth, and MyDiameter parameters.
To do so, select Tools>Publication and select the MyVolume, MyDepth, and MyDiameter parameters in the specifications tree. Click OK. The published parameters appear in the specifications tree below the Publication node. Close the file.
-
Open the KwrScrew2.CATPart and repeat the steps listed above (steps 1 to 3 included). The part is identical to the one below. Close the file.
-
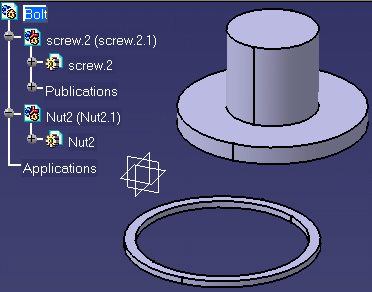
Create a CATProduct file. Select Insert>Existing Component... and click the root of the specifications tree. The File selection box is displayed. Select the KwrScrew.CATPart file and click Open. The screw is imported.
-
Select Insert>Existing Component..., select the Kwrnut.CATPart file and click Open. The nut part is inserted.
-
Double-click the inner circle of the nut, the Hole Definition window is displayed.
-
Right-click the Diameter field and select Edit formula.... The Formula Editor opens.
-
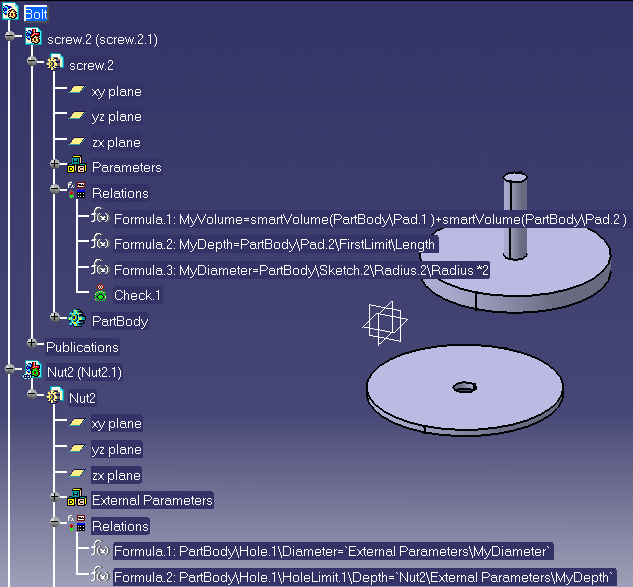
Select MyDiameter in the screw publications. The formula is:
PartBody\Hole.1\Diameter=`External Parameters\MyDiameter`. Click OK.
-
Right-click the Depth field and select Edit formula.... The Formula Editor opens.
-
Select MyDepth in the screw publications. The formula is:
PartBody\Hole.1\HoleLimit.1\Depth=`External Parameters\MyDepth`. Click OK twice.
-
-
Double-click, then right-click the Screw.2 component in the specifications tree and select Components>Replace Component.... The File Selection window opens. Select the KwrScrew2.CATPart file and click Open.
-
Click Yes when prompted to replace all instances with the same reference as the selected product. Update the nut part: the parameters are recomputed.
Initialized Parameter: Any value assigned to a parameter explicitly by user by altering the default value assigned to a parameter (disturbing the default value) is an Initialized parameter. An initialized value cannot be made Non-Initialized by assigning the default values.
When rerouting (replacing) a publication
between parameters that are non-initialized, the external parameter will
be able to recognize
that the rerouting (replacing) has no impact on the publication. In this case, there is no de-synchronization.
However this is not the case with parameters which are initialized.
VPM cannot recognize this particular case and therefore shows a
potential impact in both cases.