- Diffusion laws:
 Constant Law: deforms all the selected control points
identically.
Constant Law: deforms all the selected control points
identically.
Using this law, you can translate all selected points at a time, even if they belong to several surfaces or curves, provided the active support options Normal to compass and Compass Plane. Linear Law: deforms all the selected control points with a
linear law.
Linear Law: deforms all the selected control points with a
linear law. Concave Law: deforms all the selected control points
positioned on a linear concave.
Concave Law: deforms all the selected control points
positioned on a linear concave.
This option is P2-only. Convex Law: deforms all the selected control points
positioned on a linear convex.
Convex Law: deforms all the selected control points
positioned on a linear convex.
This option is P2-only. Bell Law: deforms all the selected control points with a bell
law.
Bell Law: deforms all the selected control points with a bell
law.
This option is P2-only.

Constant Law gets applied as default law, when none of the above laws is selected.
- To link/unlink the diffusion laws with the cross diffusion laws:
 Link Laws: diffusion laws with the cross diffusion laws are
linked, the selected cross diffusion law selects automatically the
equivalent diffusion law.
Link Laws: diffusion laws with the cross diffusion laws are
linked, the selected cross diffusion law selects automatically the
equivalent diffusion law. Unlink Laws: diffusion laws with the cross diffusion laws are
unlinked.
Unlink Laws: diffusion laws with the cross diffusion laws are
unlinked.
-
Click the Control Points icon:

The Control Points dialog box appears. 
-
Move the Compass onto Surface.3.

-
Click the Normal to compass icon if not already selected:

-
Click the Mesh only icon from the Options frame:

-
Click the Cross Constant Law icon if not already selected:

-
Click one of the icons from following list to select the required diffusion law.
Icon Diffusion Law Constant Law Linear Law Concave Law Convex Law Bell Law -
Select the mesh line.

-
Drag the control point to the corner of the surface, close to the cursor has shown in the image below.

The deformation applied to one point is applied to all other selected points.
In the image below, the manipulator is displayed in a corner of the surface, but all points lying on the selected mesh lines undergo the same translation.
Diffusion Law Result Constant Law 
Linear Law 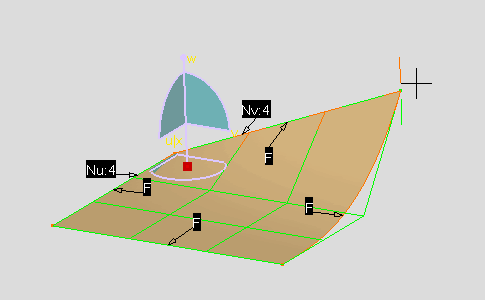
Concave Law 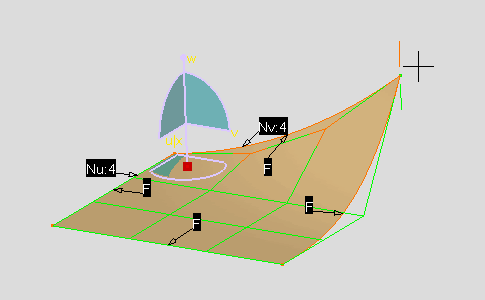
Convex Law 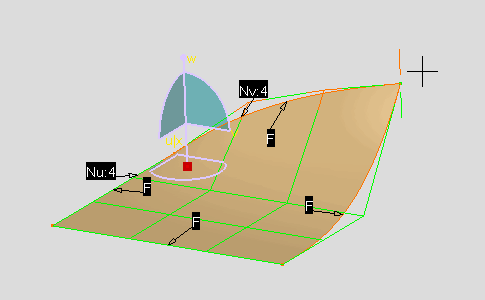
Bell Law 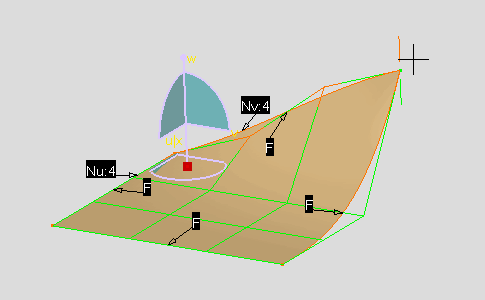
|
|
Note: After application of one diffusion law on the selected
control points, it is possible to apply multiple diffusion laws
one after another on the same set of control points. To apply multiple diffusion laws one after another on the same set of control points, clear the Delay Law Application check box under Tools > Options > Shape > FreeStyle > Control Points Diffusion/Cross Diffusion Law. |
The diffusion laws are regrouped in two categories: Concave + Convex and S curve. The strength manipulator can adopt values between 0 and 1. A value of 0.5 is corresponding to a linear diffusion.
2. S curve (Bell): 0 to 0.5 values correspond to an S curve diffusion (the closer to 0, the stronger is the diffusion). 0.5 to 1 values correspond to an opposite S curve diffusion (the closer to 1, the stronger is the diffusion).
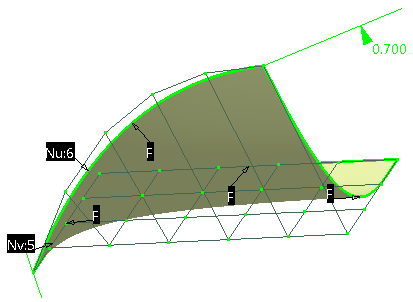
For the following example, diffusion is set to Linear Law and the strength manipulator is moved along the displayed ruler:
 |
 |
 |
 |
| Strength set to 0.5: Linear diffusion | Strength set to 0.2: Concave diffusion | Strength set to 0.7: Convex diffusion | Strength set to 0.1: S curve (Bell) diffusion |