 |
The Plane System command
provides tools letting you define a number of planes in a given
direction. Planes can then be used as reference planes or supports when
creating other items.
In structure applications, you can, for example, define reference
planes in each ship direction to assist you place structural elements.
You must define one plane system for each direction. |
 |
This task shows you how to create a
regular asymmetric, a
irregular asymmetric and a
semi-regular plane system. |
 |
-
Click Plane System
 . .
- In the Generative Shape Design workbench, this icon is
found in the Tools toolbar. You can also select Insert >
Advanced Replication Tools > Plane System... from the menu
bar.
- In the Structure Preliminary Layout workbench, this icon is
to be found in the Structure Grid Set toolbar. Having selected
this command, you also need to select an entry in the
specification tree under which you want to create a new CATPart
to locate your plane system before proceeding. If you want to use
an existing CATPart, then select that CATPart in the tree.
|
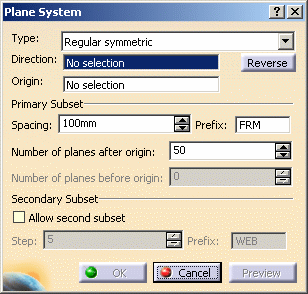
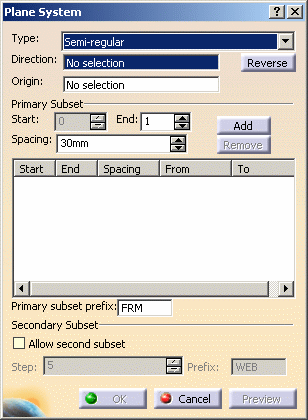
| The Plane System dialog box appears. |
 |
-
Select the type of plane system you want to create:
| Five types are available:
|
|
 |
Symmetric Plane Systems
Symmetric plane systems are created in similar fashion to asymmetric
plane systems. The difference being that they have the same number of
planes on either side of the origin. |
Creating a
Regular Asymmetric Plane System
|
|
|
|
-
Select a plane or a line to define the direction of the
plane system.
| If you select a plane, the center of the plane is automatically
taken as the origin of the plane system and an arrow appears
showing the direction. |
| You can, if desired, change the origin. |
 |
-
If you selected a line, select a point to define the
origin,
Or,
If you selected a plane and want to change the origin,
click the Origin field and select a point.
 |
- Use the Reverse button in the dialog box or select the arrow
in the geometry area to invert the direction.
- The contextual menus in Direction and Origin fields let you
create appropriate geometry directly without having to exit the
current command.
|
-
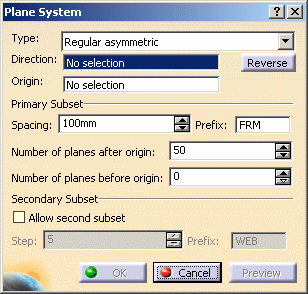
Specify the primary subset:
- Specify the distance between two planes in the Spacing field.
- Enter a prefix identifying all planes in this set.
Planes are identified by this prefix plus a positive or negative
number that increments away from the origin. Plane numbers are
positive in the direction of the plane system. The origin is
identified by suffix.0.
|
 |
- Specify the number of planes.
| The number you enter is the number of planes you want to
create on either side of the origin. Note that the number of
planes does not include the plane at the origin. |
|
-
Optionally, check Allow second subset to group a
number of planes in the primary subset together and create a secondary
subset:
- Specify the step. For example, enter 4.
Every fourth primary subset plane will belong to the secondary
subset.
- Enter a prefix identifying all planes in this set.
|
| Note: The plane at the origin always belongs to the
primary subset. |
 |
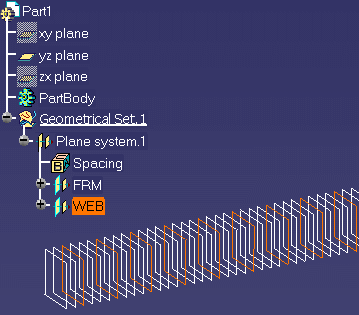
Select the subset in the
specification tree to visualize all planes in this set in the
geometry area. |
-
Click OK when done to create a plane system
along the specified direction.
|
|
 |
Creating
an Irregular Asymmetric Plane System
|
 |
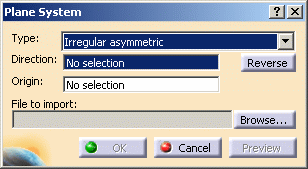
Plane systems can be created
by importing a TSV (tab-separated) file containing the definition of the
plane system.
This file must be formatted as follows:
positive_or_negative_absolute_distance_from_origin<TAB>subset_prefix
where <TAB> denotes a TAB character
and should contain an entry 0<TAB>subset_prefix. Typically,
-4800 WEB
-4200 FRM
-3600 FRM
-3000 FRM
-2400 WEB
...
0 FRM
...
2300 WEB
2700 WEB
Notes:
- Do not type space characters using the space bar.
- It is not necessary to specify the positive sign '+' when entering
positive distances.
It defines a plane system in one ship direction only but can contain
as many subsets as desired. |
|
|
|
-
Select a plane or a line to define the direction of the
plane system.
| If you select a plane, the center of the plane is automatically
taken as the origin of the plane system and an arrow appears
showing the direction. |
| You can, if desired, change the origin. |
 |
-
If you selected a line, select a point to define the
origin,
Or,
If you selected a plane and want to change the origin,
click the Origin field and select a point.
 |
- Click Reverse in the dialog box or select the arrow
in the geometry area to invert the direction.
- The contextual menus in Direction and Origin fields let you
create appropriate geometry directly without having to exit the
current command.
|
-
Click Browse... and navigate to the file
containing the plane system definition.
-
Click OK when done to create a plane system
along the specified direction.
|
|
 |
Creating a Semi-Regular Plane System
|
 |
The semi-regular option lets you easily, and
rapidly, define a plane system comprising groups of planes with different spacing. |
| |
|
|
-
Select a plane or a line to define the direction of the
plane system.
| If you select a plane, the center of the plane is automatically
taken as the origin of the plane system and an arrow appears
showing the direction. |
| You can, if desired, change the origin. |
 |
-
If you selected a line, select a point to define the
origin,
Or,
If you selected a plane and want to change the origin,
click the Origin field and select a point.
 |
- Click Reverse in the dialog box or select the arrow
in the geometry area to invert the direction.
- The contextual menus in Direction and Origin fields let you
create appropriate geometry directly without having to exit the
current command.
|
-
Specify the primary subset:
- Specify the distance between two planes in your first group
in the Spacing field.
- Enter the number of the last plane having the specified
spacing in the End field.
- Click Add to confirm your first group.
|
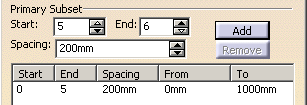
| The first group is identified in the list view control and the
Start field incremented to display the number of the first plane in
your second group. |
 |
- Repeat to specify the spacing and the number of the last
plane to be created with this spacing, then click Add.
- Continue until satisfied.
|
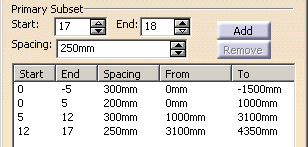
| Note: If the current spacing is the same as the spacing of the
previous group, any new planes are added to the previous group. |
 |
- Enter a prefix identifying all planes in the primary set.
Planes are identified by this prefix plus a positive or negative
number that increments away from the origin. Plane numbers are
positive in the direction of the plane system. The origin is
identified by suffix.0.
|
-
Optionally, check Allow second subset to group a
number of planes in the primary subset together and create a secondary
subset:
- Specify the step. For example, enter 4.
Every fourth primary subset plane will belong to the secondary
subset.
- Enter a prefix identifying all planes in this set.
|
| Notes: The plane at the origin always belongs to
the primary subset. |
 |
Select the subset in the
specification tree to visualize all planes in this set in the
geometry area. |
|
| |
Adding Groups to Your Plane System
|
| |
- Click in the list view control to return to the Add mode.
|
| |
Modifying Groups in Your Plane System
|
| |
- Select the group you want to modify.
- Enter a new spacing value or modify the End value to change the
number of planes in the group.
Note: You cannot modify the Start value.
- Click Modify.
| The plane system is updated. Changing the number of planes in
any one group does not affect the number of planes in other groups. |
| Note: Click in the list view control to cancel unwanted
modifications that have not been confirmed using Modify. |
|
| |
Removing Groups
|
| |
- Select the group you want to remove.
- Click Remove.
|
|
-
Click OK when done to create a plane system
along the specified direction.
|
 |
When you edit a plane system, Irregular symmetric
and Irregular asymmetric types are not available. |
|
 |


