 |
This command is only available with the
Generative Shape Optimizer or Developed Shapes product. |
 |
This task shows how to develop wires, and
points, onto a revolution surface, that is to create a new wire by mapping
a wire's planar abscissa and ordinate with abscissa and ordinate within a
local axis-system on a surface, with respect to the surface's curvature.
The wire can be any curve or sketch, provided it is a manifold element.
Therefore it cannot be, for example, a T or H-shaped element. |
 |
About Developing Wires
|
|
There are three modes of developing on a surface:
- Develop-Develop
- Develop-Project
- Develop-Develop inverted
the difference being in the way the points are mapped onto the
revolution surface.
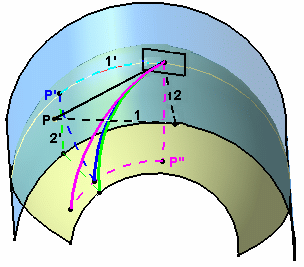
The following illustration shows the three developing types, based on
developing the black solid wire, the two black dotted wires representing
the 1 and 2 coordinate lengths in the wire's axis-system. |
|
|
| |
- In the case of the Develop-Develop option, a given point
(p) of the wire is developed on the revolution surface by mapping its
first coordinate as a curvilinear abscissa on the revolution surface (1
into 1') up to a (p') point (represented by the light blue dotted curve),
then from that (p') point reporting the other coordinate of (p) as a
curvilinear abscissa (2 into 2') along the revolution surface (dark blue
dotted curve).
The resulting developed wire is the dark blue solid curve in the above
illustration.
- In the case of the Develop-Project option, a given point
(p) of the wire is developed on the revolution surface by mapping its
first coordinate as a curvilinear abscissa (1 into 1') onto a virtual
cylinder passing through the point on support (default or user-defined),
to generate a (p') point (represented by the light blue dotted curve),
reporting the other coordinate parallel to the cylinder's revolution
axis, then projecting normally from that cylinder onto the
revolution surface (light green dotted line).
The resulting developed wire is the light green solid curve in the above
illustration.
- In the case of the Develop-Develop inverted option, a
given point (p) of the wire is developed along the revolution surface by
mapping its first coordinate as a curvilinear abscissa on the virtual
cylinder up to a (p'') point (represented by the pink dotted line), then
from that (p'') point reporting the other coordinate of (p) as a a
curvilinear abscissa along the revolution surface.
The resulting developed wire is the pink solid curve in the above
illustration
- In the case of a Develop inverse, a given wire is developed from the
revolution surface. Therefore, a point on support needs to be specified
in order to define the plane, tangent to this point, that will contain
the resulting developed wire.
As an example, if you develop any of the wires in the above illustration
using their original development method, the resulting developed wires
will be the black solid curve.
|
|
As you can see, the results differ slightly, the developed
curves not ending on the same point. |
| |
|
 |
Open the
Develop1.CATPart document. |
 |
-
Click Develop
 . .
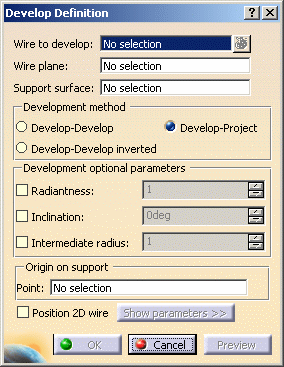
The Develop Definition dialog box is
displayed as well as the Tools Palette.
For further information about the Tools Palette, refer to Selecting
Using Selection Traps in the CATIA Infrastructure User's Guide. |
 |
-
Select the wire(s) to be developed.
| When there are several wires to develop, the bag icon becomes
available. You can click it to access the Elements to develop dialog
box and remove or replace the selected wires. |
- By default, the plane containing this wire is automatically
computed. If a wire to develop is replaced
using Replace, the new wire must lie on the same
plane as the wire to be replaced. If it lies on another plane,
click Remove or clear the selection and select
a new wire.
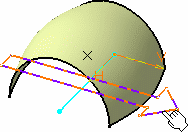
- However, when the wire is a line, you need to specify a
Wire plane.
|
 |
-
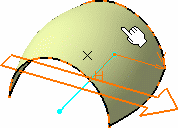
Select the Support surface onto which the wire is to
be developed.
 |
 |
If the support surface is a
planar surface, only revolution surfaces are valid. Otherwise, an error
message is issued. |
-
Click Preview.
|
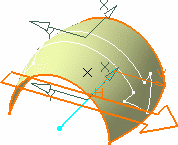
The axis-systems are displayed both on the wire's
virtual plane and the surface. These are the default axis-systems. By
default, the origin of the support's axis-system is located at a
point on the surface where the plane is parallel to the wire's plane.
However, it is usually more pertinent to specify
exactly the axis-systems origin. |
 |
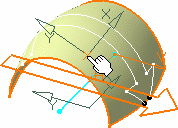
-
Click the Point field and select a point, on
the surface, defining the support axis-system's origin.
|
The axis-systems are modified, the support's
axis-system to coincide with the selected point, and the wire's
axis-system to retain the shortest distance between the two
axis-systems' origins.
Consequently, the resulting wire is also modified. |
 |
-
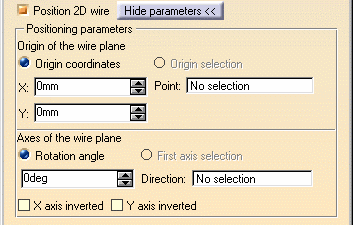
If you check the Position 2D wire then click
the Show Parameters button to expand the dialog box and modify the wire
axis-system's positioning.
 |
| |
 |
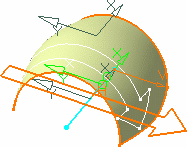
The wire's axis-system turns
green, meaning it can be edited, i.e. change location. You can
directly move it in the geometry and the dialog box will be updated
accordingly. |
- Specify the wire axis-system's origin by either entering
coordinates, or selecting a point.
- Specify the x-axis of the axis-system by either selecting a
line or specifying a rotation angle in relation to the initial
lowlight position.
- Select the X-axis inverted check box to invert the
x-axis orientation (while keeping the y-axis unchanged).
- Select the Y-axis inverted check box to invert the
x-axis orientation (while keeping the y-axis unchanged).
|
| You could get something like this: |
 |
 |
If you want to go back to the
initial axis-system positioning, uncheck the Position 2D wire
option, and collapse the dialog box using the Hide parameters button. |
-
Click OK to create the developed wire.
|
| |
Additional Parameters
|
|
Three optional parameters are available
from the Develop Definition dialog box allowing to apply a transformation
to the wire prior to developing it. They are illustrated below by the
developing of a square wire onto a surface: |
| |
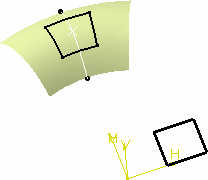
|
|
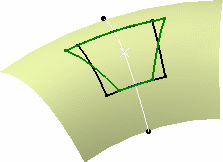
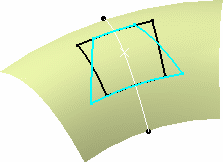
1. Radiantness: allowing to specify a radial deformation ratio on the
developed wire. This transformation is defined by the distance between
the axis-system origin on the revolution surface and the revolution axis
(R), and the ratio you specify in the Develop Definition dialog box.
The formulas used to define the radiantness are:
x' = (R + y1 * Ratio) * x1 / (R + y1)
y' = y1
Where:
x1 and y1 are the coordinates of any point in the
initial axis system of the wire to be developed
x' and y' are the coordinates the same point on the developed wire
|
|
 |
 |
|
Developing with positive radiantness value
(green curve)
|
Developing with negative radiantness value
(light blue curve)
|
|
|
|
|
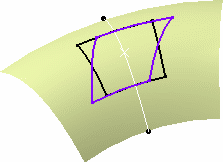
2. Inclination: the angular deviation (d) from the default
developing.
The formulas used to define the inclination are:
x' = x1 + y1 tan(d)
y' = y1
|
| |
|
|
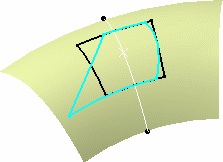
You can combine these two options to
develop a wire: |
|
|
|
| |
|
|
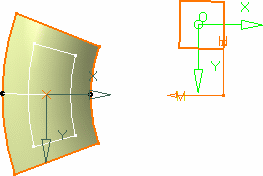
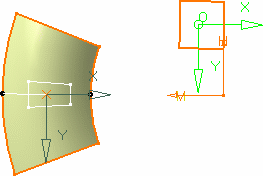
3. Intermediate radius:
a ratio is applied to the wire's coordinates along the y axis, prior to
developing it (i.e. the development operation itself is not affected,
only the wire's shape is modified along y before the development).
|
|
|
 |
|
Developing with intermediate radius
value set to 2.
The square's length along y doubles.
|
Developing with intermediate radius
value set to 0.5.
The square's length along y reduced to half its initial length.
|
|
 |


