-
In the Document Location list, select File.
-
Click the
 button to open the File Selection dialog box which lets you
search for the files to be processed. Click the thumbnail below to see
the full-size picture:
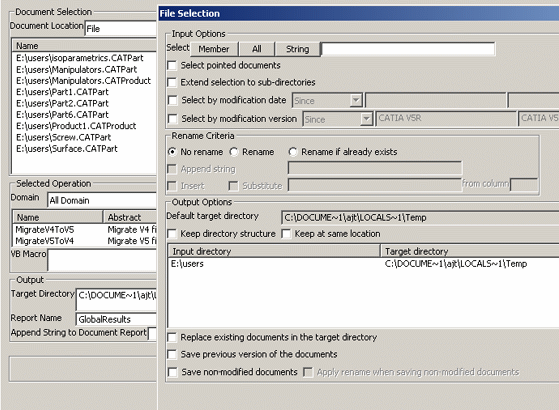
This dialog box lets you select the documents to be processed and define the input/output options as well as the rename criteria to apply to the selected documents.
The corresponding online documentation can now be accessed from the File Selection dialog box by clicking Help. Input Options

Depending on the batch you are running, the Input Options area lets you search for document types such as:
-
Version 4 model documents (.model, .library, .session, etc.)
-
Version 5 documents (.CATPart, .CATProduct, .CATDrawing, .CATProcess, etc.).
The three buttons displayed lets you select your documents. Each button opens an additional dialog box as explained below:
-
Member: lets you select one or several documents in the directory you specify in the File Selection dialog box. When finished, click Open to validate and close the dialog box. Note that the last selected path is stored in preference files (which are identified by the suffix *.CATPreferences, and are created in the same location as settings, referenced by the CATUserSettingPath variable). This means that the last selected path is kept from one session to another and next time you access the File Selection dialog box, this path will be the default.
-
All: lets you select all the documents stored in the directory you specify in the Browse dialog box. When finished, click OK to validate and close the dialog box
-
String: lets you search for documents containing the string you specify. Proceed as follows:
-
Enter a search string in the box displayed to the right. For instance, entering
padsearches for documents whose names contain the string "pad". -
Click the String button to open the Browse dialog box that lets you select the directory to which the filter is applied.
-
Click OK to validate and close the Browse dialog box.
-
When using All and String, you can select the Extend Selection to Sub-Directories check box to propagate the selection to the sub-directories of the selected folder. The main application window displayed in background is updated and displays the name and path of the selected documents.
The File Selection dialog box is still displayed in foreground to let you select more documents if needed:
The utility also supports DLNames which are identified by the string CATDLN://.
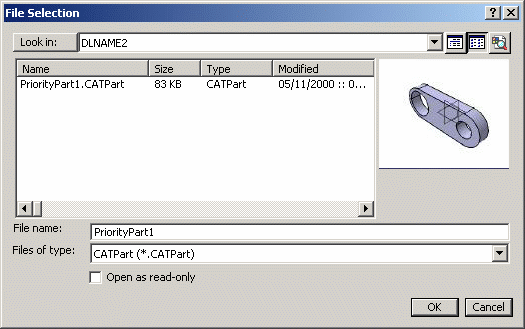
In that case, specific interfaces are provided to let you access your documents:- Clicking Member opens the File Selection box dedicated to the DLName environment:

For further information about this dialog box, refer to the Document task.
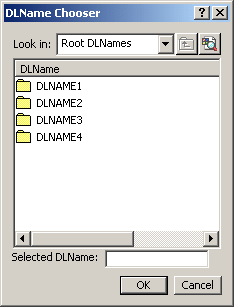
Click OK when finished selecting your documents.- Clicking All button the DLName Chooser dialog box:

Use the Look in list to select the root DLName in which you want to navigate. The sub-folders (if any) stored in the selected root DLName are then displayed in the DLName list below and you can choose a DLName in list: the selected DLName is displayed in the Selected DLName box and is set as the target directory.
Note that once you are in a sub-folder, you can re-access the upper level by clicking .
.You can also click
 to access the
Search Results dialog box which lets you search for DLNames
using a specific interface.
to access the
Search Results dialog box which lets you search for DLNames
using a specific interface.When you have found the desired DLName, click OK to validate.
- To search for a string, enter your criterion in the field
then click String. This opens the above-detailed
DLName dialog box that lets you select the DLName in which
you want to perform your search.
When finished, click OK to validate and close the DLName dialog box.
The list of documents displayed in the main application window looks something like this:

When you have made your selection, you can perform the following actions on the documents displayed in the list: - Select pointed documents
Select this check box if you want to include automatically all the documents pointed to by the document you select.
Note: This option must be activated before selecting Member for the original data. - Extend selection to sub-directories
Select this check box to extend the selection to the sub-directories of the directory you specify in the File Selection dialog box. - Select by modification date
Select this check box to select documents according to their modification date.- Since: enter the modification date, YYYY.MM.DD (including the given milestone), to be taken into account
- Before: enter the modification date, YYYY.MM.DD (excluding the given milestone), to be taken into account
- Between: if you choose this option, the two boxes are activated to let you enter the start and end dates, YYYY.MM.DD (including the given milestones), to be taken into account.
- Select by modification version
Select this check box to select documents according to their modification version.- Since: enter the level (GA or Service Pack) to
be taken into account. The syntax is as follows: CATIA V5RnSPx,
for instance, CATIA V5R12SP4.
Note that enteringSP0orGAstands for the General Availability level.
If no specific level is indicated, all the service packs of the release are taken into account. - Before: enter the level (GA or Service Pack) to
be taken into account. The syntax and rules are identical to
the one used for the Since option, i.e. CATIA V5RnSPx.
However, note that you cannot select documents saved prior to V5R10. - Between: if you choose this option, the two boxes are activated to let you enter the start and target versions. The syntax and rules are identical to the one used for the Since and Before options, i.e. CATIA V5RnSPx.
- Since: enter the level (GA or Service Pack) to
be taken into account. The syntax is as follows: CATIA V5RnSPx,
for instance, CATIA V5R12SP4.
More about file selection
Selecting documents
- If no criterion (no date and no version) has been defined, all the documents found are selected
- If at least one criterion has been defined, all the documents fulfilling this criterion are selected.
Parameter file
- After the batch execution, an XML file containing the batch parameters is generated in a temporary folder. Nevertheless, the fields used to select your documents are not specified in this file. You can only get information on the documents that have been selected but not on the filter used to select them.
Rename Criteria

The Rename Criteria area lets you rename the documents you have selected in the Input Options area using pre-defined rename criteria. - No rename
This is the default. If it is selected, it means that no document will be renamed. - Rename
If this option is selected, it means that the documents are renamed. In that case, the check boxes displayed below are activated. The meaning of these check boxes will be detailed further. - Rename if already exists
If this option is selected, it means that only the documents whose names are identical to those already existing in the target directory are renamed. In that case, the check boxes displayed below are activated.
The chosen rename criterion is identified in the XML parameter file as follows:
<Rename_Scope>No</Rename_Scope>if No rename has been selected
<Rename_Scope></Rename_Scope>if Rename has been selected
<Rename_Scope>ifExists</Rename_Scope>if Rename if already exists has been selected.If you select the Rename or Rename if already exists option, you can then select the following rename criteria: - Append string
This criterion lets you insert a string at the end of the document name when running the batch. Enter the string to be added in the field displayed to the right of the Append string check box.
For instance, if you have a document named "MyPart.CATPart" then you enter "_DataLifeCycle" in the Append string box, the document is renamed to "MyPart_DataLifeCycle.CATPart".
The defined string is identified in the XML parameter file as follows:
<Append_String>my_string</Append_String>
- Insert
This criterion lets you modify the document name by inserting the string of your choice, starting at a defined column.
Enter the string to be inserted in the first field then in the from column box, indicate the position of the character from which you want to add the string. The column is an integer comprised between 1 and 80.
For instance, if you enter "DataLifeCycle" then "3" in the from column box, a document named "MyPart.CATPart" will be renamed to "MyDataLifeCyclePart.CATPart".
The defined string and colomn number are identified in the XML parameter file as follows:
<Insert_string>my_string</Insert_string>my_number
<Insert_column></Insert_column>
Note that you cannot select both Insert and Substitute, they are exclusive. When Insert is activated, selecting Substitute automatically clears Insert. However, if you entered a value in the box, this value is kept even when Insert is cleared
- Substitute
This criterion lets you modify the document name by substituting a string.
Enter the string to be modified then in the from column box, indicate the position of the character from which you want to insert the new string.
For instance, if you enter "DataLifeCycle" then "3" in the from column box, a document named "MyPart.CATPart" is renamed to "MyDataLifeCycle.CATPart".
The defined string and colomn number are identified in the XML parameter file as follows:
<Substitute_string>my_string</Substitute_string>my_number
<Substitute_column></Substitute_column>Note that you cannot select both Insert and Substitute check boxes, they are exclusive. When the Substitute check box is selected, selecting Insert automatically clears Substitute. However, if you entered a value in the box, this value is kept even when Substitute is cleared.
More about Rename options
Append string and Insert/Substitute
If you select the Append string and Insert or Substitute check boxes simultaneously, Append string is applied first, then Insert or Substitute.
Let's suppose the following example with a document name MyPart.CATPart:
- we select Append string and enter the value "Append_String_"
- we select Insert and enter the value "DataLifeCycle_" starting at column "17"
In that case, the document MyPart.CATPart is renamed to MyPartAppend_StrDataLifeCycle_ing_.CATPart.Cancel
If you click Cancel, this closes the File Selection dialog box but when re-opening it, the last validated values are restored.Output Options

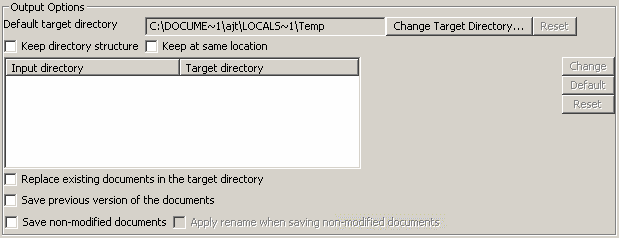
The Output Options area lets you define the following output options: Selecting the target directory
- Default
target directory
Displays the path of the directory in which your processed documents will be stored. This means that each time a new directory is added to the Input directory list, its target directory will be the one specified in the Default target directory field.
By default, the field is initialized with the current or temporary directory, depending on your configuration and on the write access.
To change this path and specify another directory, click Change Target Directory... then navigate to the desired directory.
Example
- Set E:\Documents in the Default target directory box
- Select MyPartInput Directory.CATPart from the input directory, E:\users\Directory1
As a consequence, the Input/Target directory mapping looks like this:

If you clicked Extend selection to sub-directories, the directory mapping displays one line per directory impacted by the selection:

Once the target directory has been changed, you can restore the default directory (i.e. the directory displayed in the Target Directory box of the main application interface) by clicking Reset.
If you leave the default path, Reset is grayed out.The target directory is identified in the XML parameter file as follows:
<target_dir>path_of_the_directory</target_dir>- Keep directory structure
This option lets you reflect the initial file tree in the target directory. Note that this option is relevant only when:- Extend selection to sub-directories is activated in the Input Options area
- the current document environment is not "DLName".
Note that you cannot select both Keep directory structure and Keep at same location check boxes, they are exclusive.
If no sub-directory exists in the target directory, you are informed that a sub-directory will be created before writing the documents. As a matter of fact, when directories are created, they are created when the documents are written and not when they are selected.
Note: This option must be activated before selecting the destination folder.
Example
1. Set E:\Documents in the Target directory box. This directory has no sub-directory.
2. Select the Extend selection to sub-directories check box.
3. Select the Keep directory structure check box.
4. Click All and select E:\users\Directory1 as the input directory. This directory contains one sub-directory named "Batch".The Input/Target directory mapping looks like this:

In the above example, the selection has been extended to "Batch" which is the sub-directory of "Directory1". A sub-directory named "Batch" has been created for "E:\Documents" since the target directory had no sub-directory.
The Keep directory structure check box is identified in the XML parameter file as follows:
<KeepfileTree>Yes/No</KeepfileTree>"yes" if the check box has been selected, otherwise, "No" is displayed.- Keep at same location
If you select this option, it means that the input directory is used as target directory.
Note that:- Replace existing documents in target directory must be activated, otherwise it does not make sense.
- You cannot select both Keep directory structure and Keep at same location check boxes they are exclusive.
- If you want to use a target directory other than the default displayed, select first the new directory before activating Keep at same location. The reason is that selecting this check box grays out Change Target Directory... (which enables you to select your own target directory).
If Extend selection to sub-directories is selected, the directory mapping displays one line per directory impacted by the selection and for each of these lines, target directory=input directory.
Example
1. Set E:\Documents in the Default target directory box.
2. Select the Keep at same location check box.
3. Select the Extend selection to sub-directories check box.
4. Click All then select E:\users\Directory1 as the input directory.The Input/Target directory mapping looks like this:

Keep at same location is identified in the XML parameter file as follows:
<KeepLocation>Yes/No</KeepLocation>"yes" if the option has been activated, otherwise, "No" is displayed.Defining the directory mapping
The directory mapping can be modified whenever you need using Default, Change and Reset displayed to the right of the File Selection dialog box. Note that you can select multiple files from the directory list using Ctrl and Shift.
- Change
This buttons allows you to modify one or several target directories. It is available when at least one line is selected in the list. To do so, select the desired input directories, click Change then navigate to the new target directory. The selected lines are then updated accordingly.
This button impacts only the target directory of the lines you select and not the default target directory. In the example below, you can see that "E:\users\Directory1\Batch" has been mapped to a target directory different from the default one:

This change is effective for the selected input directory and if you add another directory to the directory mapping, it will be mapped to the default target directory.
- Default
This button is relevant only if you used Change Target Directory... to modify the target directory. In that case, you can click Default afterwards to restore the target directory to its original state (i.e. set the folder displayed in the Target directory field as the Target directory in the mapping).
This button is available when at least one line is selected in the list and if at least one of the selected output directories is different than the target directory.
Example
1. Set E:\Documents in the Default target directory box.
2. Set E:\users\Directory1 as the target directory in the mapping.
3. Select the line containing E:\users\Directory1 from the mapping list.
4. Click Default: the selected output directory is changed to E:\Documents.- Reset
This button allows you to reset the selected target directories to their first value. It is available when at least one line is selected in the list and if at least one of the selected output directories is different than the target directory.
Example
1. Set E:\Documents in the Default target directory box.
2. Set E:\users\Directory1 as the target directory in the mapping.
3. Select the line containing E:\users\Directory1 from the mapping list.
4. Click Default: the selected target directory is changed to E:\Documents.
5. Click Reset: the selected target directory is changed back to E:\users\Directory1.The mapping is identified in the XML parameter file as follows:
<directory_mapping>IN=Directoryx OUT=Directoryy RES=Directoryz</directory_mapping>where:
- "IN" is for the input directory
- "OUT" is for the target directory
- "RES" is for the default, i.e. the directory displayed in the Default target directory box.
- Replace existing documents in target directory
If this check box is selected, it means that when a document with the same name already exists in the target directory, this option automatically replaces the old document by the new one. - Save previous version of the documents
If this check box is selected, it means that when the Replace existing documents in target directory check box is selected, the already existing document isl not overwritten and a backup version is kept.
This backup version is identified by the following suffix:
".DLC.date" where date is YYYY.MM.DD_HH.MM.SS - Save non-modified documents
If this check box is selected, it means that documents that are not impacted by the selected operation are saved in the target directory you specified.
This helps you identify more easily on which documents the batch has been run.
This option is identified in the XML parameter file as follows:
<File_SaveNonmodifiedDoc>No</File_SaveNonmodifiedDoc>if the option is not selected
<File_SaveNonmodifiedDoc>Yes</File_SaveNonmodifiedDoc>if the option is selected - Apply rename when saving non-modified documents
This check box can be selected only once Save non-modified documents is activated AND at least one rename criterion has been defined. If this check box is selected, it means that non-modified documents that are going to be saved will be renamed according to the criteria specified in the Rename Criteria area.
This option is identified in the XML parameter file as follows:
<File_RenameNonmodifiedDoc>No</File_RenameNonmodifiedDoc>if the option is not selected
<File_RenameNonmodifiedDoc>Yes</File_RenameNonmodifiedDoc>if the option is selected.
More about Output options
Mapping definition
Once a directory mapping is defined, it is kept as is even if all the selected documents contained in a directory are removed from the Document Selection list.Cancel
If you click Cancel, this closes the File Selection dialog box but when re-opening it, the last validated values are restored.Application scope
Output capabilities are applied to documents that are processed and stored by the batch. They are not applied to new Version 5 documents created from documents processed by the batch.Input/Target mapping is provided at directory level only and not at document level. It is not possible to define two different target directories for two documents coming from the same input directory.
In addition to that, output capabilities are not applied to reports, results and any other output that may be generated.
Parameter file
When opening an XML parameter file containing a mapping definition, no information is provided if a directory does not exist or if a specific read-write access has been defined. -
-
When you have finished selecting your documents and defining the necessary rename and output options, click OK to validate and close the File Selection dialog box.
![]()