- Selection traps do not allow you to select sub-elements (e.g. edges, faces, vertices and so on).
- When objects are selected through the Select command,
a contextual menu named xxx object (when one object is
selected) or Selected objects (when multiple objects are
selected) is available.
The commands available in this contextual menu are also available through Edit > xxx object or Edit > Selected objects.
However, the contextual menu is not displayed if more than 50 objects are selected. To be able to display it, increase the value of the Limit display of manipulators to ... element(s) option accordingly.
Using the Bounding Outline
-
Click Select
 to enter selection mode, if it is not already activated.
 -
Drag (using the left mouse button). A bounding outline appears as you drag.
-
Drag the bounding outline until the objects you want to select are completely inside the bounding outline.
The objects must be completely inside the bounding outline: if not, they are not be selected. -
Release the mouse.
The objects are highlighted to indicate they have been selected. 
When using the bounding outline in the Part Design workbench, you can only select the last feature you created, not the whole part.
The Selection Traps
The Select toolbar provides several modes to select using traps:
Whatever the selection mode, you can keep on selecting objects as long as the selection mode is active, you do not have to click its icon before each selection.
When working in different workbenches, you can use a different trap selection mode for each workbench. However, if you open multiple windows for a same document in a workbench, the trap selection mode will be the same for all windows.
About Icon Display
When the Select toolbar is docked, the icon of the chosen
selection mode replaces the Select
![]() icon to indicate that this selection mode is activated:
icon to indicate that this selection mode is activated:
You are in selection mode each time a command is over because whenever the selection is available, it is the default command.
If you have already chosen a selection mode before running a command, then the icon of the chosen selection mode is displayed in the docked Select toolbar but as soon as the command is over, the Select icon replaces the icon of the chosen selection mode.
Select
When Select
![]() is deactivated, you cannot select any element using the selection traps.
For instance, open a .CATPart document, click Sketcher and
select any of the selection traps: you cannot perform the selection because
Select is not active.
is deactivated, you cannot select any element using the selection traps.
For instance, open a .CATPart document, click Sketcher and
select any of the selection traps: you cannot perform the selection because
Select is not active.
To be able to select with traps, first click Select then the trap to be used.
Selection Trap above Geometry
Selection
Trap above Geometry
![]() allows you to start the trap on a specific element and not on an empty
space as this is the case for the other selection trap modes.
allows you to start the trap on a specific element and not on an empty
space as this is the case for the other selection trap modes.
However, note that you must activate this mode each time you want to start a selection because as soon as the trap is drawn, the Selection Trap above Geometry is deactivated.
Rectangle Selection Mode
Rectangle Selection Mode
![]() lets you select objects by drawing a rectangular trap. Drag using the left
mouse button to define the rectangle until the objects you want to select
are completely inside. Then, release the mouse: the objects are highlighted
to indicate that they have been selected.
lets you select objects by drawing a rectangular trap. Drag using the left
mouse button to define the rectangle until the objects you want to select
are completely inside. Then, release the mouse: the objects are highlighted
to indicate that they have been selected.
Note that you must start the rectangular trap on an empty space.
Intersecting Rectangle Selection Mode
Intersecting Rectangle Selection Mode
![]() lets you select objects by drawing a rectangular trap just like
Rectangle Selection Mode but this time, any objects intersected by
and inside the trap will be selected.
lets you select objects by drawing a rectangular trap just like
Rectangle Selection Mode but this time, any objects intersected by
and inside the trap will be selected.
Note:
- You must start the rectangular trap on an empty space.
- At least one vertex of the geometry or the center of the bounding sphere must be selected by the rectangular trap.
Polygon Selection Mode
Polygon Selection Mode
![]() lets you select objects by drawing a closed polygon. Drag using the left
mouse button to define the polygon around the object to be selected, then
double-click to close the polygon.
lets you select objects by drawing a closed polygon. Drag using the left
mouse button to define the polygon around the object to be selected, then
double-click to close the polygon.
When Polygon Selection Mode is active, each click you make is identified by a new point of the polygonal trap. However, as long as this mode is active, the mouse clicks are not received by the current command which means that:
- In the Select command, you cannot empty your selection by clicking an empty space.
- In Sketcher commands, you cannot draw sketch elements.
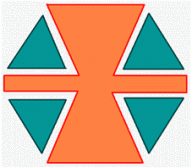
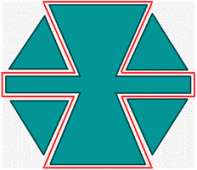
| Trap definition | Selection result |
|
|
 |
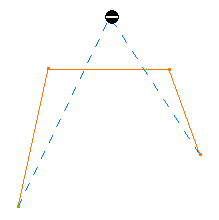
- Each time a new point is created to check that the polygon definition is valid. If the polygon
you define is not authorized, the following symbol
 is displayed.
 - At the end of the polygon definition (when you double-click): if the last mouse click defines an unauthorized polygon, no trap selection is performed.
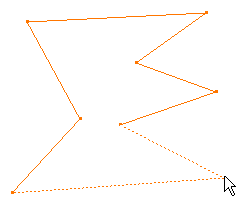
Below is an example while defining a polygon selection:
| Authorized selection | Forbidden selection |
 |
 |
The Polygon Selection Mode checks that the geometry is entirely inside the polygon, otherwise it is not selected.
Note that:
- There is a price to pay in performance when selecting concave polygons because more checks are necessary but the selection of convex polygons has no impact on performance.
- Selection Trap on Geometry is deactivated because it is not necessary to start the selection on an empty space.
-
You can pan or zoom the model while
drawing a polygon by using either the mouse buttons, or the Pan
 ,
Zoom In
 or Zoom Out
 icons in the View toolbar.
This capability can be used with a 2 or 3-button mouse when working in a 3D parallel view, in a 2D view or in multi-view mode. The SpaceMouse is not supported.
A check is performed to make sure that the new vertex definition (corresponding to the cursor position) creates a valid polygon because the zoom commands modify the display but not the cursor position. The polygon is defined by the current point which does not follow the zoom then, when a zooming command is run, by points following the zoom. Therefore, the polygon can be valid at the beginning and incorrect at the end.
When the polygon is closed, the selection takes into account the polygon's form, whatever the zooming or panning operation applied to the model.
Free Hand Selection Mode
Free Hand Selection Mode
![]() lets you select objects by simply drawing a paint stroke across them. Drag
using the left mouse button to create the paint stroke: any objects crossed
by the paint stroke will be selected.
lets you select objects by simply drawing a paint stroke across them. Drag
using the left mouse button to create the paint stroke: any objects crossed
by the paint stroke will be selected.
Note that you must start the paint stroke on an empty space.
Outside Rectangle Selection Mode
Outside
Rectangle Selection Mode
![]() lets you select objects by drawing a rectangular trap just like
Rectangle Selection Mode but this time, any objects located strictly
outside the trap will be selected.
lets you select objects by drawing a rectangular trap just like
Rectangle Selection Mode but this time, any objects located strictly
outside the trap will be selected.
Note that you must start the rectangular trap on an empty space.
Outside Intersecting Rectangle Selection Mode
Outside
Intersecting Rectangle Selection Mode
![]() is different than the above-detailed Intersecting Rectangle
Selection Mode
is different than the above-detailed Intersecting Rectangle
Selection Mode
![]() since it lets you select objects intersecting the rectangular trap as well as
objects located outside the rectangular trap. Drag using the left mouse button:
any objects outside the trap or intersecting the trap are selected.
since it lets you select objects intersecting the rectangular trap as well as
objects located outside the rectangular trap. Drag using the left mouse button:
any objects outside the trap or intersecting the trap are selected.
Note that you must start the rectangular trap on an empty space.
Regarding intersection with points, note that only point symbols whose middle point is located inside the trap are selected as shown below:
|
|
|
| Example 1 | Example 2 |
![]()
