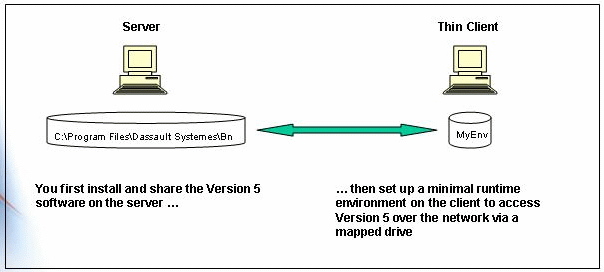
This type of scenario is sometimes referred to as a "code server" scenario. The advantages of this type of scenario are:
- you save time: the code is installed on the code server only, and not on the clients; and future upgrades and installation of service packs are easier since you only have to upgrade the software on the server, and not the clients
- you save disk space: code is installed on the server only, so you save disk space on the clients.
The drawbacks with this type of scenario are:
- the code is sent over the network to the client, so you will experience problems if the network is not efficient or goes down
- the code is executed on the client, so performance may vary depending on the power of the client computer and the amount of memory on the client.
Note that the default installation path can be:
C:\Program Files\Dassault Systemes\B27 (64-bit code
on Windows, x64 Edition)
C:\Program Files\(x86)\Dassault Systemes\B27 (32-bit code
on Windows, x64 Edition)
C:\Program Files\Dassault Systemes\B27
then share the disk and folders in the installation path.
You need to use the Explorer to connect to the server over the network
and access the C:\Program Files folder on the server.
The Map Network Drive dialog box is displayed, and looks something like this:
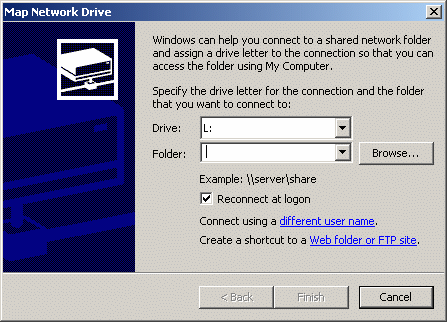
This is the folder containing the
Dassault Systemes folder in which you installed the Version 5
software.
Note that selecting the folder displays the server name and folder name in the Path field:
\\server\Program Files
![]()
Program
     Files on 'server' (F:)
where "server" is the server name, for example, and "F:" is the name of the drive you mapped.
F:\Program Files\Dassault Systemes\B27\win_b64\code\bin (64-bit code
on Windows, x64 Edition)
F:\Program Files (x86)\Dassault Systemes\B27\intel_a\code\bin (32-bit code
on Windows, x64 Edition)
where, for example, "F:" is the name of the mapped drive and represents
F:\Program Files.
Then, run the following command using exactly the syntax indicated, depending on whether you are running CATIA, ENOVIA DMU Navigator or DELMIA:
V5Regserver –set PRODUCT_LINE
where "MyEnvironment" is the name of the environment, and "MyEnvDirectory" the name of an existing folder containing the environment on the client, if you intend to create an environment on the client as described in step 10a.
If you intend to use the environment on the server (step 10b), run the command:
cnext /regserver
dmu /regserver
delmia /regserver
This activates OLE support which ensures that double-clicking Version 5 document icons on the client will run a Version 5 session.
setcatenv
     -tools -cs MyProductLine -e MyEnvironment -d
     MyEnvDirectory
to set up the Start > Programs > MyProductLine > Tools menu containing the Batch Management V5-6R2016, Environment Editor V5-6R2016, Nodelock Key Management V5-6R2016, Printers V5-6R2016, Settings Management V5-6R2016 and Software Management V5-6R2016 commands.
To do so, you have two possibilities:
- from the directory:
F:\Program Files\Dassault Systemes\B27\win_b64\code\bin(64-bit code on Windows, x64 Edition)
F:\Program Files (x86)\Dassault Systemes\B27\intel_a\code\bin(32-bit code on Windows, x64 Edition)run the following command:
setcatenv -p "F:\Dassault Systemes\B27" -e MyEnvironment -d
       MyEnvDirectory -a global -desktop yes -cs MyProductLine
where "MyEnvironment" is the name of the environment, "MyEnvDirectory" is the name of the folder containing the environment and "MyProductLine" is the name of the product line.
- or, use the Start > Programs > MyProductLine > Tools > Environment Editor V5-6R2017 command. In this case:
- Select the Environment > New command to display the New Environment dialog box.
- Select the Options menu, then the Set Global Storage Directory command, and set the environment storage directory to the same location you set in step 8.
- Enter the same environment name you also set in step 8.
- Enter the path of the shared installation folder on the server as follows:
F:\Dassault Systemes\B27- Select Global for the Mode.
- Select your Product Line.
- Click OK.
In both cases, a global environment is created on the client computer which can be used by all users who log onto the client.
For illustration purposes, let's suppose you installed the code for example on Windows in:
E:\Program Files\Dassault Systemes\B27
To facilitate access to the runtime environment over the network, the environment must be located in a shared easily accessible location, and NOT in the default location in the All Users profile on the server which is:
C:\%WINDIR%\Profiles\All Users\Application Data\DassaultSystemes\CATEnv
For illustration purposes, let's suppose you created the runtime environment on the server in the following shared location:
E:\CATEnv
To access the environment over the network:
- Map a drive to the shared folder on the server.
You must choose the same drive letter on the client as the drive on which the code was installed on the server, for example "E:". - Open a Command Prompt window and go to the directory "E:", then to
the directory:
E:\Program Files\Dassault Systemes\B27\win_b64\code\bin(64-bit code on Windows, x64 Edition)
E:\Program Files (x86)\Dassault Systemes\B27\intel_a\code\bin(32-bit code on Windows, x64 Edition) - To start a session, run the command:
cnext -env MyEnvironment -direnv E:\CATEnv
dmu -env MyEnvironment -direnv E:\CATEnv
delmia -env MyEnvironment -direnv E:\CATEnv
where "MyEnvironment" is an example for the name of the runtime environment on the server.
Note that this scenario will only work if the drive letter on the client and the drive letter on the server are identical. In certain cases, you may not be able to use the same drive letter on the client and the server. For example, the code is installed on "E:" on the server, but the drive "E:" on the client is not free, so you map the drive "K:". If you then try to start a session, the runtime environment will not be found because the paths referenced in the runtime environment point, for example, to "E:..." like this (on Windows):
...

     CATInstallPath=E:\Program Files\Dassault Systemes\B27\intel_a

     CATDLLPath=E:\Program Files\Dassault Systemes\B27\intel_a\code\bin

     ...
whereas on the client there is no software installed on the "E:" drive.
To bypass this problem, create a new global environment on the server using the following command:
setcatenv -e NewEnvironment -d \\servername\home\CATEnv -a global
     -p "\\servername\home\Program Files\Dassault Systemes\B27" -desktop no
where "\\servername\home" is the UNC name of the server and shared folder, and "NewEnvironment" is the new environment name. Creating a new environment this way will create the correct UNC paths as follows (on Windows):
...

     CATInstallPath=\\servername\home\Program Files\Dassault Systemes\B27\intel_a

     CATDLLPath=\\servername\home\Program Files\Dassault Systemes\B27\intel_a\code\bin

     ...
This time, your attempt to start a session will be successful if you use the following command:
cnext -env MyEnvironment -direnv \\servername\home\CATEnv
dmu -env MyEnvironment -direnv \\servername\home\CATEnv
delmia -env MyEnvironment -direnv \\servername\home\CATEnv
Note also that if you disconnect the drive you mapped, you will have to remap it as before for the scenario to continue to work.
VE0IFONT.exe -env MyEnvironment -direnv MyEnvDirectory
from the directory:
F:\Program Files\Dassault Systemes\B27\win_b64\code\bin (64-bit code
on Windows)
F:\Program Files (x86)\Dassault Systemes\B27\intel_a\code\bin (32-bit code
on Windows)
For more information, refer to "Using and Customizing Fonts" in your Infrastructure Users Guide.
Install the VC10 runtime which is a prerequisite for VBA installation. To do so, open an elevated Command Prompt window, go to the first CD-ROM folder, then to the folder:
INTEL (32-bit media)
WIN64 (64-bit media)
and run the following command:
msiexec /i InstallDSSoftwareVC10Prerequisites_x86_x64.msi /q
To install VBA7 on all Windows platforms, run the following commands:
DSVBA71Installer.exe /install [/norestart] /log "Path_LOG"
from the directory:
		E:\Program Files\Dassault Systemes\B27\win_b64\VBA (64-bit code on
		Windows)
		E:\Program Files (x86)\Dassault Systemes\B27\intel_a\VBA (32-bit code on
Windows) To do so, open a Command Prompt window, go to the first CD-ROM folder, then to the folder:
INTEL (32-bit media)

        WIN64 (64-bit media)
and run the following command:
msiexec /i InstallDSSoftwarePrerequisites_x86_x64.msi /q
15. You will need to install the VC11 Runtime prerequisite on each client computer. This has to be installed before running any Version 5 executable programs on this platform.
To do so, open a Command Prompt window, go to the first CD-ROM folder, then to the folder:
INTEL (32-bit media)

        WIN64 (64-bit media)
and run the following command:
msiexec /i InstallDSSoftwarePrerequisites_x86_x64.msi /q
Used to support process interoperability (for example, between CATIA and DMU), the backbone needs to be set up on each computer running applications which need to communicate.
To set up the ports using the default values:
- Log on as administrator.
- Open a Command Prompt window and go to the installation directory,
for example:
F:\Program Files\Dassault Systemes\B27\win_b64\code\bin(64-bit code on Windows, x64 Edition)
F:\Program Files (x86)\Dassault Systemes\B27\intel_a\code\bin(32-bit code on Windows, x64 Edition) - Enter the commands:
setV5Ports


       \\Server\"Program Files\Dassault Systemes\B27\intel_a\code\bin"\BBDemonService
       -create
where "server" is the name of the server machine. The UNC path must be used imperatively.
For more information about the communications backbone, refer to Communications Backbone Files.
Make sure that you have set up your licenses (either network or nodelocked) before starting a session.
To update the
registry (deactivate OLE support):
V5Regserver –unset
To delete the reference environment:
delcatenv -d MyEnvDirectory -e MyEnv -a global -desktop yes -cs
     MyProductLine
To delete the Start menu entries:
delcatenv -tools -cs MyProductLine
Note:
There is no issue between VBA 6.5 and 7.1 on the same
machine. Automation usage on multiple level on the same machine can not
be done in parallel but only consecutively and with unregistering the
first version before registering the new one to switch from Rn to Rn+x.
In the V5Rn installation directory, in a command prompt window, run the
following command:
catstart -run "V5RegServer -unset env MyV5Environment DirEnv
		MyV5EnvDirectory”
In the V5Rn+x installation directory, in a command prompt window, run
the following command:
catstart -run "V5RegServer -set ProductLine env MyV5Environment
		DirEnv MyV5EnvDirectory”
![]()